|
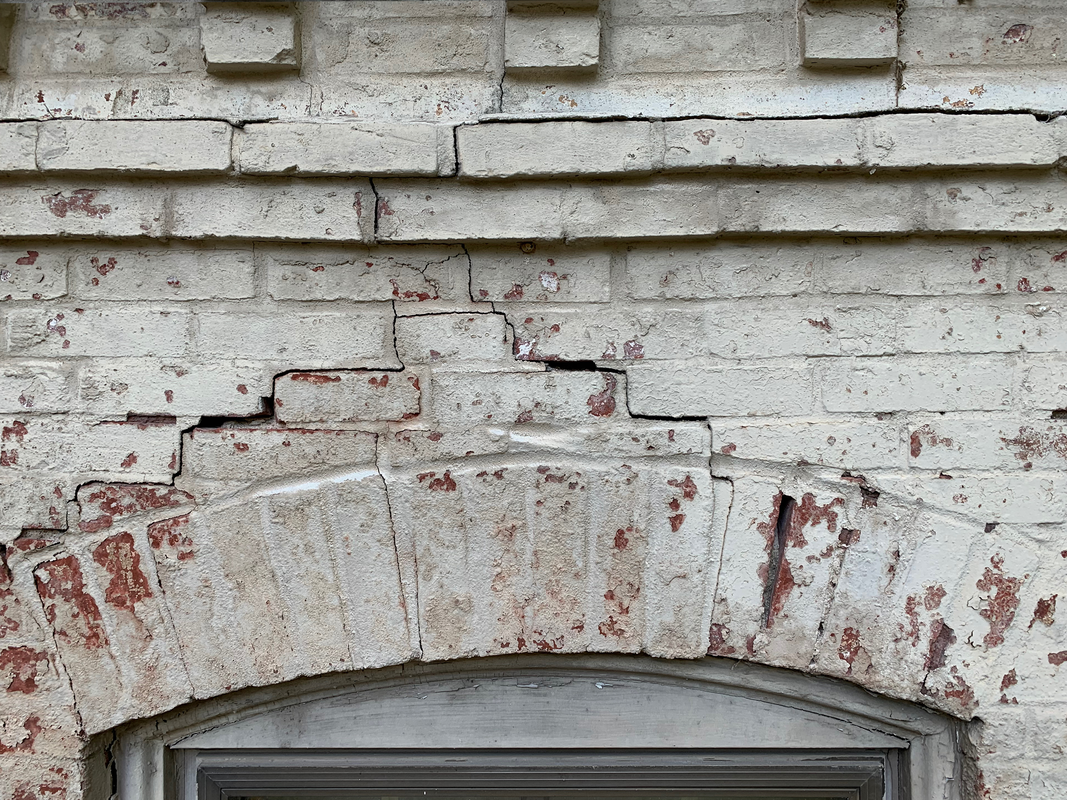
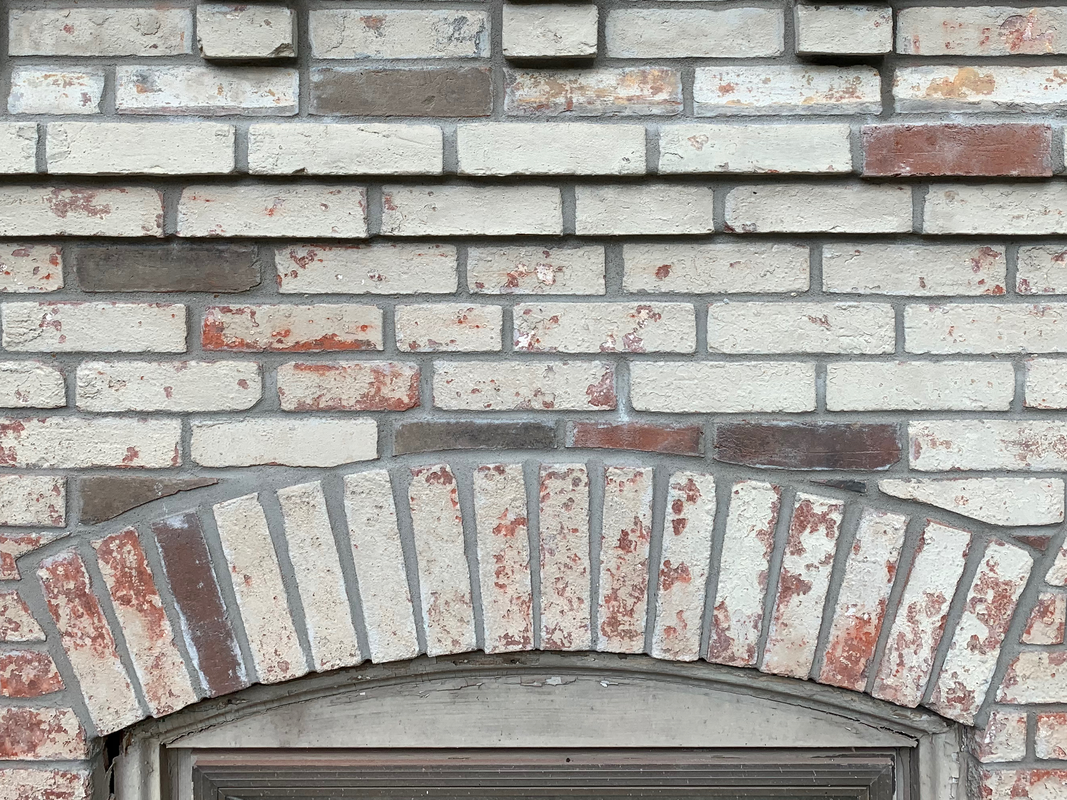
Let's get the insignificant stuff out of the way first: I've been busy - REALLY busy - rebuilding the top 5' or so of a couple brick walls on the side of the house.
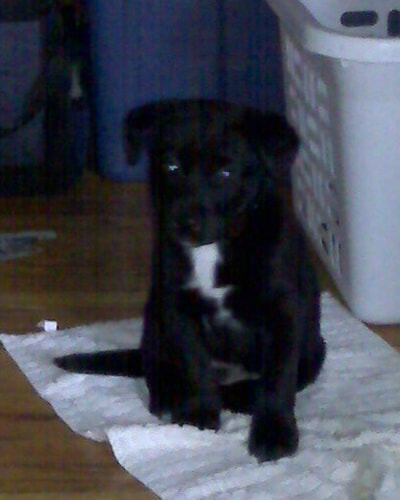
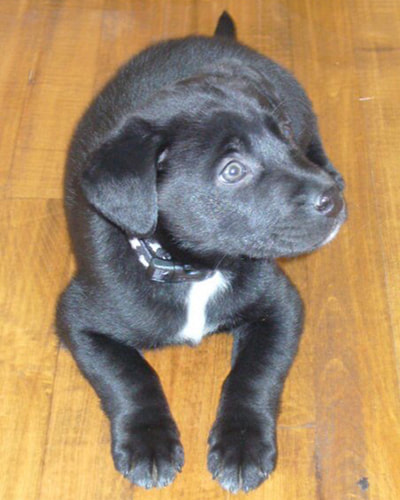
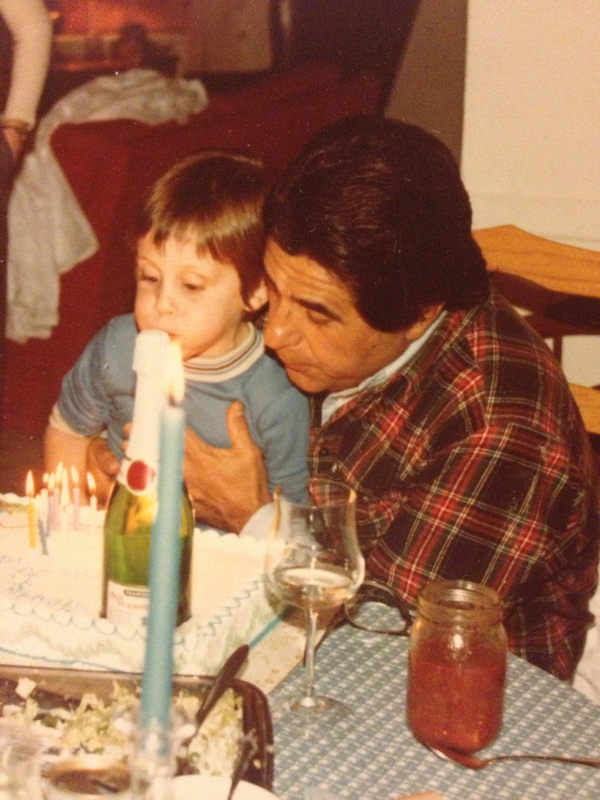
The top couple feet of this particular wall were trash, the way the roof membrane tied into (covered, really) the top of the parapet was trash, and it all got torn out and redone. I'm happy with the results and have moved on to an adjacent wall but like I said...big picture, it's not real significant right now. Almost a month ago, on September 22nd, after a long, valiant fight against a foe no living thing has ever bested - time - Roscoe passed away. I've written and rewritten this about 28 times. It's not necessarily a eulogy, but I have a whole new respect for people who have to write those things; condensing Roscoe's life and importance to me into a few sentences or paragraphs is pretty much impossible. BUT...I have thousands of pictures of Roscoe, and if a picture is worth a thousand words...maybe I can succinctly tell a little bit of Roscoe's story with a few pics. I got Roscoe, erroneously billed as a lab/rott mix, in early 2009 when he was about 8 weeks old. His original name was "Harper" and he was a typical puppy: cute, clumsy, and interested in everything. (Apologies for the quality of the older pics...phone cameras weren't real great 14 years ago.)
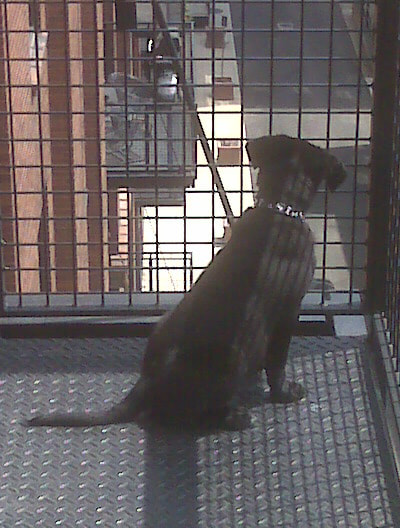
Roscoe spent his first couple years living with me in a 6th floor loft downtown. There was no yard for him to run around in, but we had a balcony and Roscoe spent a lot of time out there observing the world around him. This was an early indication that Roscoe was going to be a very curious, inquisitive dog.
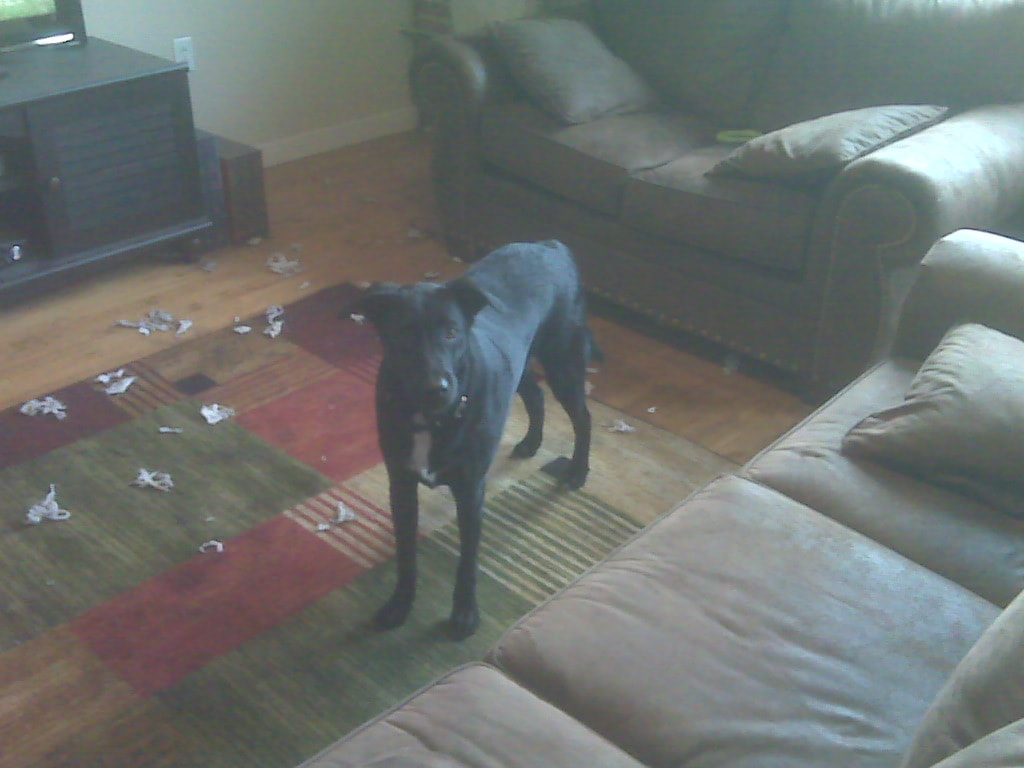
For anybody that's ever had a puppy, this will come as no surprise: Roscoe's favorite puppy activity was chewing on things. I didn't have a kennel for him at first, and when I was gone Roscoe would chew on the baseboards, the couches, the tv stand, pretty much anything and everything. My mom got Roscoe his first kennel, a portable/travel setup, and Roscoe wasted no time trying to chew his way to freedom one day while I was at work. I couldn't help but laugh when I walked in the door and caught him in the act. Eventually, I resorted to just giving Roscoe old socks to chew on and every day when I got home from work, said sock would be shredded. Socks were cheaper to replace than furniture, so it was a deal I was willing to make.
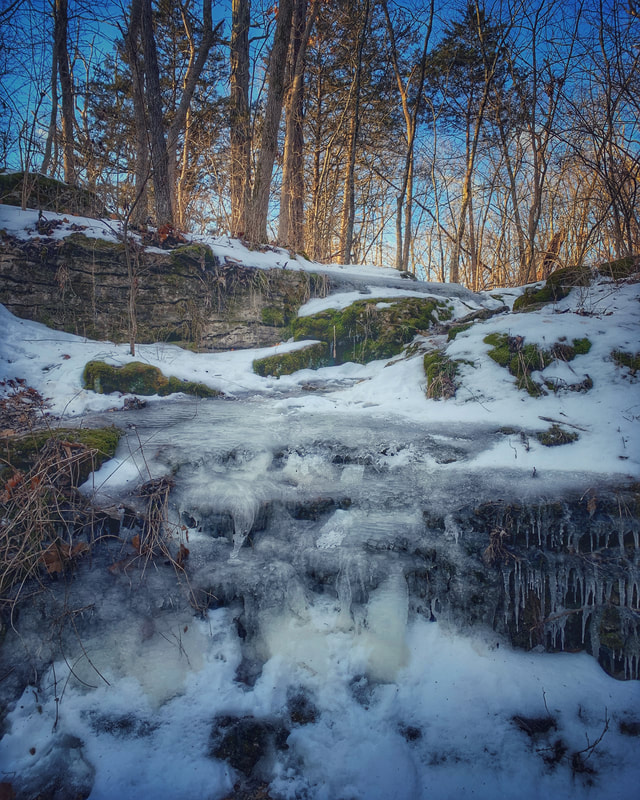
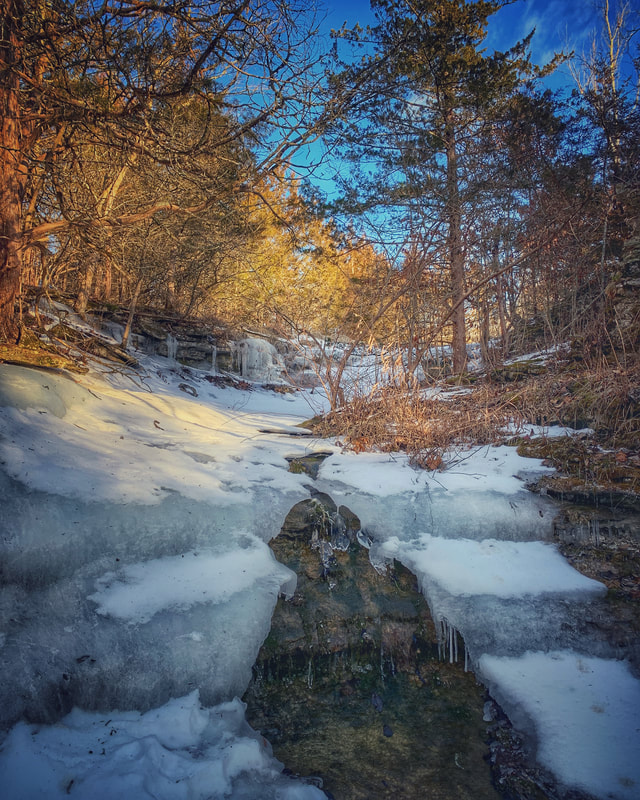
Starting when Roscoe was about 6 months old, Lafayette Park became our home away from home. I learned a lot about Roscoe - and myself - over the course of our hundreds of trips there. 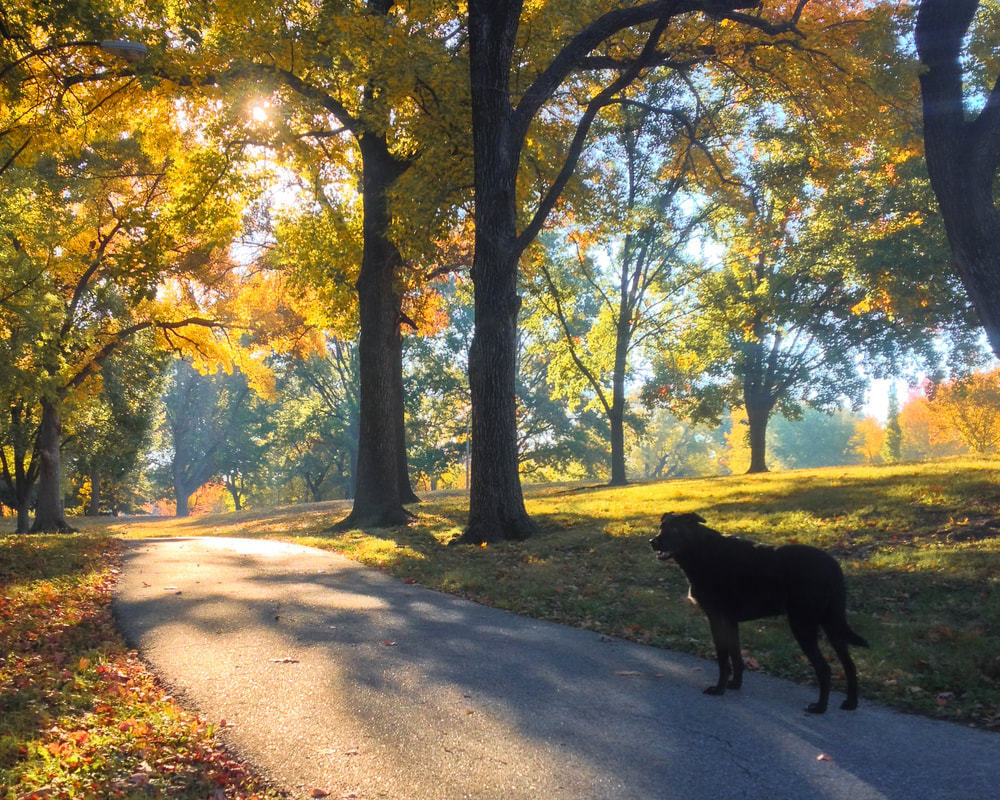 I think Lafayette Park was Roscoe's favorite park and no matter how much our roster of parks and trails expanded over the years, we always carved out a little time every now and then for return visits. Although in his later years we didn't frequent that park as often as we did when he was young, I never forgot which patches of grass Roscoe'd stop to roll in or which trees he'd stop to sniff. 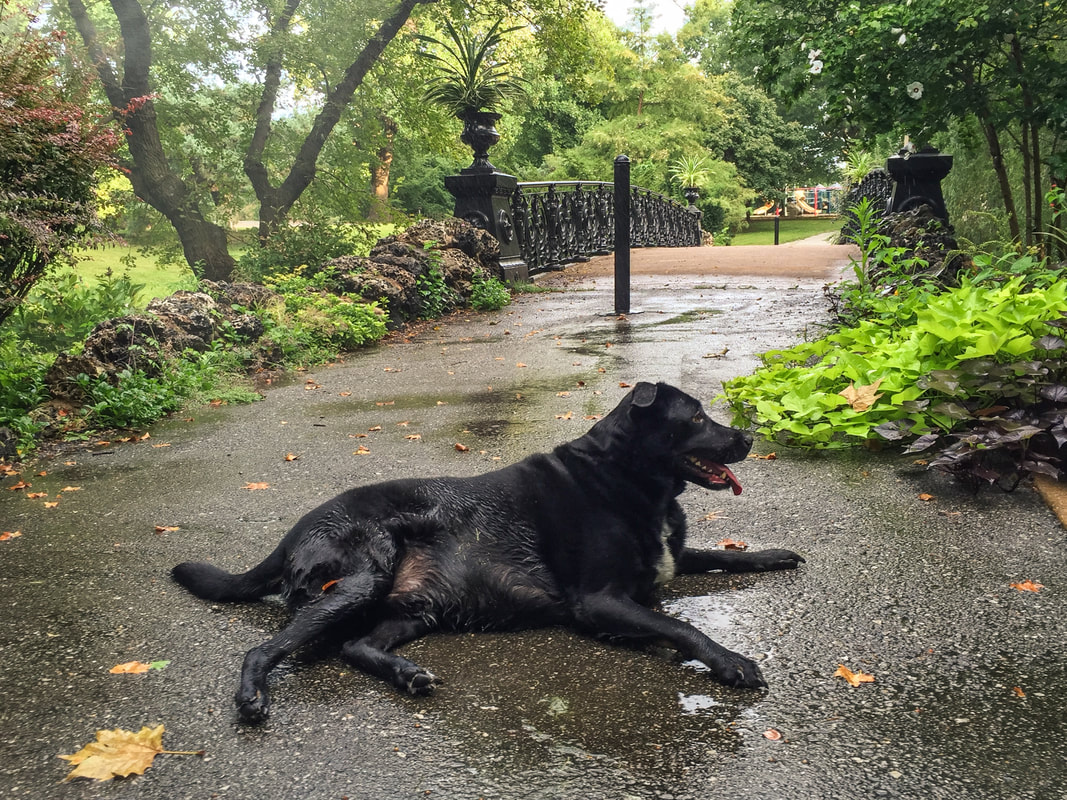 Once the loft days had run their course, we wound up living on South Grand, right across from Reservoir Park. We'd go there every day after work; it's where Roscoe became an expert on going anywhere and everywhere without needing a leash. 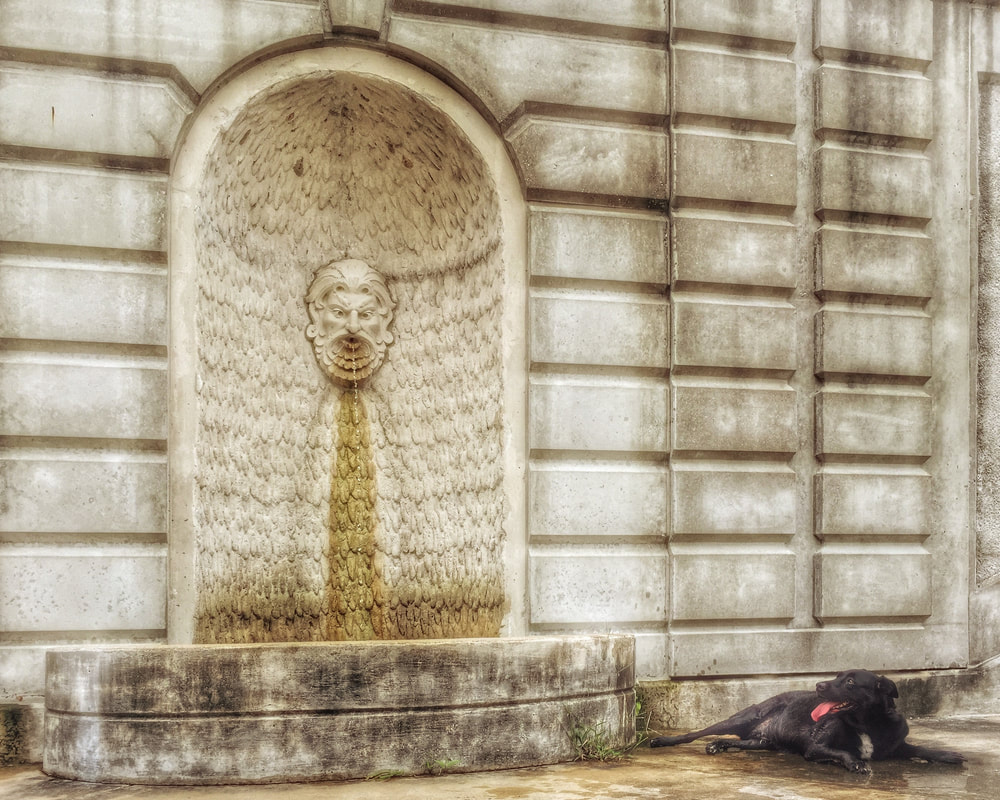 Around the time Roscoe was 3 or 4, I had to move to Cape Girardeau for work and without our usual stable of parks to go to, I had to find other options for outdoor excursions with Roscoe. 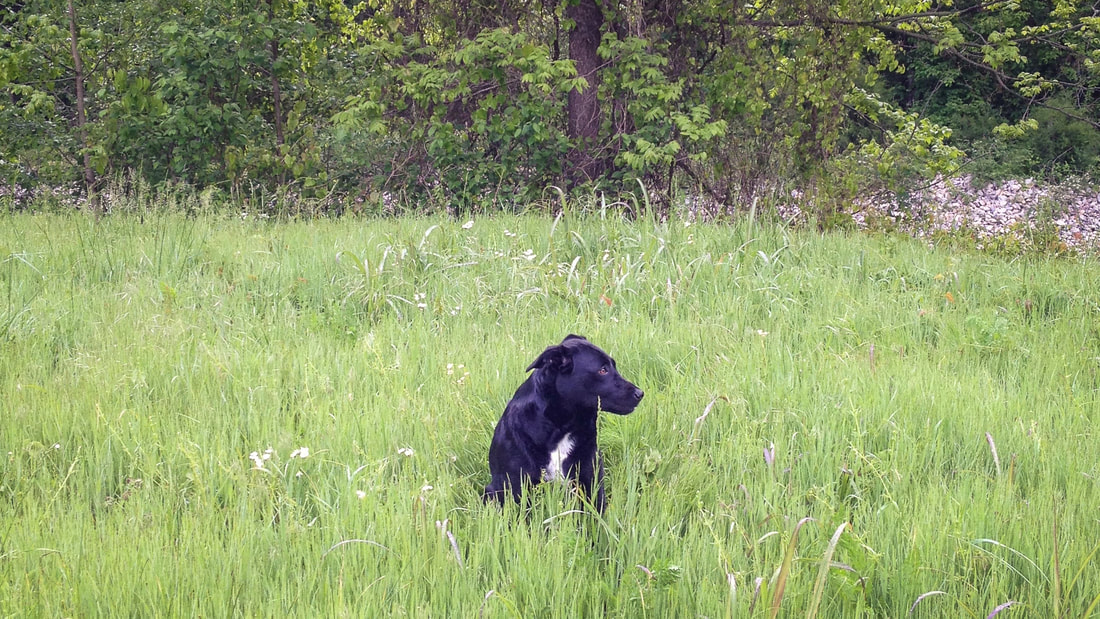 That's when I learned that for all of Roscoe's park prowess, going out on hikes was where he really excelled and was what he really loved doing. 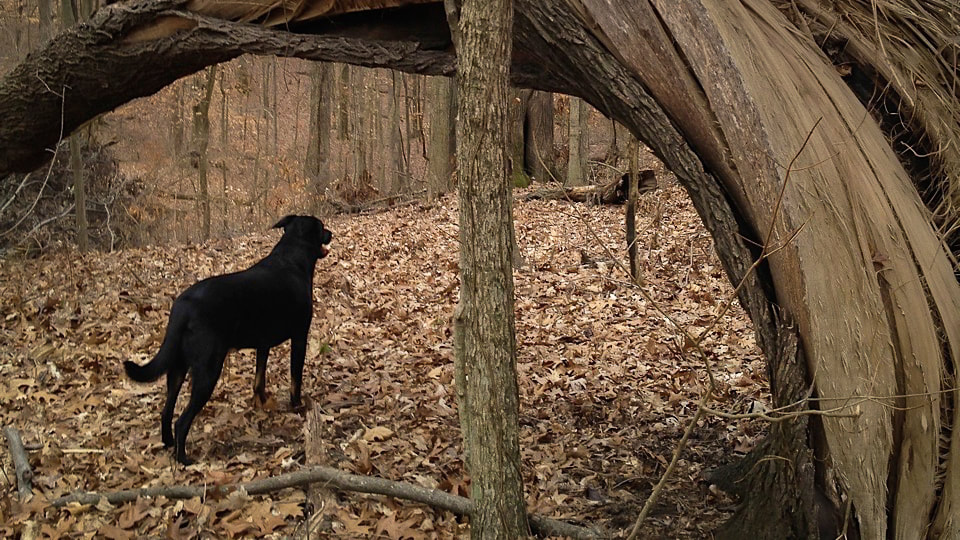 Over the course of the next 10+ years we visited every trail, river, and conservation area we could, in every type of weather and over every type of terrain. I'm glad Roscoe got to see and experience so much, and I know he loved getting out to explore all the places the little puppy that used to lay on the balcony downtown, watching cars, never knew existed. 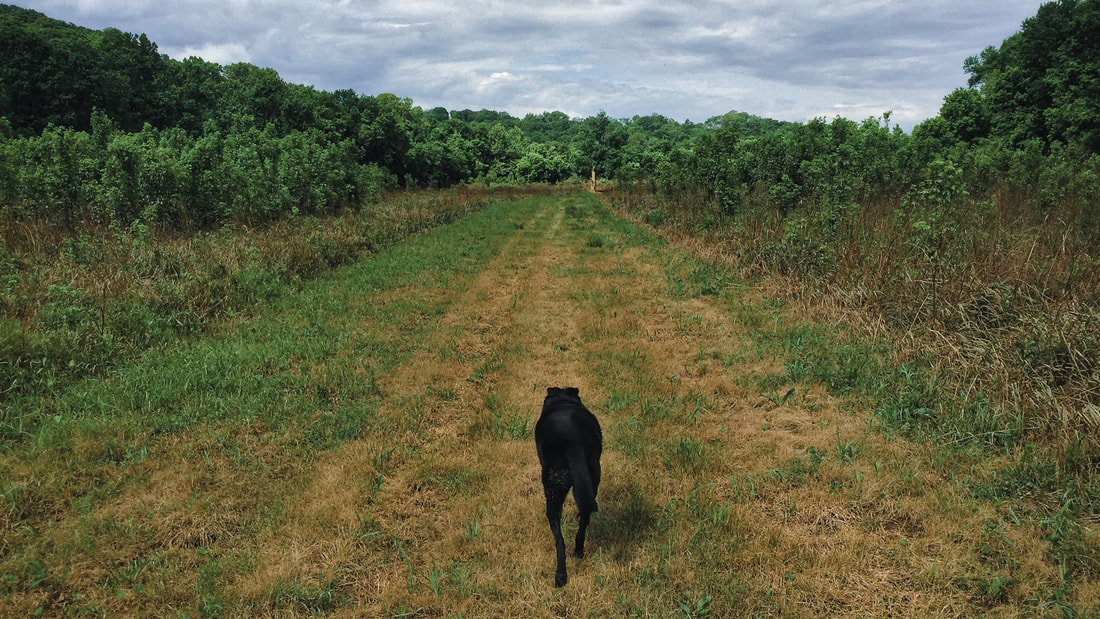 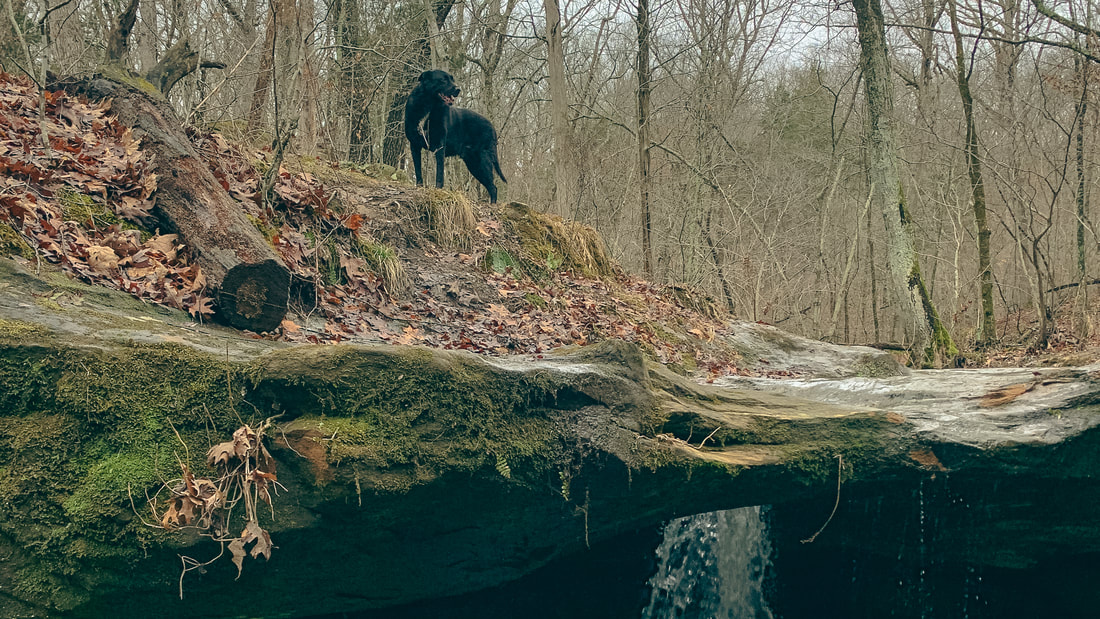 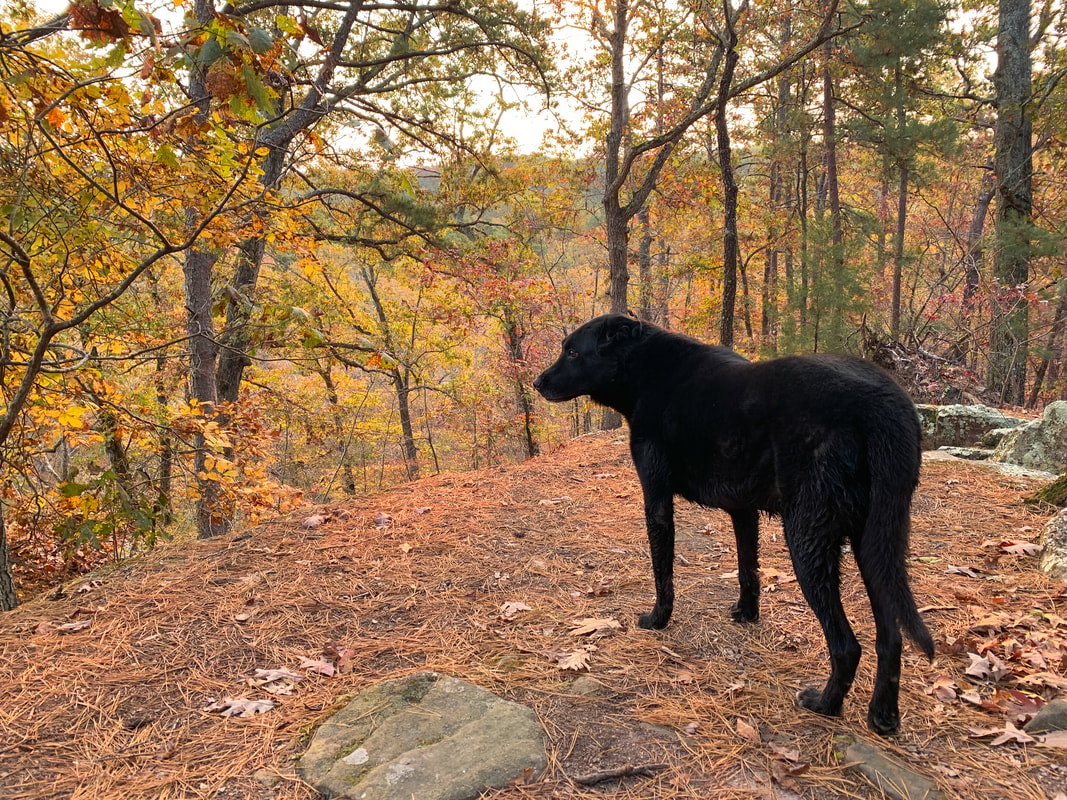 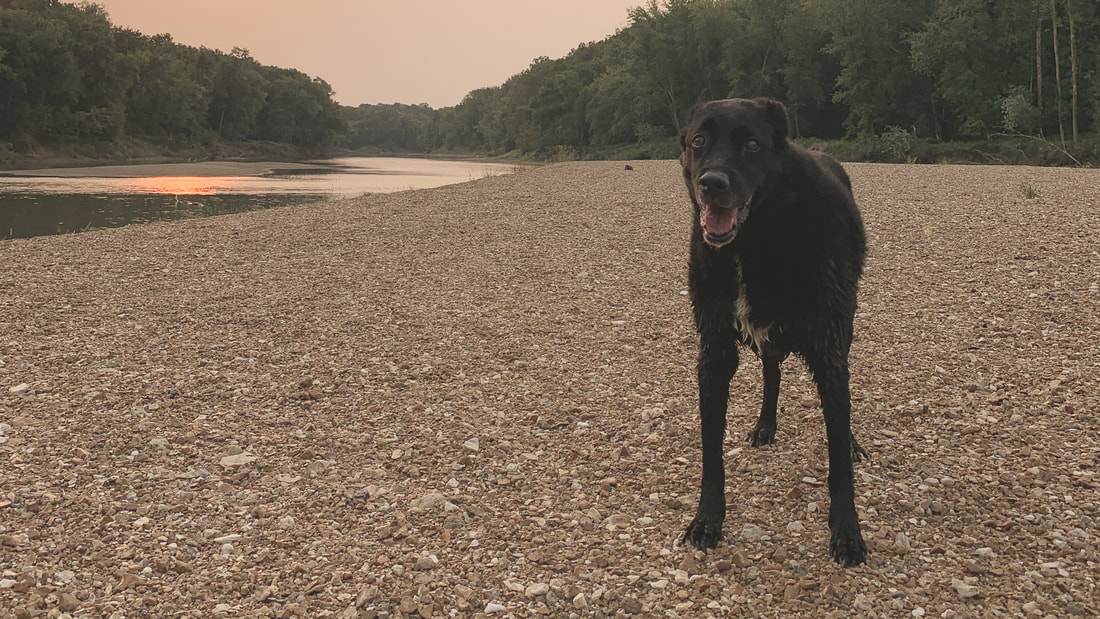 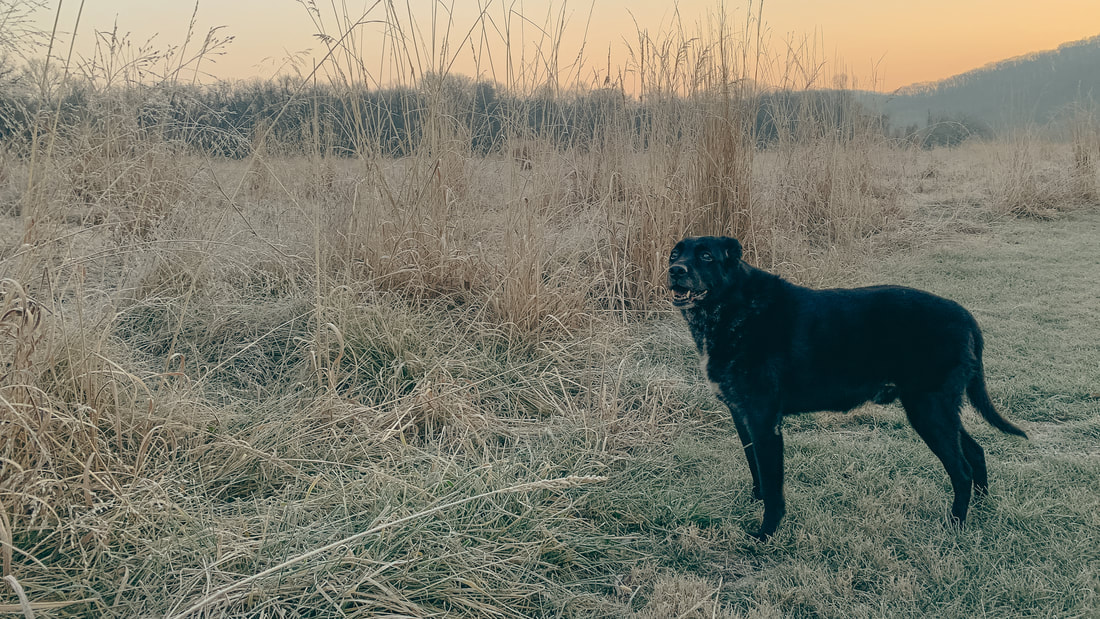 Truth be told, about 95% of the time on our hikes the only part of Roscoe I saw was his butt. He always wanted to walk out in front and because his pace was a little faster than mine, he'd get WAY out in front. Every now and then he'd stop and wait for me, but he always seemed intent on leading the way and making sure whatever lie ahead was safe for the people behind him. 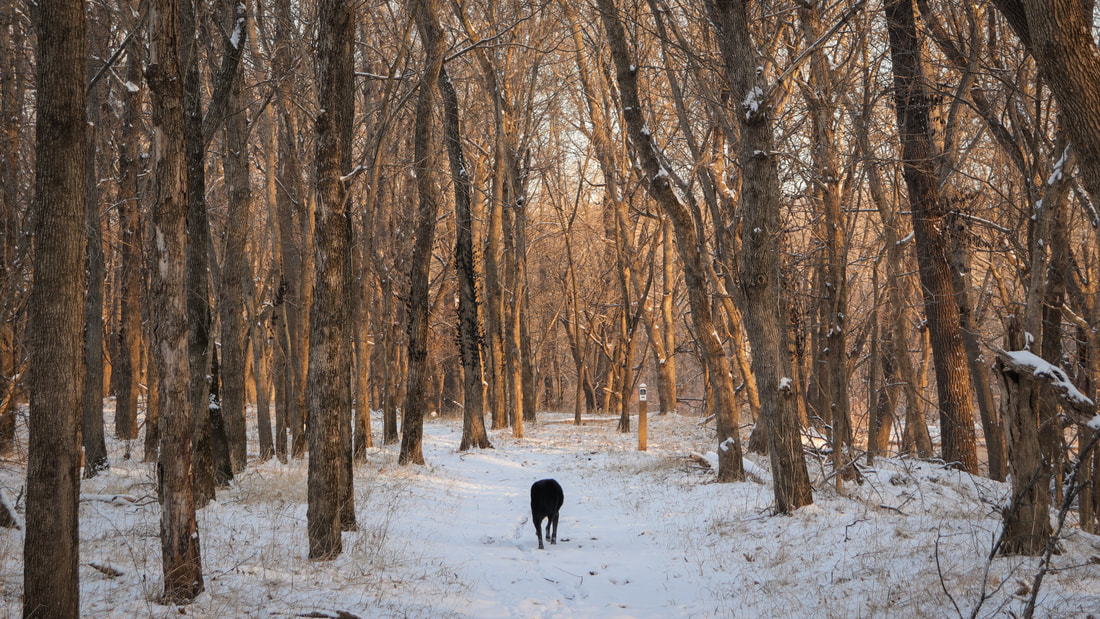 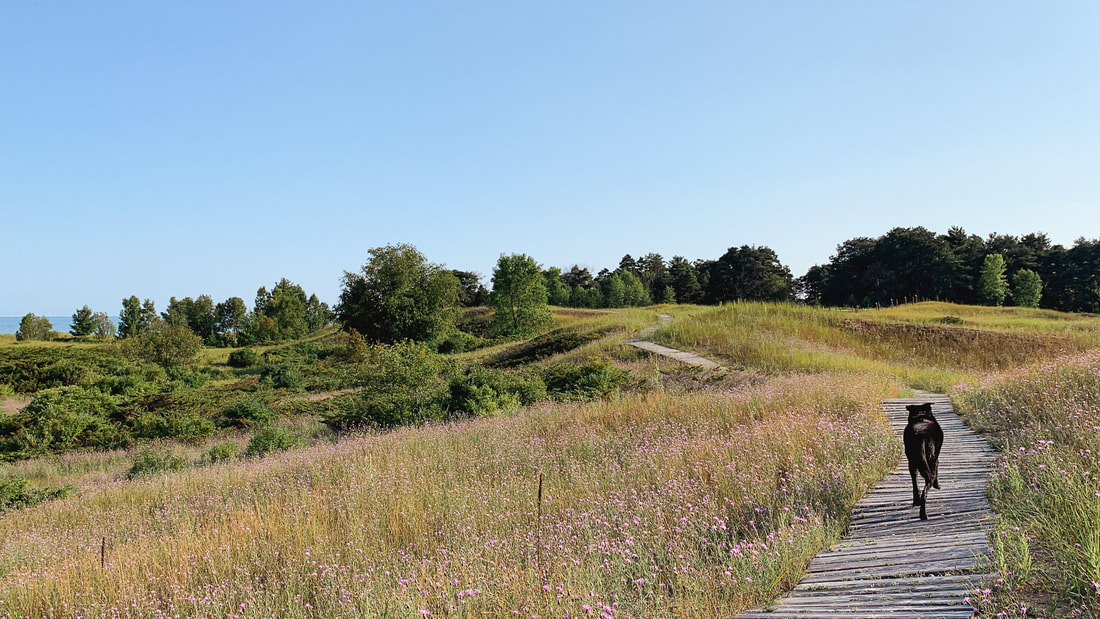 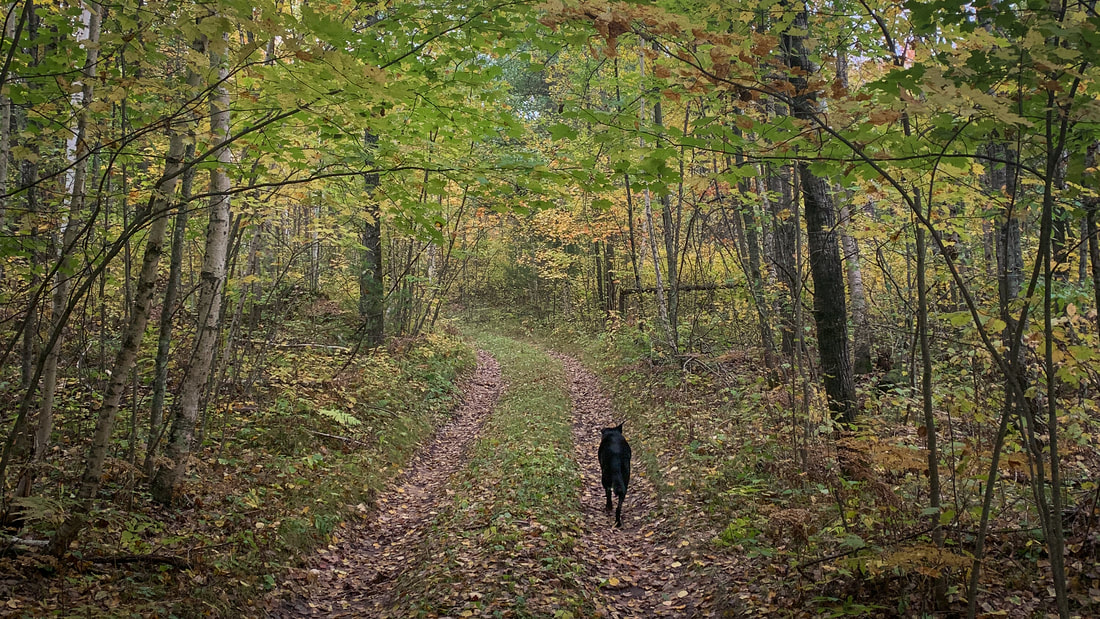 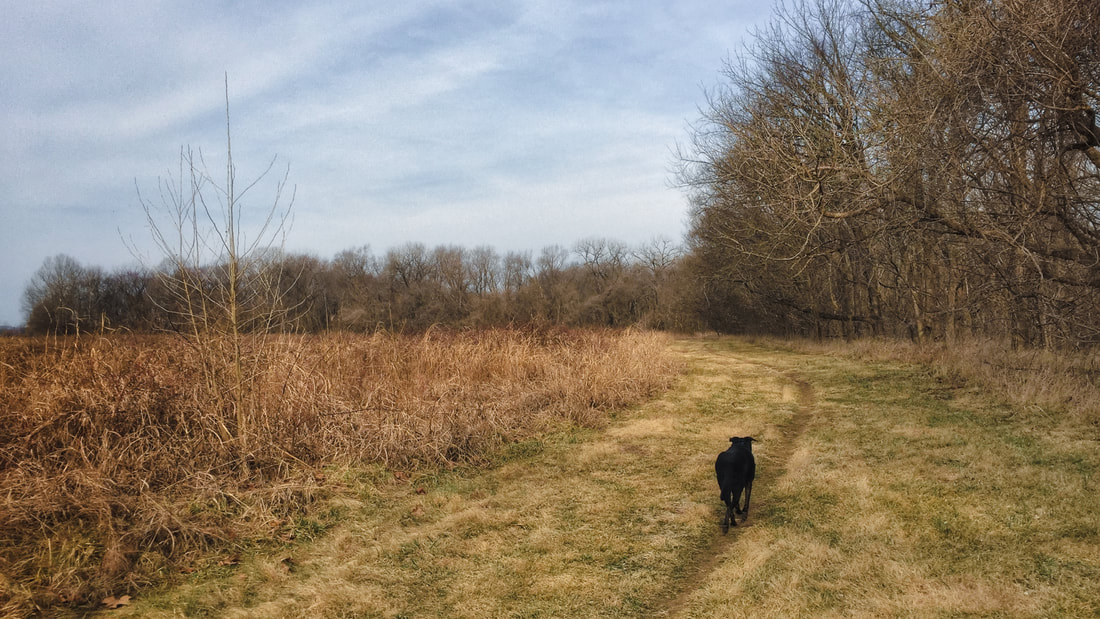 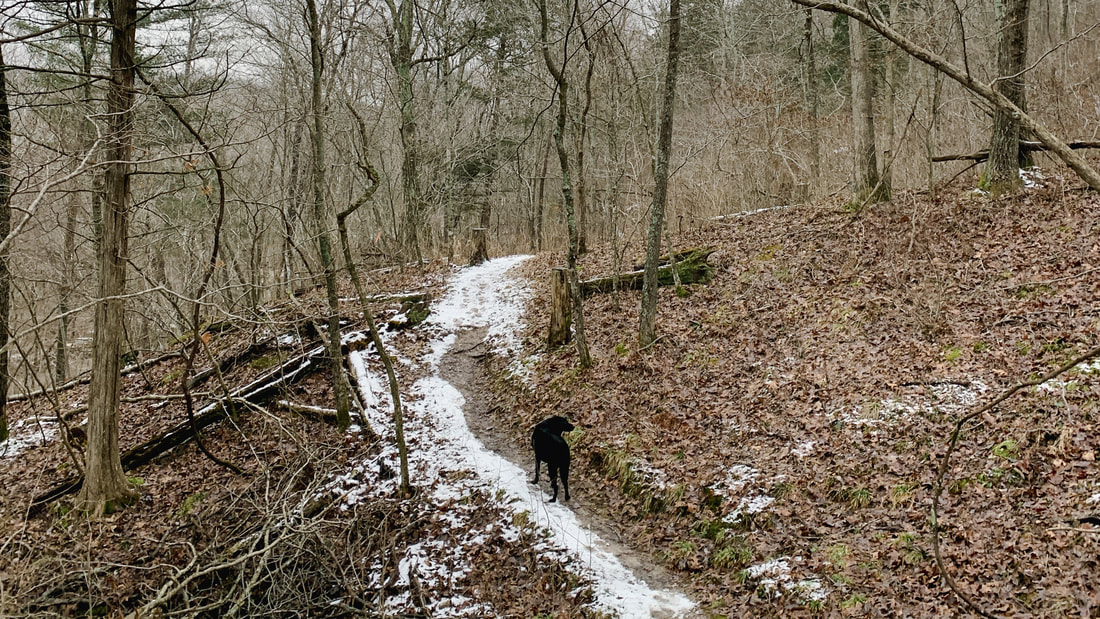 Roscoe was a total water dog, which was weird because he did NOT swim (to his credit, he did try a few times once he saw Freckles do it). But he loved walking through water, laying in water, and trying to drink entire lakes and rivers every chance he got. I never cared about him getting the 1st F150, or the FJ, or the 2nd F150 wet or muddy; park trips and hikes were always Roscoe's time to do whatever he wanted and if getting wet and and muddy was it, so be it. 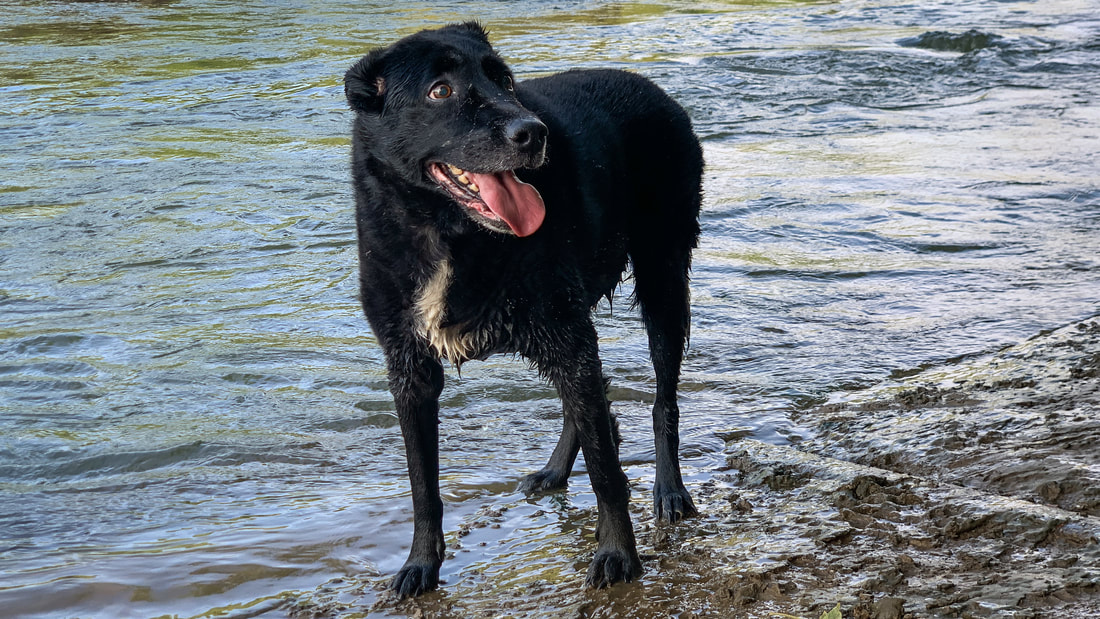 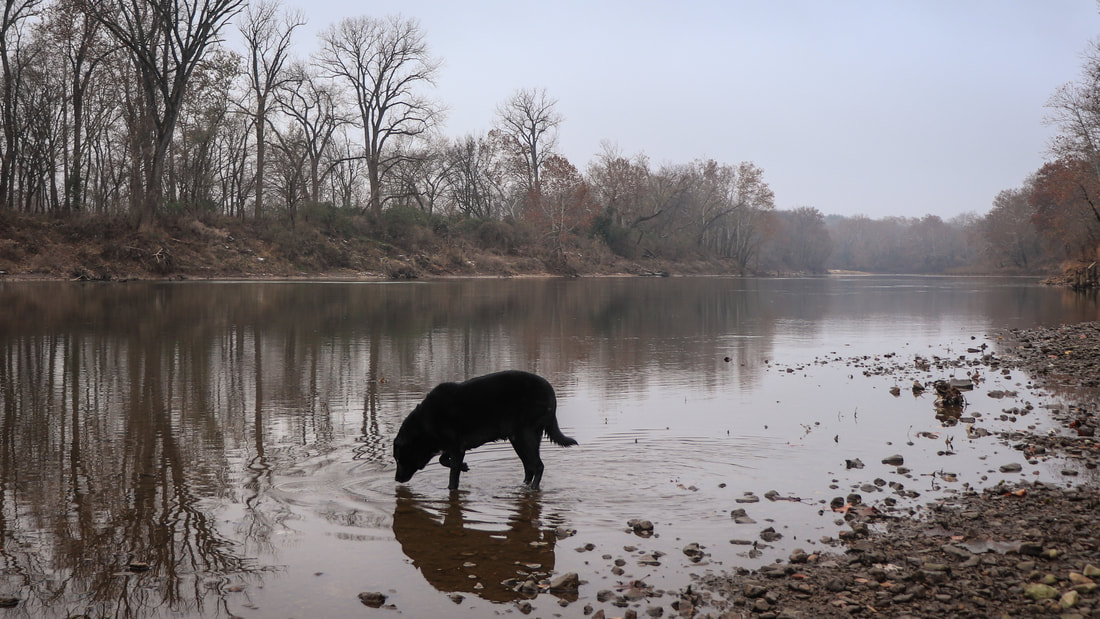 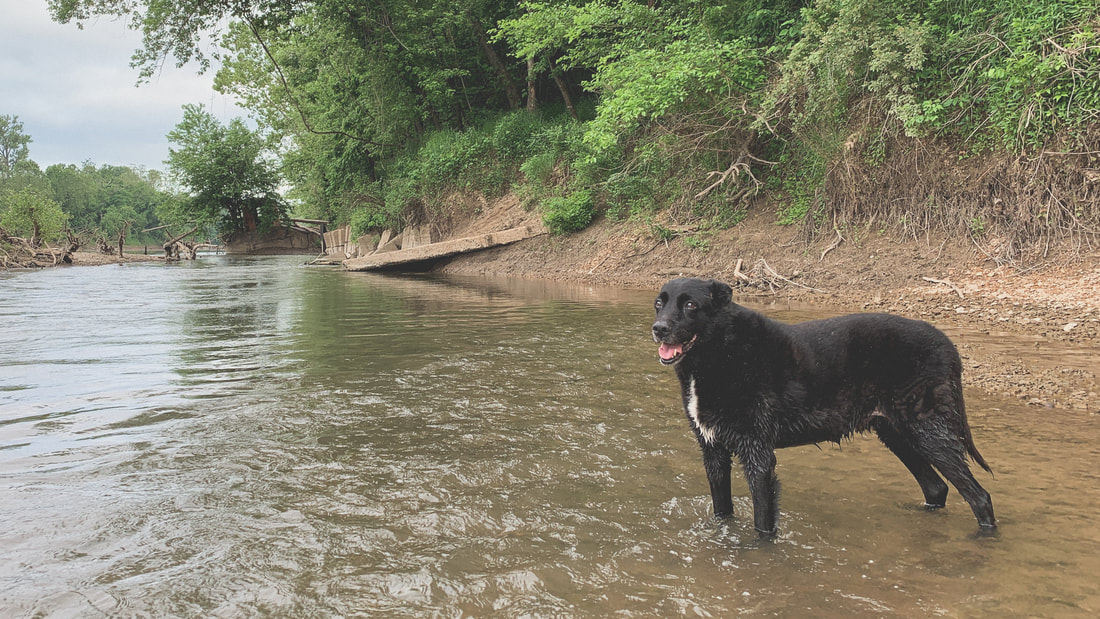 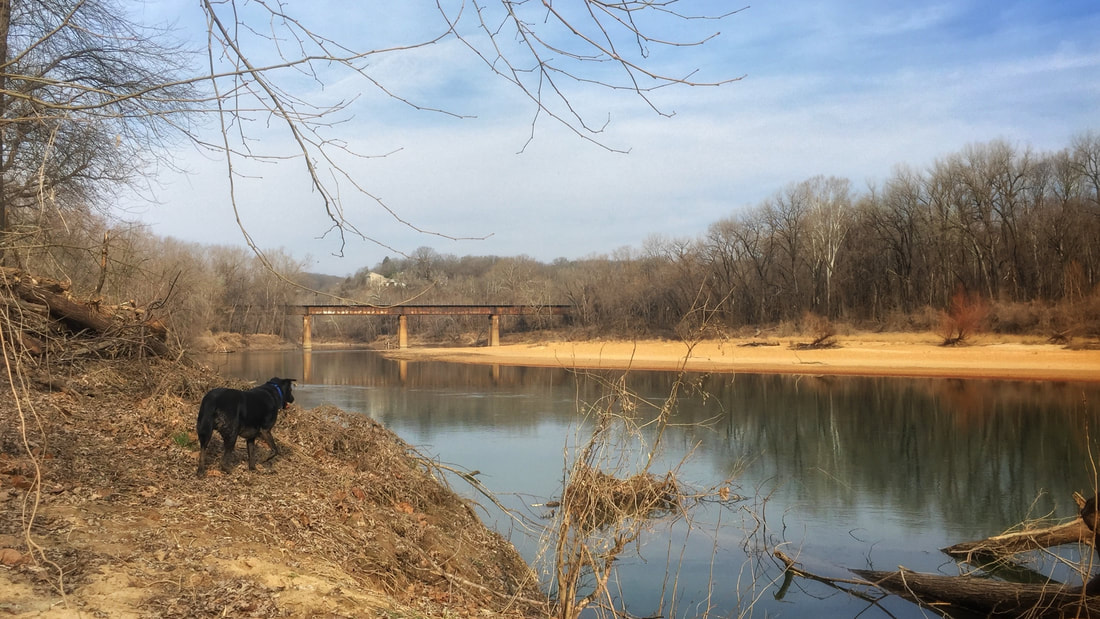 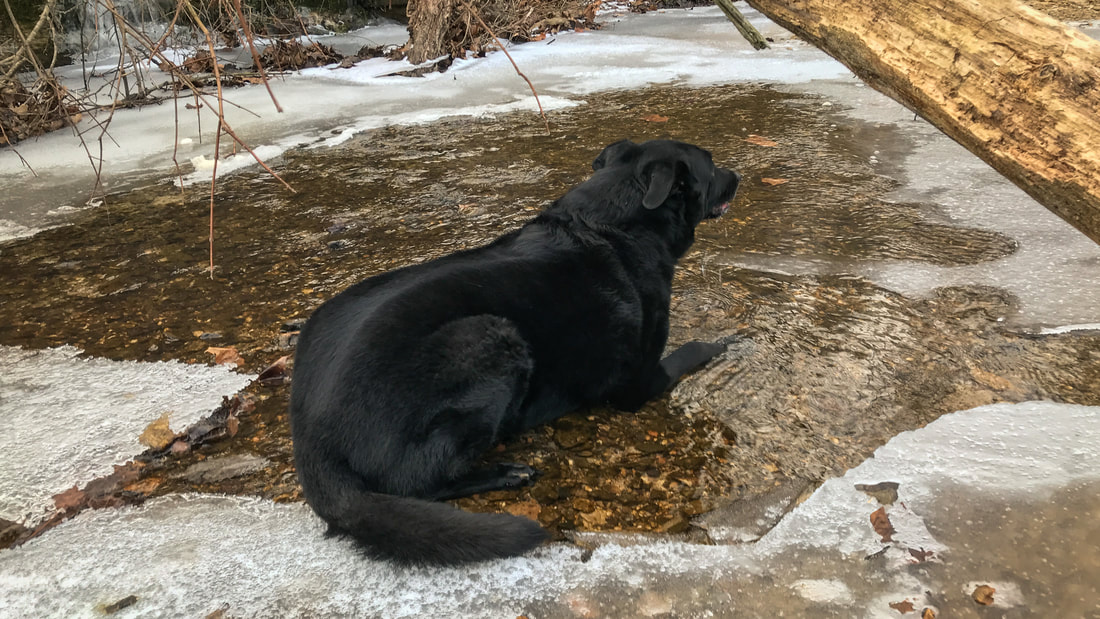 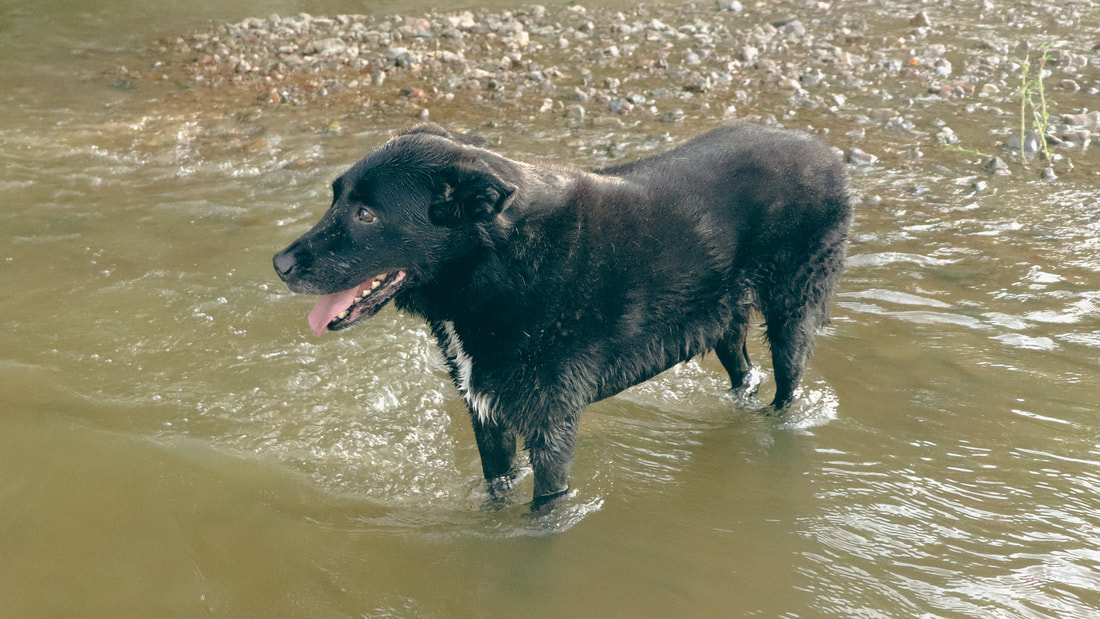 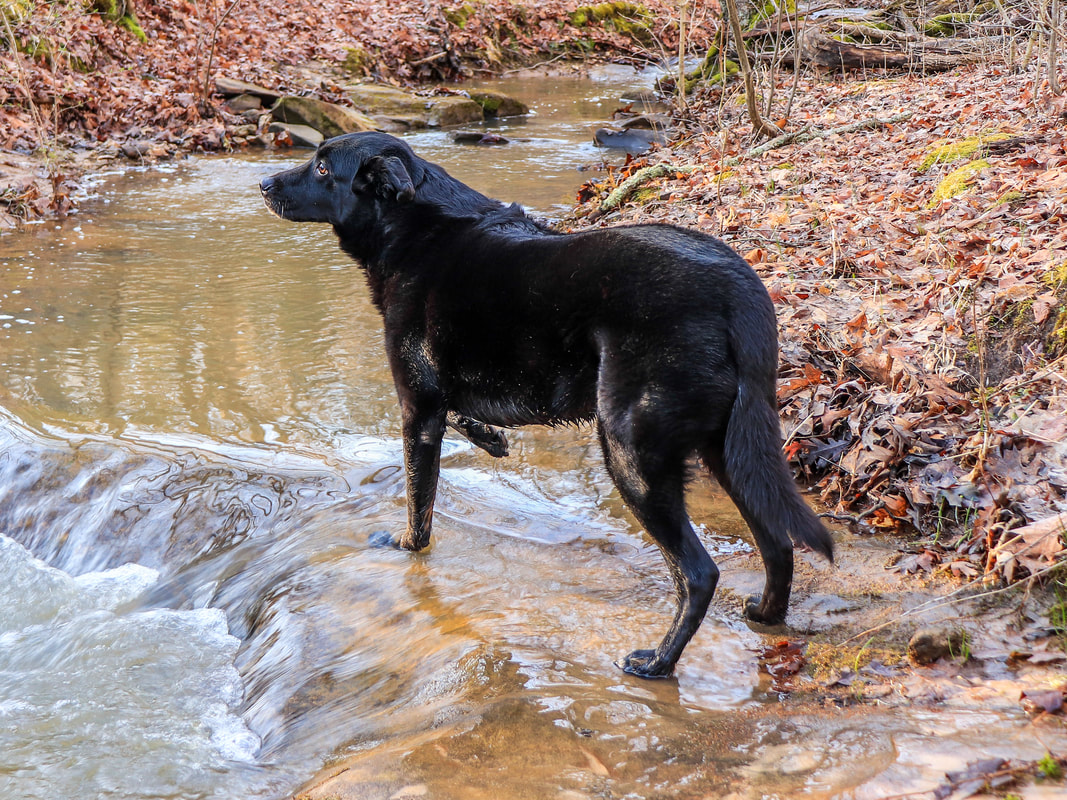 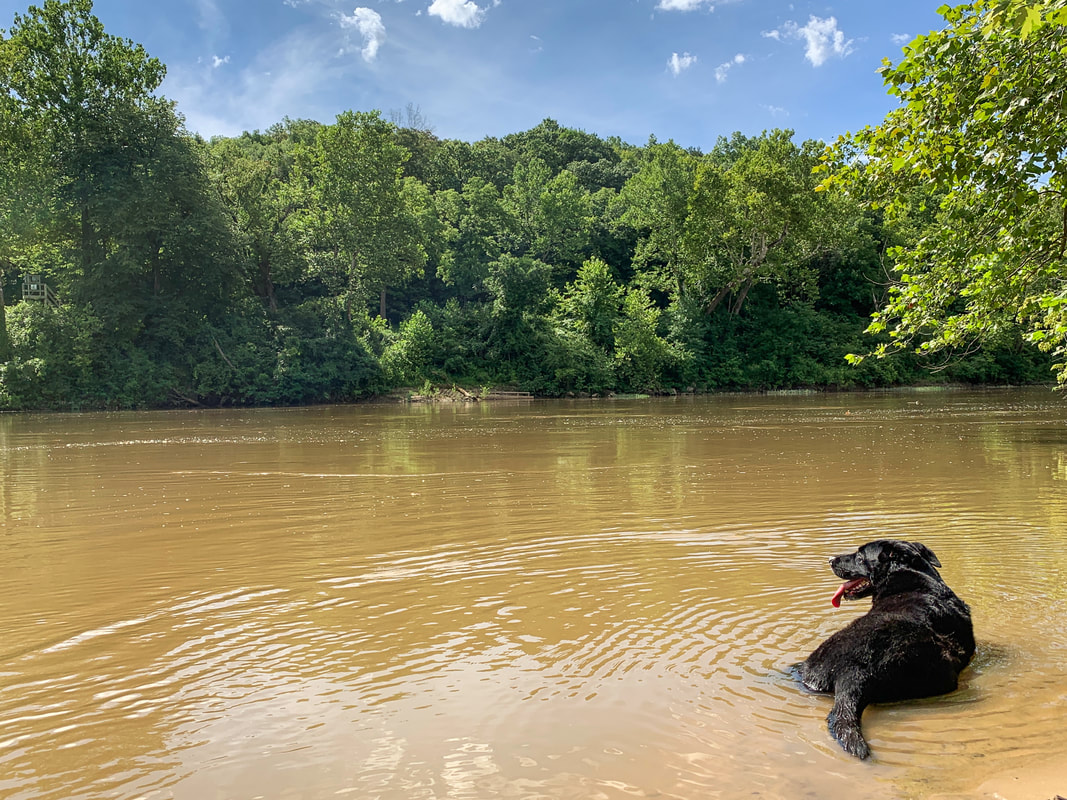 Roscoe loved snow even more than he loved water. This started at a very early age, when I'd bring snow in from the loft's balcony so he could eat it. 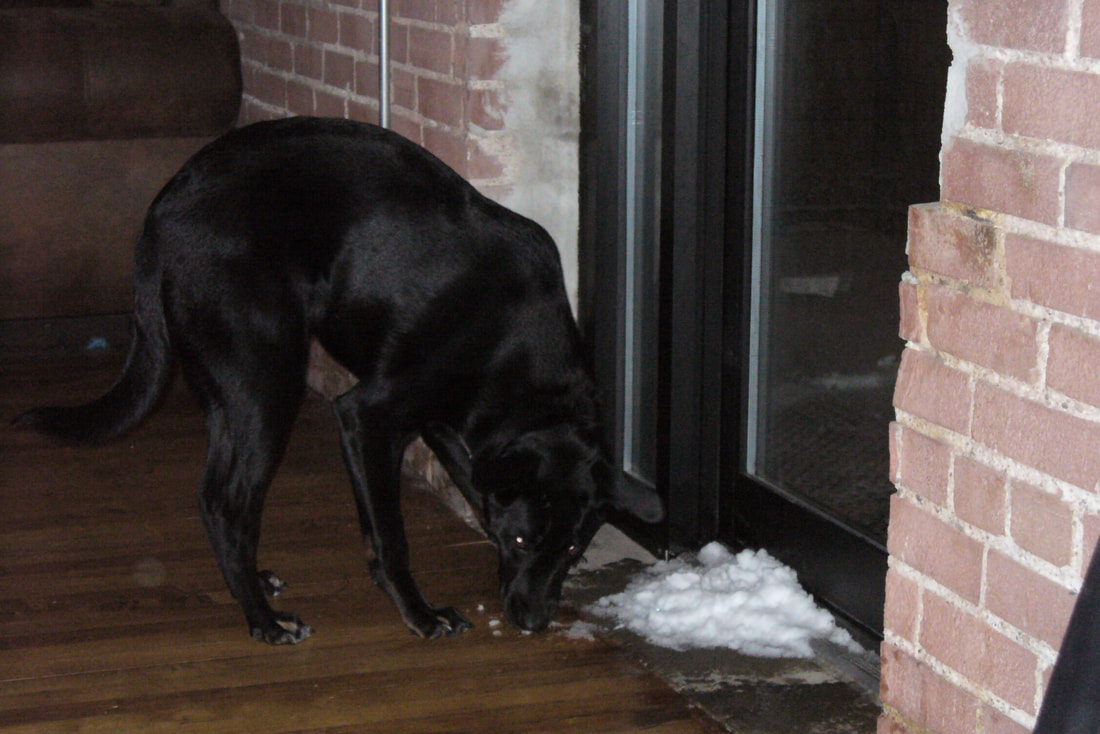 Roscoe wasn't much of a runner...unless there was snow on the ground. I don't know why, but he LOVED running in snow. The picture below, when he was 4 or 5 years old and we were at Francis Park with the place to ourselves, is my all time favorite picture of him; it's max Roscoe happiness. 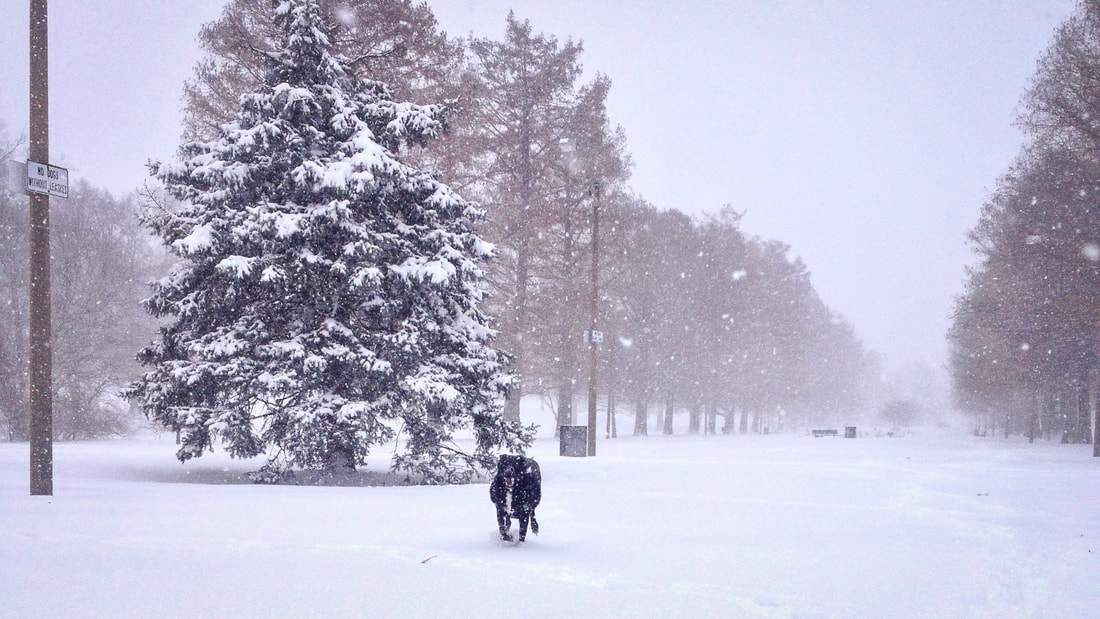 Even in his later years, Roscoe could still be counted on to have a little hop in his step when there was snow on the ground. If running was Roscoe's favorite snow activity, making snow angels was a close second.  When Roscoe was about 10, I had to go to Sheboygan, WI for 3 months for work. I agreed to go as long as Roscoe could go with me, and my employer had no issues with that. Every Saturday we'd get up at, like, 3am, and drive 2-3 hours west or north to go hiking at WI state parks and conservation areas.  Our trip to Devil's Lake State Park - sort of WI's version of MO's Elephant Rocks State Park - was the most memorable. We hiked a couple trails there but the crowning achievement was going up Balanced Rock Trail, a .4-mile trail with 500 feet of elevation gain at a 69% slope, to get to the top of the granite bluff overlooking Devil's Lake. It's basically a crazy steep climb up a mountain of small granite boulders, with the "trail" boulders looking the exact same as all the other boulders. Because of this I led the way, and Roscoe steadfastly followed behind me, no leash, no hesitation, no struggle. He hopped from 1 boulder to the next, just as I did, and enjoyed the view from the top. 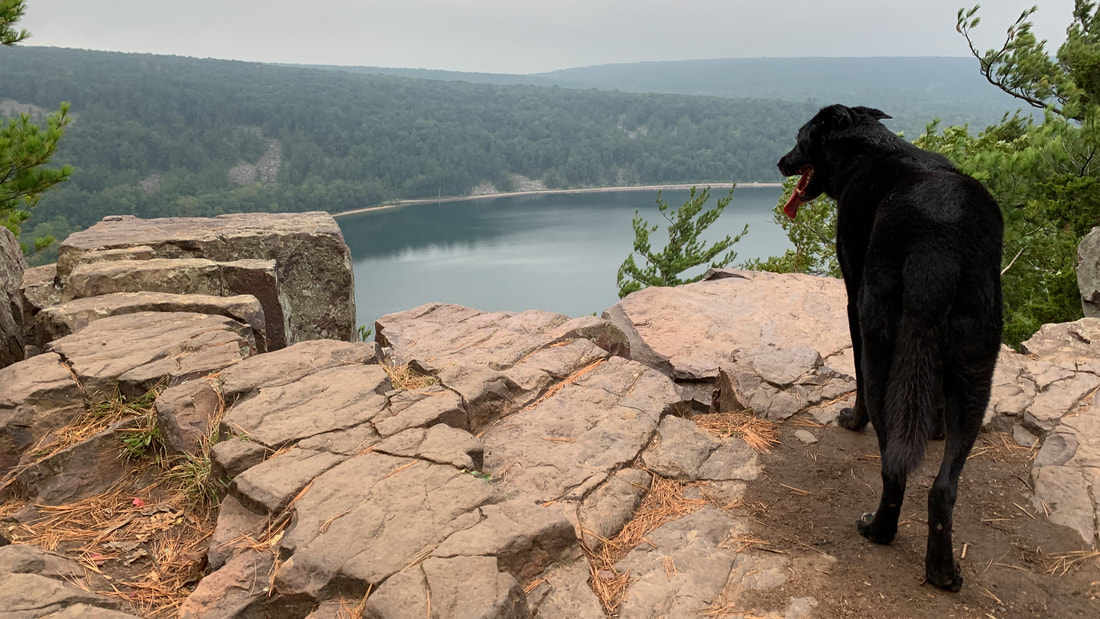 When Roscoe turned 13, we did his birthday hike at a place called Sandy Creek Natural Tunnel Conservation Area way up in Lincoln County, MO. The hike started out pretty rough for a variety of reasons, but it wound up being one of my favorites and one I'll aways remember.  On that day, many obstacles were overcome. Freckles was still pretty young and extra spazzy. Roscoe was suffering through Cushing Syndrome (hair loss, messed up insides) and he didn't have the speed or stamina he once did. It was stupid cold, everything was covered in ice, and the trail was almost entirely unmarked. After trying a couple different routes to get to the tunnel, we finally found its roof -- but we had to climb down ice-covered rocks to actually get to its mouth.
I tried getting Freckles to go first since she has no aversion to all manner of daredevil shenanigans, but she didn't want any part of it. I didn't think Roscoe had it in him to make the descent, so I started climbing down just to see if it was even possible. Without hesitation and without me giving any directives, Roscoe immediately followed me down the rocks. My ol' hikin' buddy, with deteriorating legs, cloudy eyes, and missing clumps of hair, without knowing where we were going or what we were going to find, just wanted to go on another adventure with me. If you know, you know; it was a super cool moment. 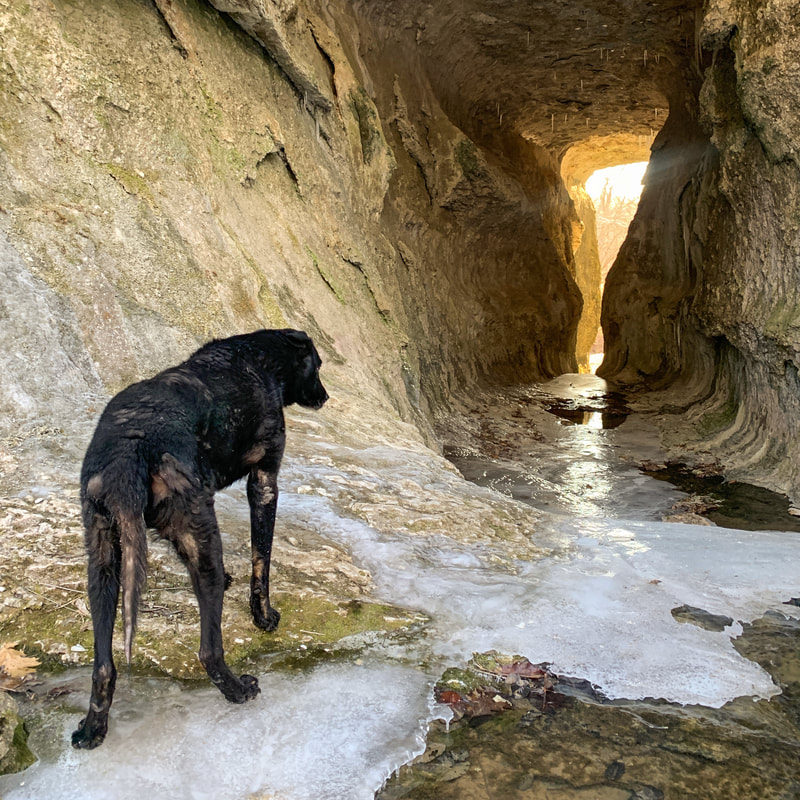 Long story short, we all got to see the tunnel. Roscoe's health issues really picked up steam in the coming months and he didn't go on many legit hikes after the Sandy Creek Tunnel outing. I'd always ask him if he wanted to go but more often than not, he declined. He'd been everywhere and seen everything, and his old body just wasn't up for the rigors of walking mile after mile anymore. Instead, I'd convince him to join Freckles and I on trips to Forest Park every now and then. His back legs had shriveled up, his energy was zero, and it wasn't at all like outings back in his prime, but it was always good to see him try to relive his glory days in the little pond in Kennedy Forest. 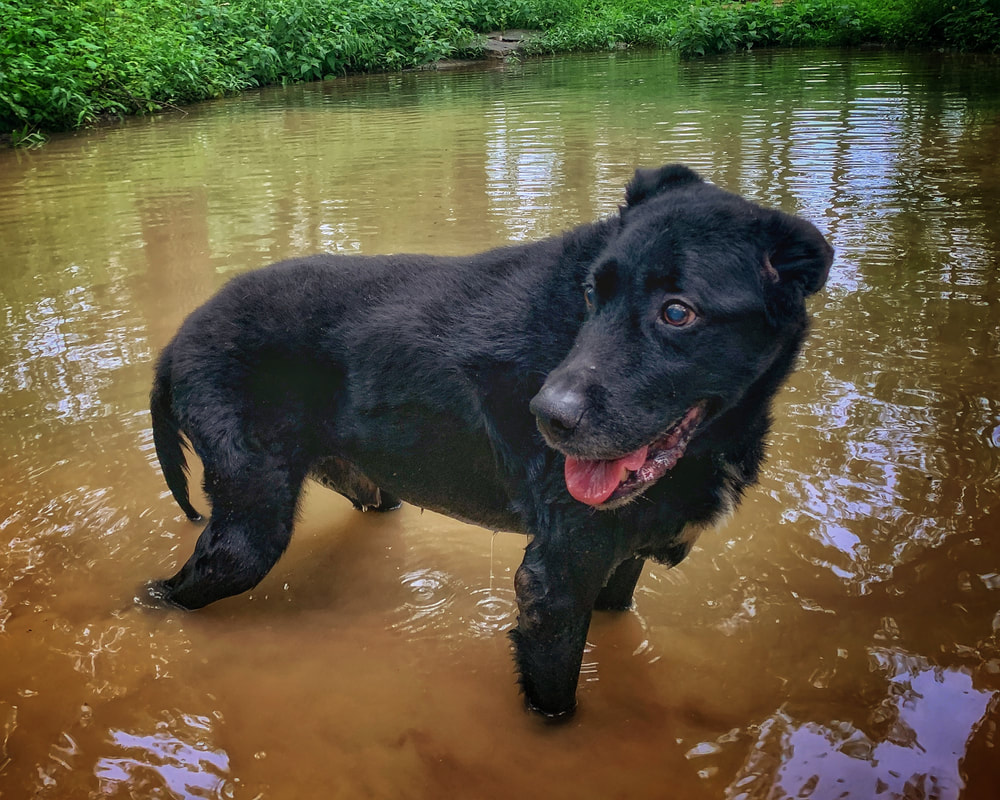 Roscoe's final hike, or the final hike where he could still kind of walk under his own power, was, fittingly, the hike we went on to celebrate his 14th birthday. We went out to the trails we'd been to more than any others and gave it a go. Roscoe moved slowly, dragging his failing back legs at times, and when he really started to struggle I'd pick him up and carry him for a while. No matter what I had to do or how long it took, I was determined to carry out that hike just like we had all the times before. We WERE going to make it to the Meramec River so Roscoe could lay in the water, and if he wanted to - he always did, even when his legs started to fail him - we WERE going to walk an extra lap around the field we walked to begin every hike there. I probably don't need to tell you this, but we DID make it to the river, and we DID walk that extra lap. 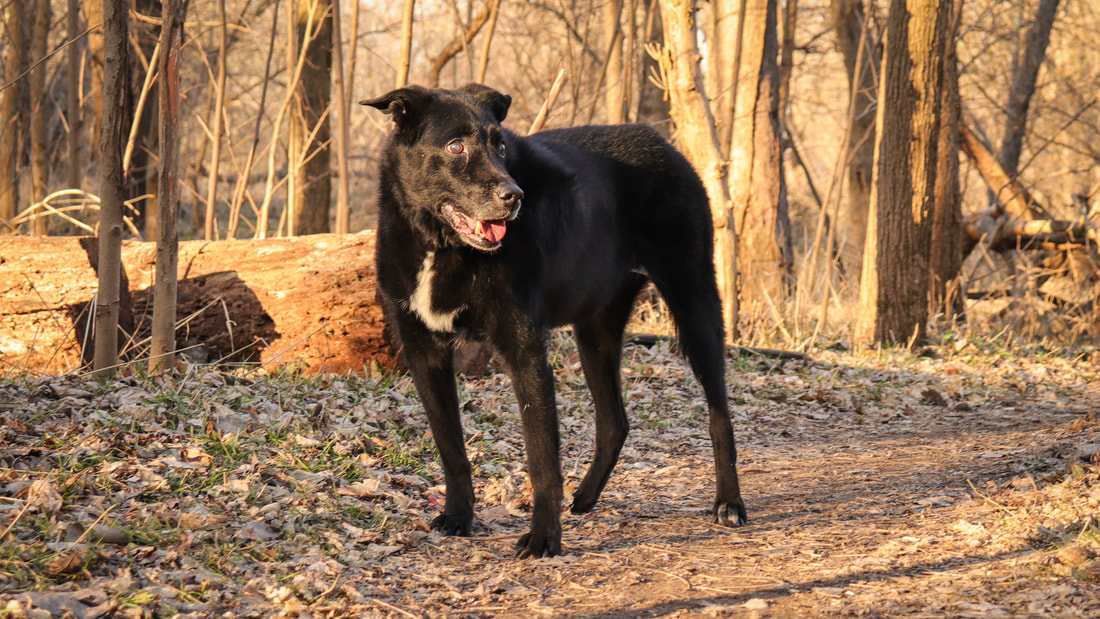 In the back of my head, especially after carrying Roscoe 2/3 of the time, I sort of knew that would be the final hike. When Roscoe was young, he NEVER wanted to leave the parks. We'd walk and walk and walk - mile after mile after mile - and eventually I had to call it quits and convince Roscoe that it was time to head home. I'd tell him, as sort of a consolation, " we can always come back". On that 14th birthday hike, after watching Roscoe really struggle, realizing that those words were no longer true hit me pretty hard. But that's life, and I was plenty aware of the reality of the situation. I made sure to get a few pics of the dogs doing their thing and I forced them to pose for a few pics. That wasn't easy; Roscoe's back knees didn't bend anymore so he couldn't sit and he was too wiped out by that point in the hike to stand up without immediately crumbling to the ground, and Freckles doesn't like to sit still for more than about a quarter of a second. In spite of that, I kinda love the picture. 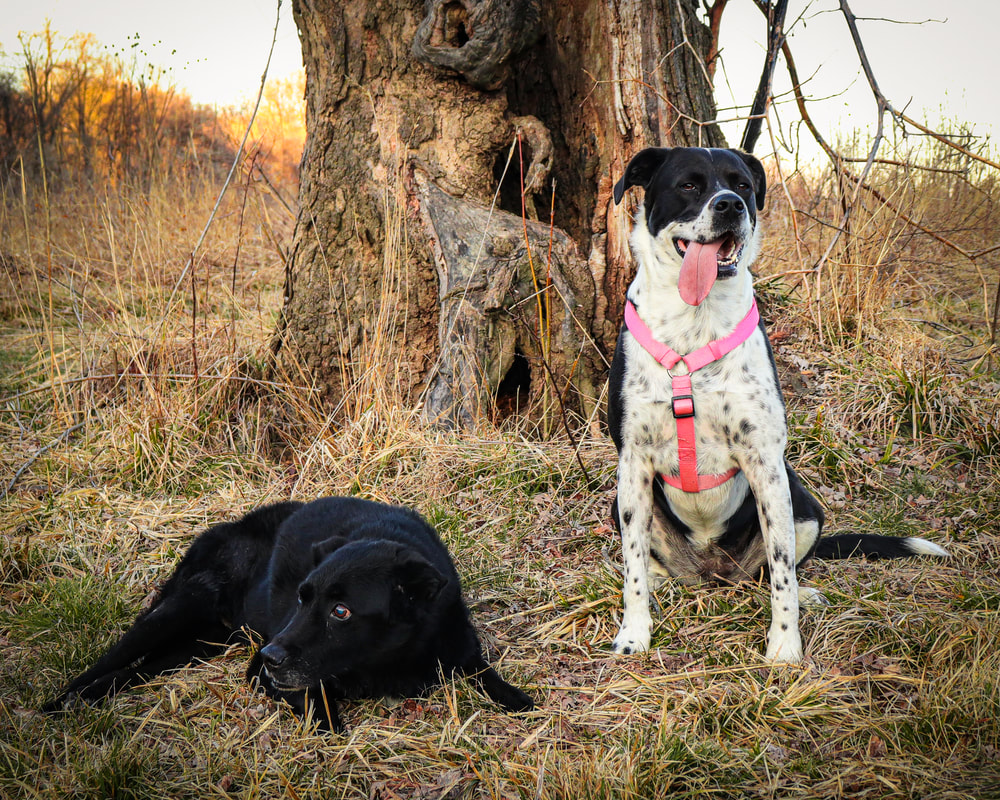 I will always remember puppy Roscoe. I will always remember struggling, old man Roscoe. I will always remember Roscoe in his prime, when no trail was too long or too difficult. But if I was only allowed to have 1 image in my head of Roscoe forever, it'd be the one below: big, strong, healthy Roscoe, by my side, hiking a trail. 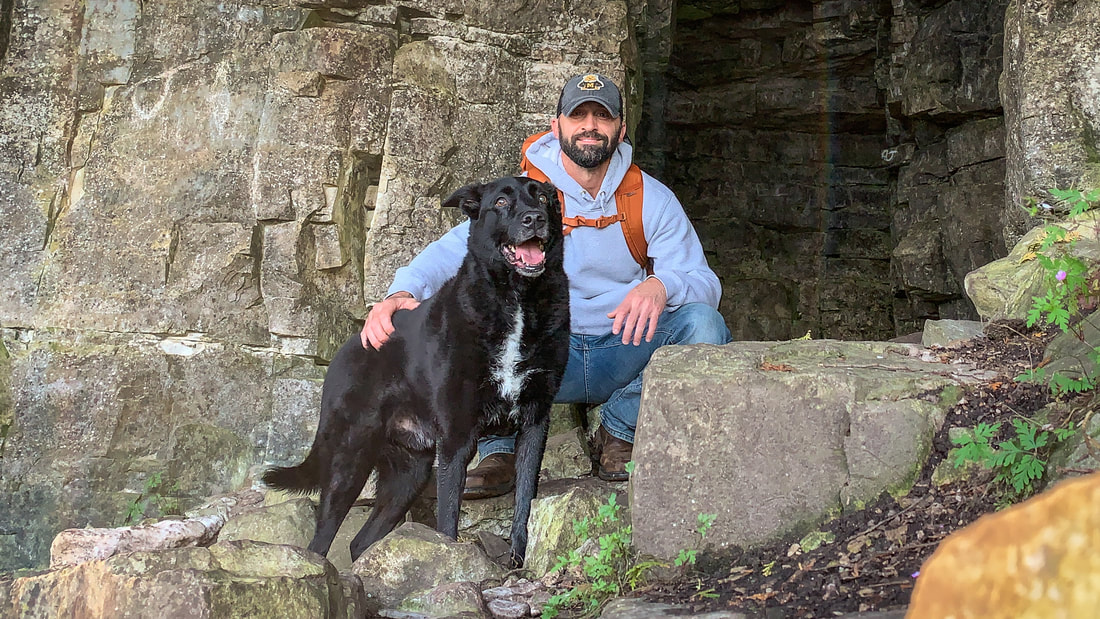 I recently got Roscoe's ashes. It's been weirdly comforting to have them here at the house, like even though Roscoe is obviously no longer alive, he's back here with Freckles and I, where he belongs. I'll bury some of them in the yard and stick a labrador statue (unless somebody knows where I can get a lab/border collie/chow/doberman/cattle dog/shepherd statue) over them as a grave marker of sorts. The rest will be scattered at the two locations Roscoe loved going to the most, and he'll forever be a part of those places.
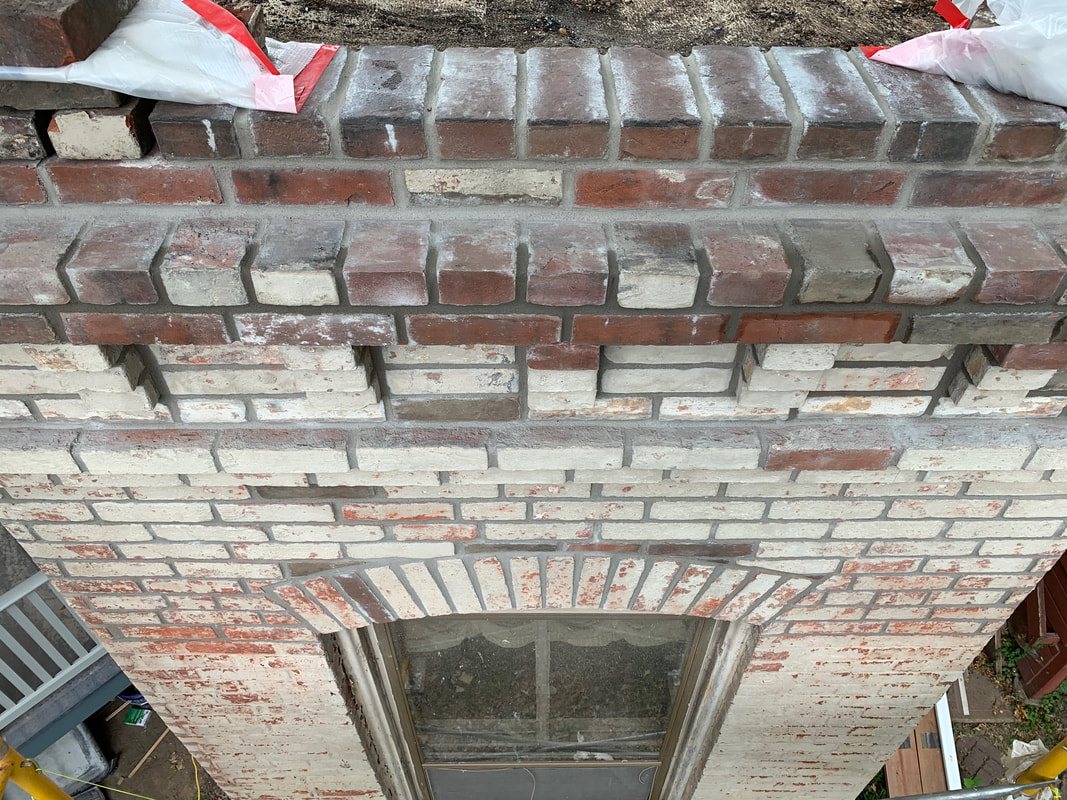
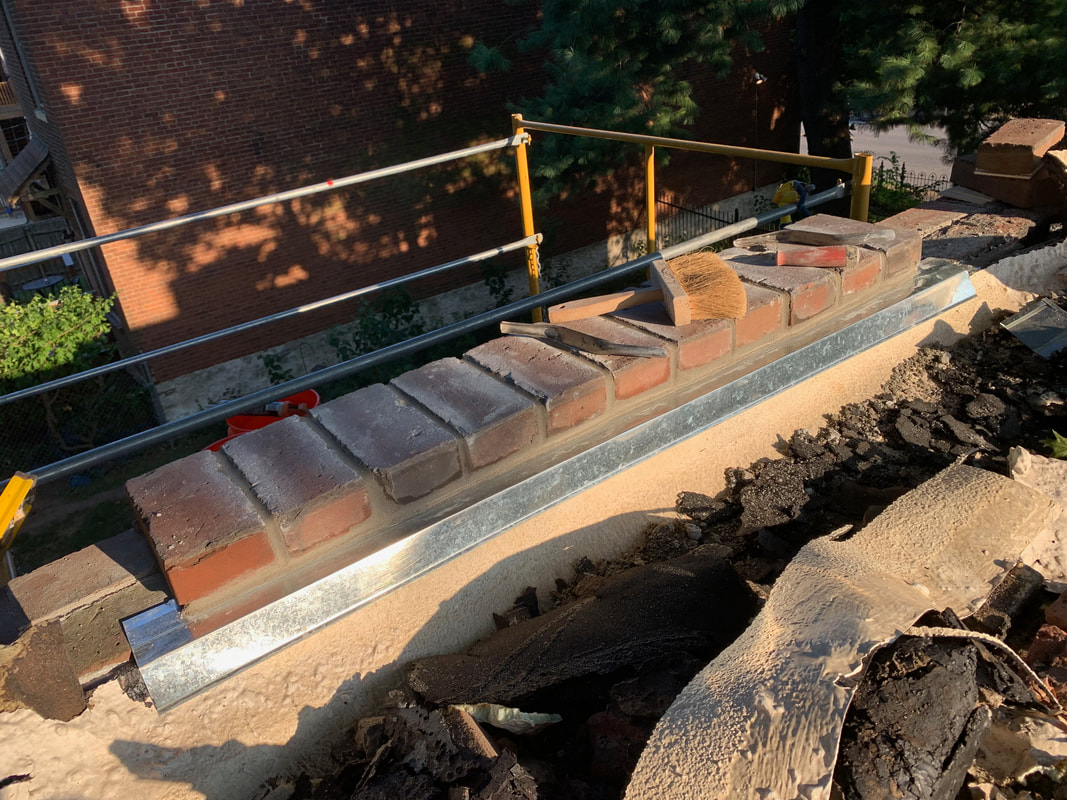
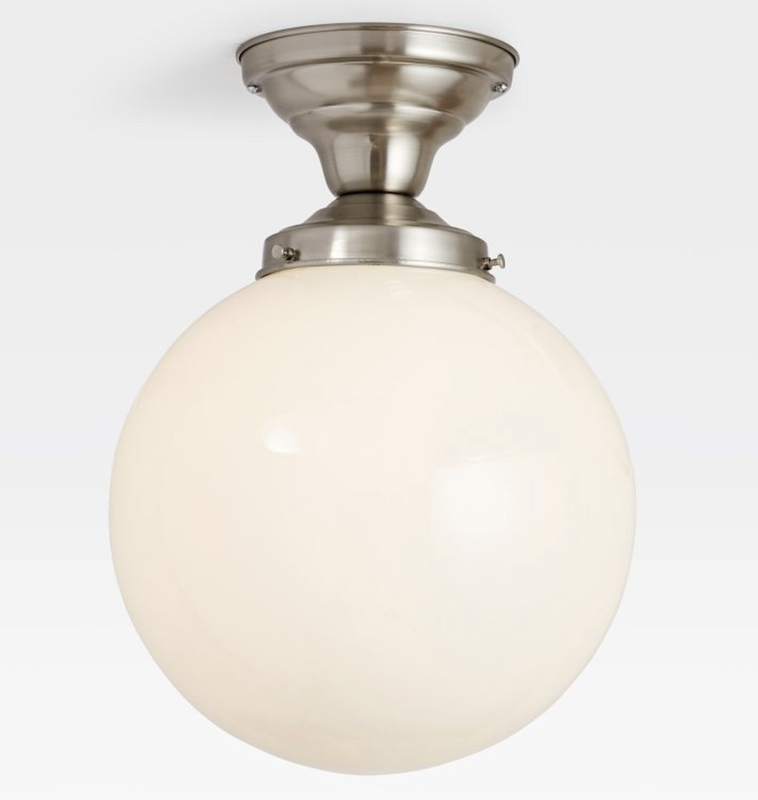
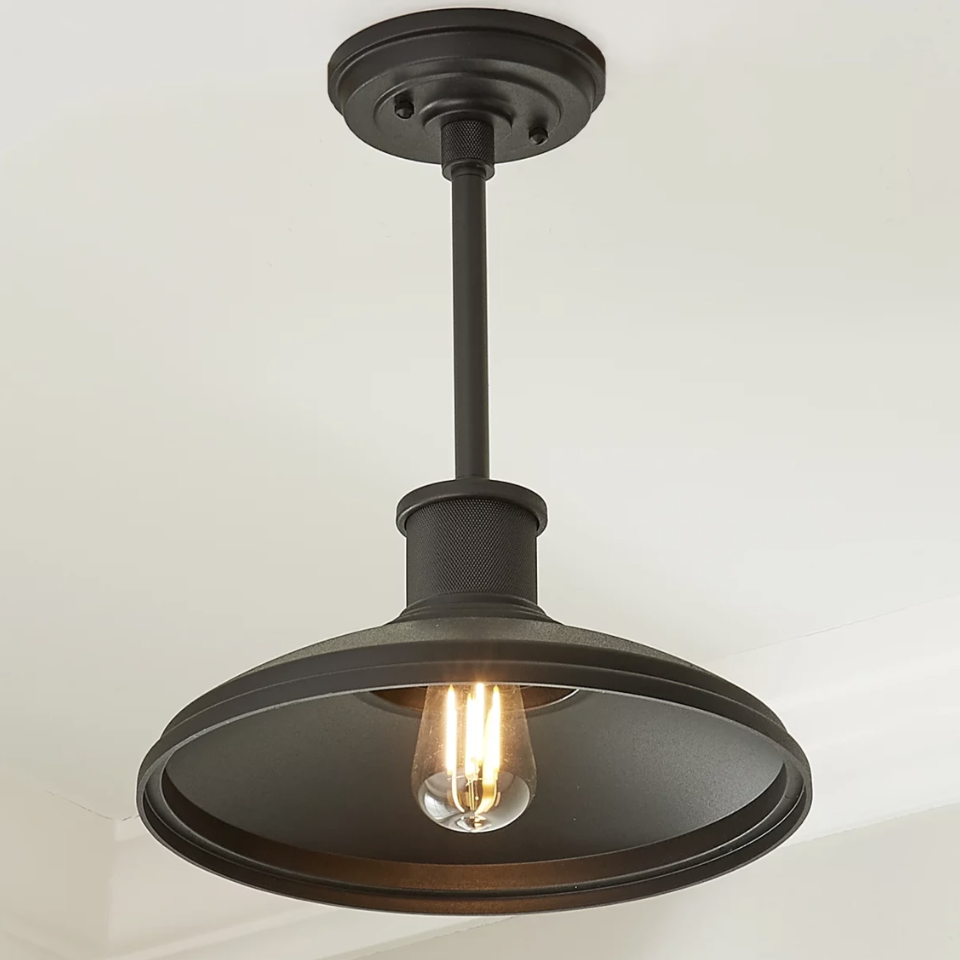
I was way beyond lucky to have crossed paths with Roscoe back in 2009. He was a one-in-a-billion dog, the best friend, and a great brother to Freckles. He will be missed forever. Rest easy, little man, and thanks for everything. I love ya. When I was building the porch I had some wire run for future lighting options. Between the shade from the nearby trees, the roof of the porch, and the porch's location on the eastern side of the house, that area just doesn't get much light. That said, when I drew up the plans and submitted them for permitting, I didn't give the lighting much thought -- at the time I figured I'd drop a few small can lights (the soffit lights are a whole other story) in the ceiling and be done with it. Since I hadn't yet built the porch, I didn't have a big structure to eyeball and think through what would look good and what wouldn't.  But let's call a timeout on the light talk for a minute. I took a week off of work at the end of August just to burn through some vacation days. I'll undoubtedly spend a LOT of time on the scaffolding repairing the brick wall I'm currently working on. 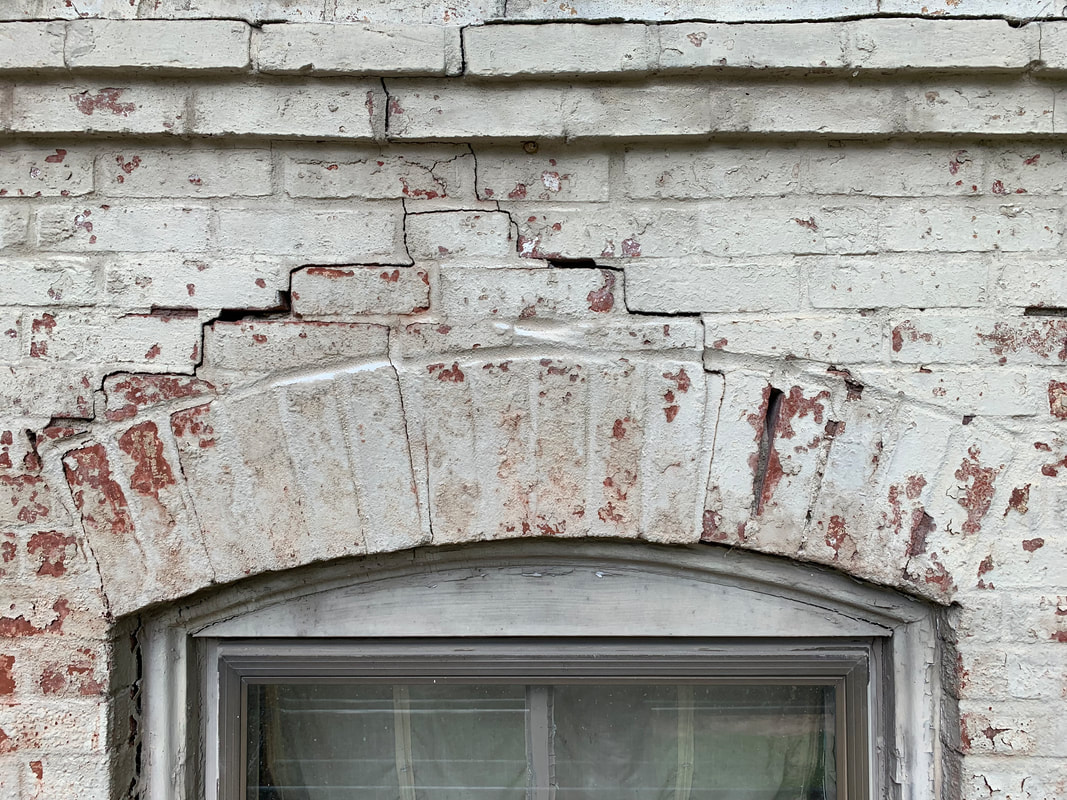 If you follow my Instagram stories, you may have seen the one I posted recently showing the catastrophe that is the house's parapet "cap" -- nothing but spray foam and liquid flashing slopped all over the top of the wall. As part of the wall rebuild, I'm going to address that, at least in the little section of wall I've currently got torn apart. Typically and/or historically, those walls get capped with clay wall coping (like the garage has, or had before a recent storm dropped a big tree limb on some of them): 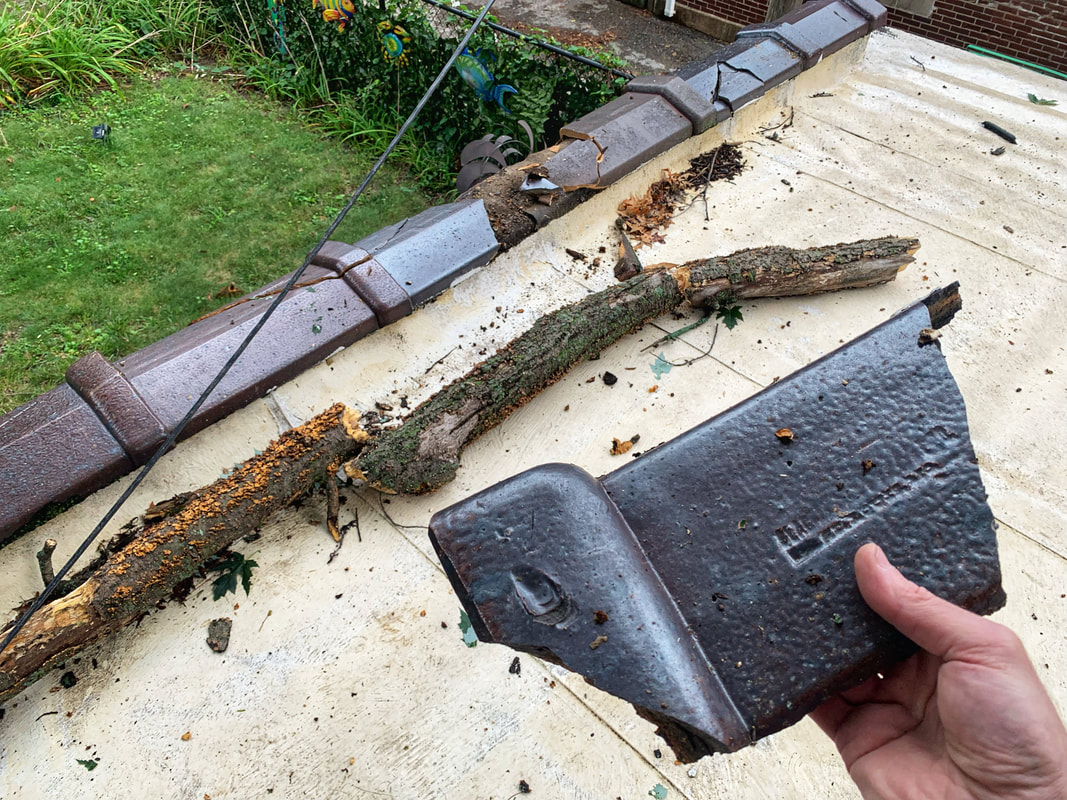 or they get capped with some kind of precast stone like this: 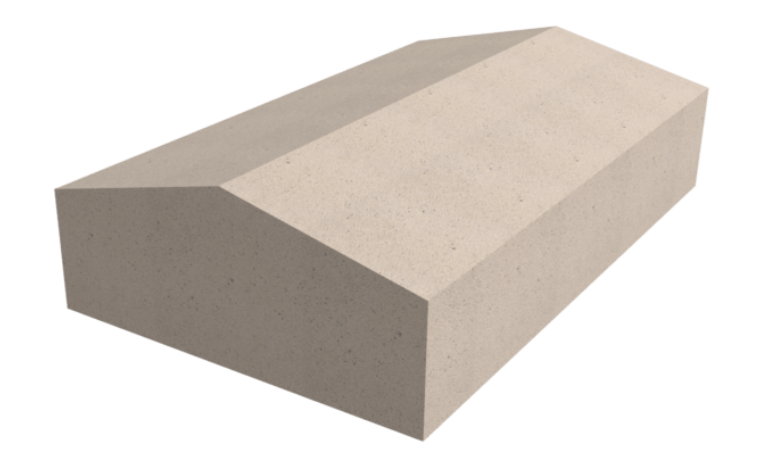 I've been wrestling with which route to go. The clay coping is the less expensive option, faster to install, and historically correct. But the house has a double brick cornice with lots of detail, and I think the clay coping - it's shape and protruding overlap section - would look weird, like there'd be too much going on visually. The precast option is pricey and while still historically correct, not a fast installation. So I've been mentally wrestling with that throughout this current wall project because I need to make a decision soon on which product to buy. Let's go back to porch lighting, which I want to tackle during my time off. Thinking through the details and designs of the different wall cap options got me to thinking about the porch lighting. Do I really want can lights? Would they look OK? Would they even make sense? Now that the porch is fully constructed, I can say with 100% certainty that can lights would look ridiculous. Everything about the porch screams pre-1900, can lights in the porch ceiling would be architectural blasphemy. I should have thought through this sooner, like back when I was drawing the plans...but here we are. At least the wires are already up in the ceiling. I've been internetting some period correct-ish lighting options, which come down to surface mounted fixtures with big circular globes, or pendant style fixtures that are kinda warehousey.
I'm kind of partial to the surface mount option - material finish still TBD - with the big globe, I think it'd look better in the center of the porch ceiling than a pendant style light. But I don't hate the pendant option, and it'd get some light a little closer to the porch floor, which is about 10'6' away from the ceiling. Either way, I've got a handful of days before I have to make a choice...
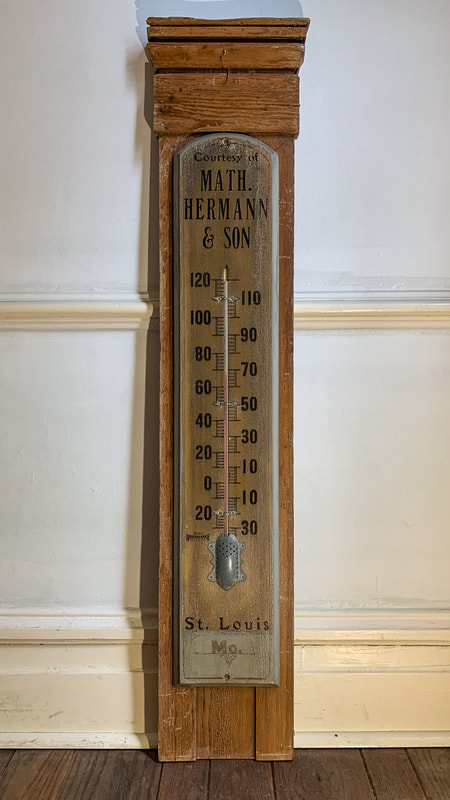
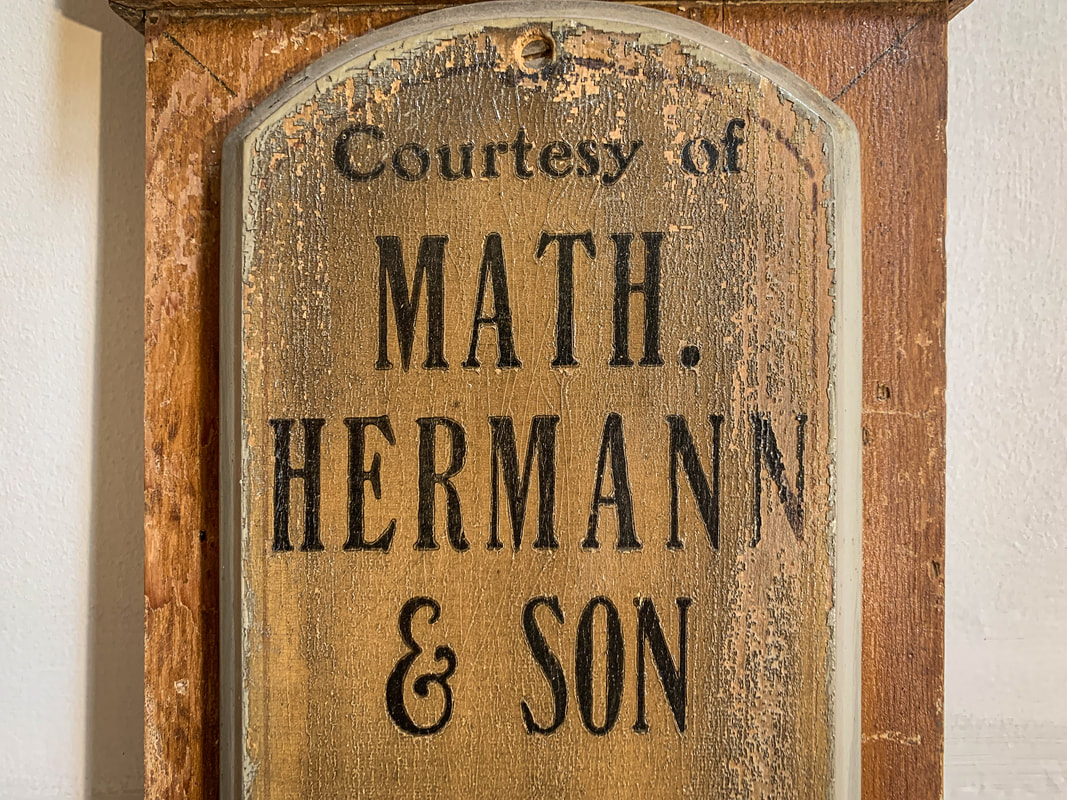
Grandpa was a number of things: a salesmen, a magician, a comedian, an athlete (in his younger days), and an artist. He was also a collector, which may have stemmed from an undoubtedly meager upbringing at the Christian Orphans' Home on North Euclid in St. Louis.  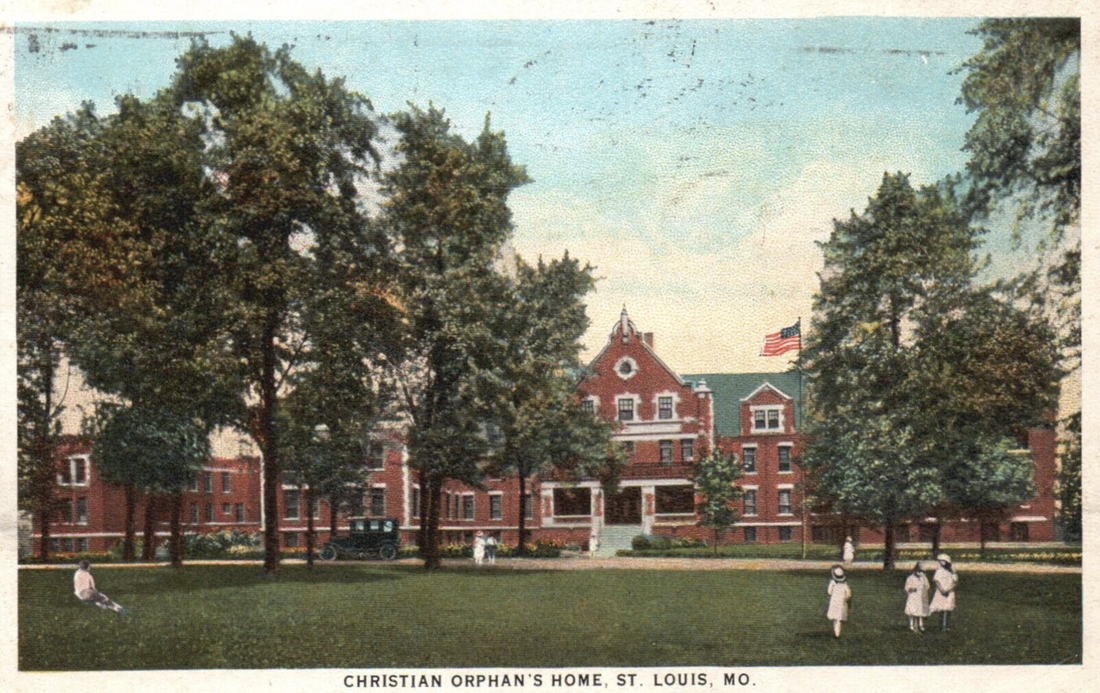 Grandpa's collection didn't focus on any single theme or niche. He had a variety of transportation-related items, like a wooden airplane propeller and a pair of oil-burning headlights from the early days of the auto industry. He had wall clocks, like the kind that hung in school rooms 100 years ago, and bit keys. He had old tools. He also had lots of old advertising, packaging, and promotional items. When grandpa moved into the assisted living place he couldn't take much with him. I'm not sure how his collection was prioritized, but some of his stuff went with him and the rest got estate-saled. Before the sale I got to grab a few items; I kinda stuck to the old tools and oddball stuff I thought was kinda cool. I felt pretty uncomfortable taking his belongings so I didn't take much. After grandpa passed away, the stuff he had at the assisted living facility had to be dealt with. My dad sent me a bunch of pics and I laid claim to a few more items. I'm not much of a collector per se, but if it's old, especially if it's old AND connected to St. Louis somehow...I'm in. One of the items I snagged was a giant wall thermometer that at one time belonged to or advertised a business known as "Math. Hermann & Son".
 3521 North Broadway, St. Louis, MO -- Pictorial St. Louis, Plate 47 (By C.N. Dry, 1876) If you look closely, you can see the Mississippi River in the bottom righthand corner of the above image. Back then, St. Louis was a rapidly growing city and Hermann's business was located in a densely populated neighborhood very near the river-driven commercial action. 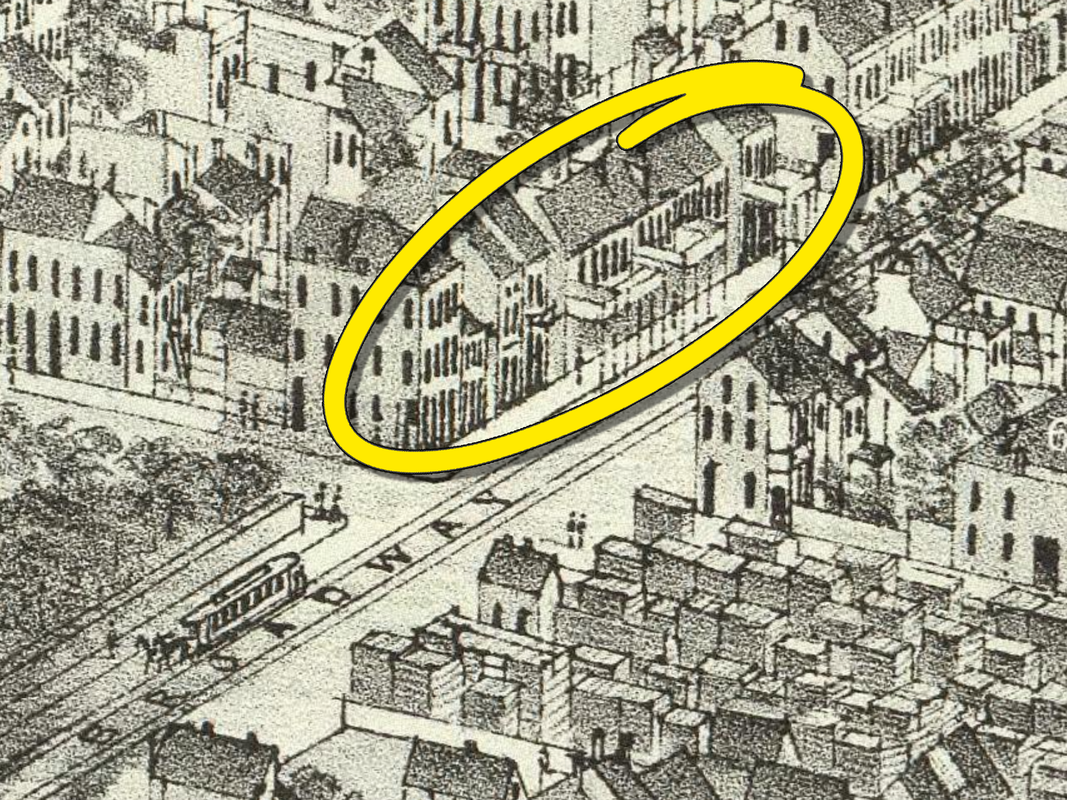 3521 North Broadway, St. Louis, MO -- Pictorial St. Louis, Plate 47 (By C.N. Dry, 1876) It's hard to say for sure which particular building was 3521, but it's one of the buildings in the center of the yellow oval. Here's a look at the area in 1909; it's tough to make out but if you squint just right you can see the word "undertaker" on a building across Broadway from the "coal & wood shed", that was Mathias Hermann's business. That area of St. Louis has been almost entirely demo'd and replaced with largely nondescript low-rise industrial buildings, surface parking lots, and blight, although the Mallinckrodt facility is still very much there and in operation. 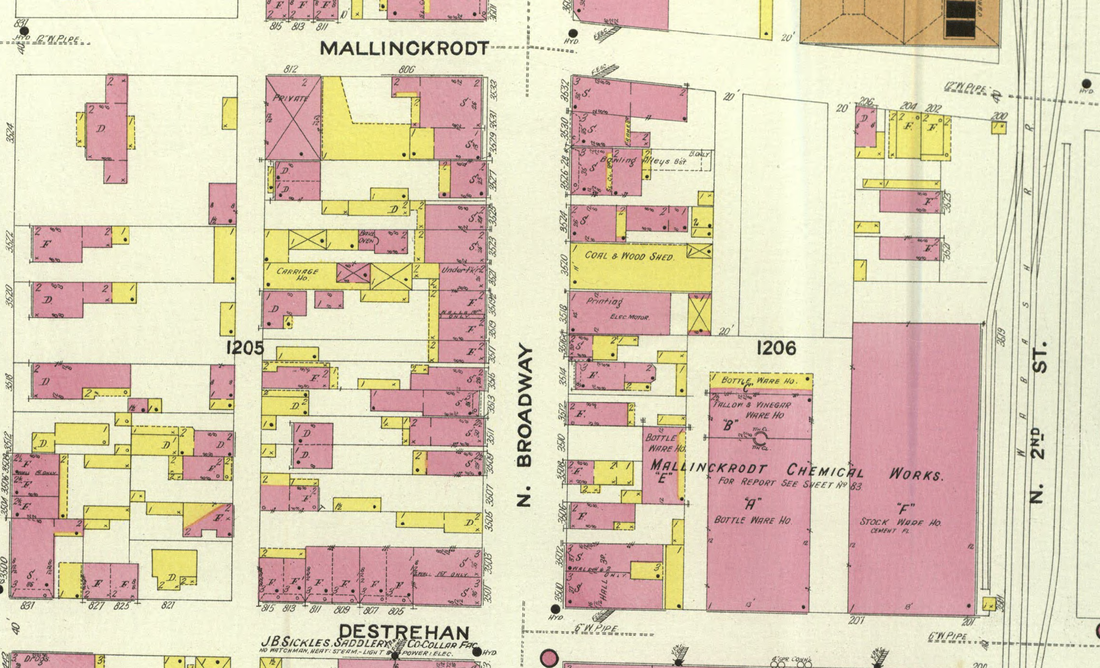 3521 North Broadway, St. Louis, MO -- St. Louis, MO, October 1909, Sheet 82, Vol. III (By Sanborn Map Company) The Hermann family residence was located at 3935 Florissant Avenue, which was about a block west of Hyde Park. Much like Hermann's business location, this once-thriving area is in poor condition and would be unrecognizable to the Hermann family patriarch today. 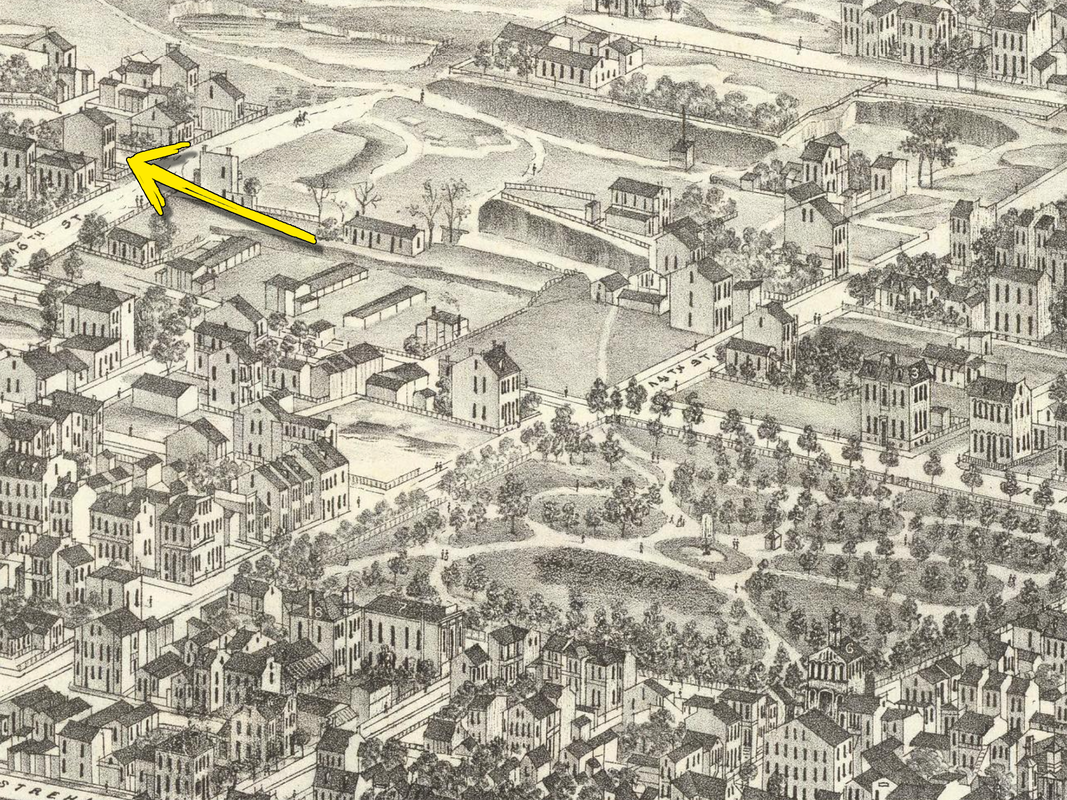 3935 Florissant Avenue, St. Louis, MO -- Pictorial St. Louis, Plate 76 (By C.N. Dry, 1876) During his lifetime, Mathias Hermann belonged to a number of societies, lodges, and clubs, as well as being a member of the Catholic church and lifelong Republican (which means he'd be a Democrat today). He died in 1908, although the business was carried on by the Hermann family for almost another 100 years. And then there's the thermometer. I have no idea where it came from or how my grandpa wound up with it, but it's pretty interesting.
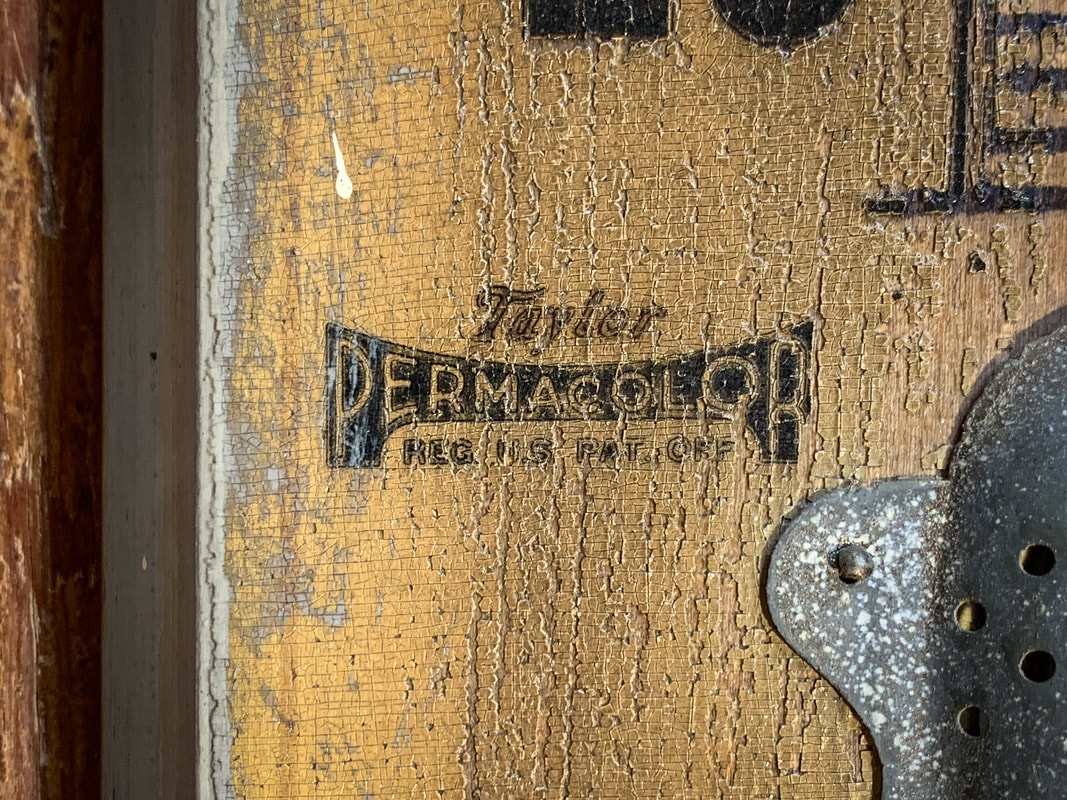
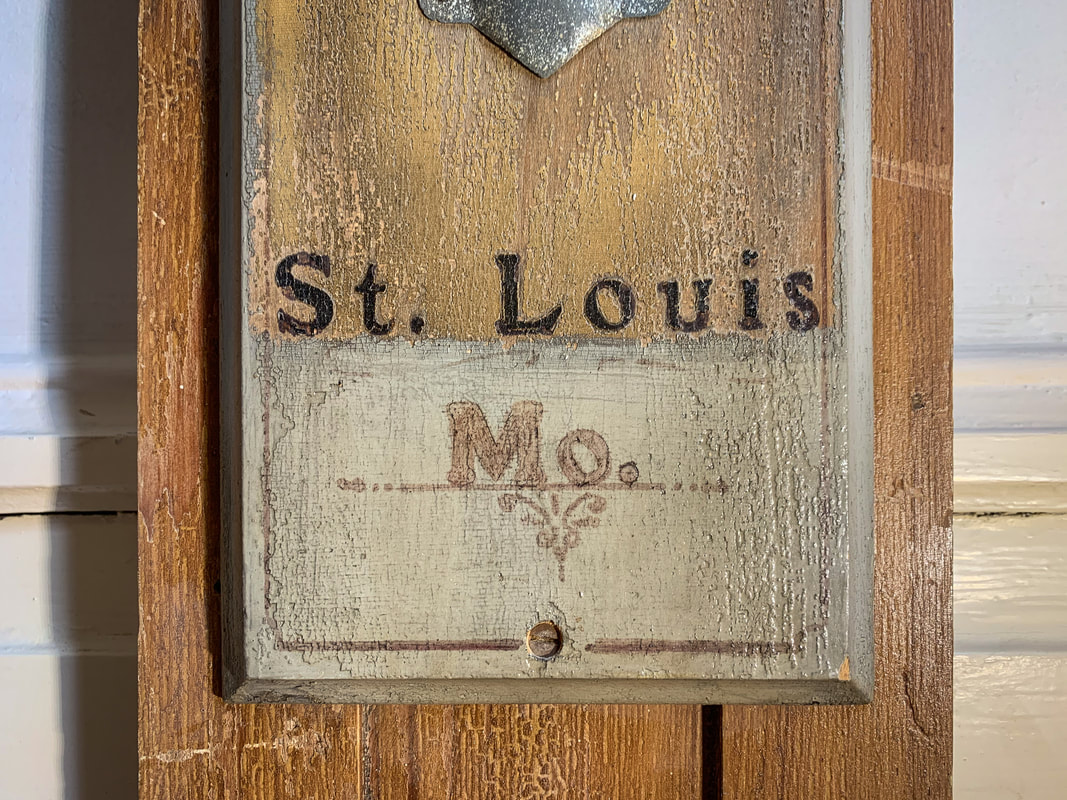 I didn't notice it at first but after looking through the pics I took of the thermometer, I'm pretty sure the bottom section -- the "Mo." part -- is grandpa's work. Looks to me like he grabbed a black marker and filled in a couple letters, and drew in a few lines where he thought there should be some. Grandpa collected stuff he liked, not because something may or may not have had monetary value; if he thought an item was missing something, he'd find a way to make the thing complete. Anyhow...the thermometer was made by Taylor, which first began making thermometers in Rochester, New York in 1851. Taylor eventually expanded and had offices all over the place, including in the Frisco Building at 9th and Olive in downtown St. Louis. The St. Louis office didn't exist until 1914, so I suspect the thermometer isn't any older than that. 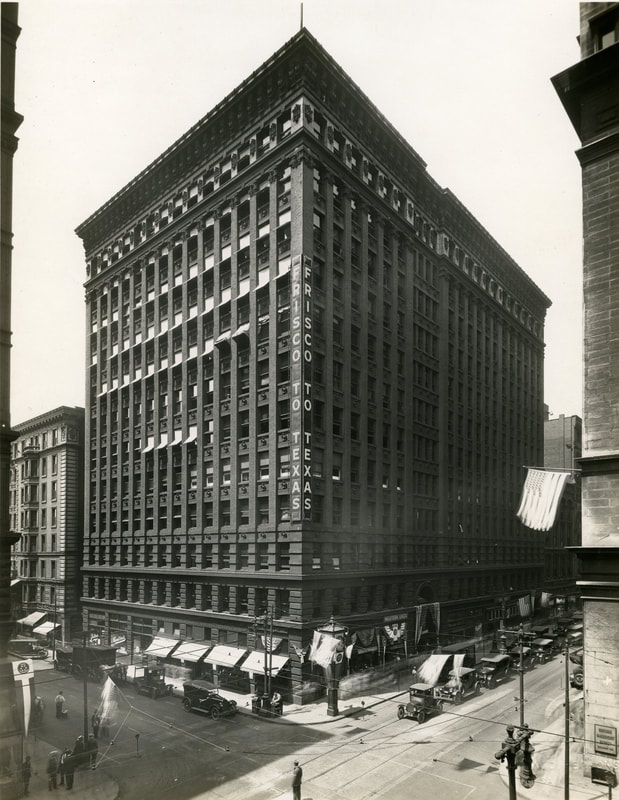 Frisco Building, St. Louis, MO, 1920s -- Missouri Historical Society Photograph & Print Collection From there, it's hard to say how old the thing is but from the looks of the paint, it's probably fairly old. And it's hard to say whether the thermometer was hung on a wall in Hermann's business, or of it was a promotional/advertising item that hung on the wall of somebody else's business. Taylor is still in business today, but they've been around for so long and produced so many varieties of thermometers that finding a record of this exact model is very needle-and-haystack.
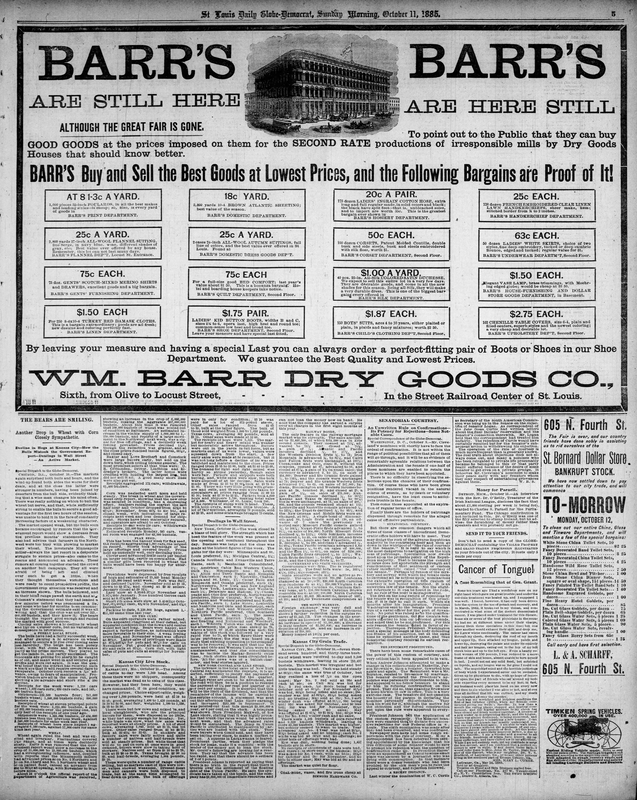
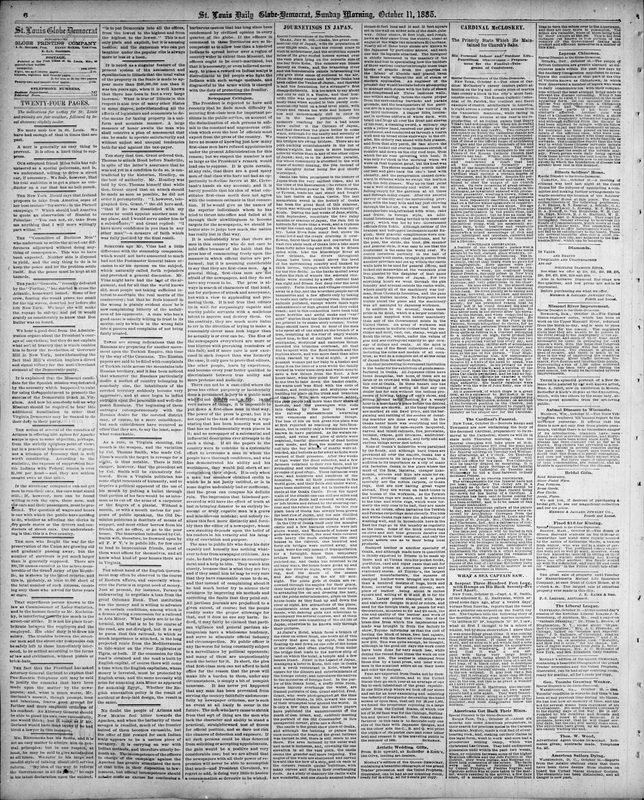
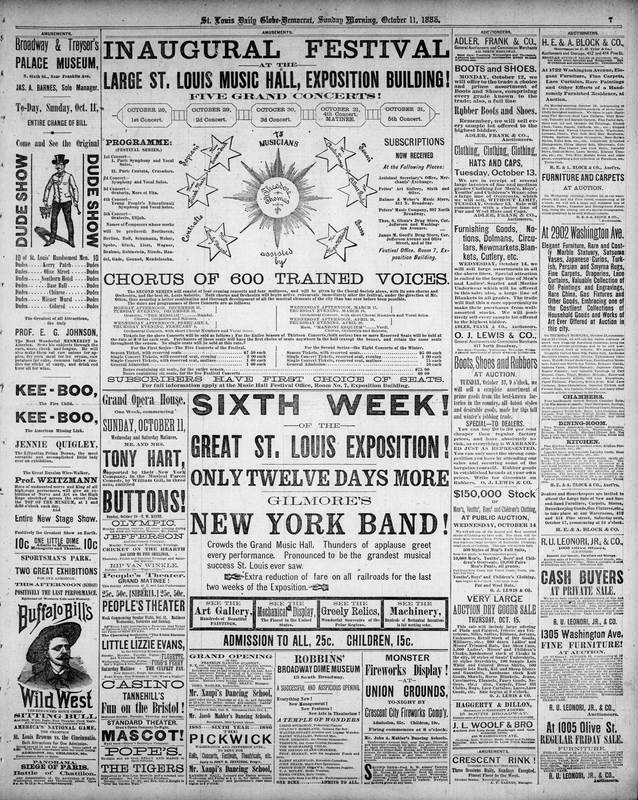
Regardless, it doesn't make any difference. It's old, it's connected to St. Louis, and for it to have been one of grandpa's last remaining possessions, he must have really liked it. That's good enough for me. I recently completed repointing the last section of the wall that I could get to without removing the fence, which meant it was time to remove some fence. 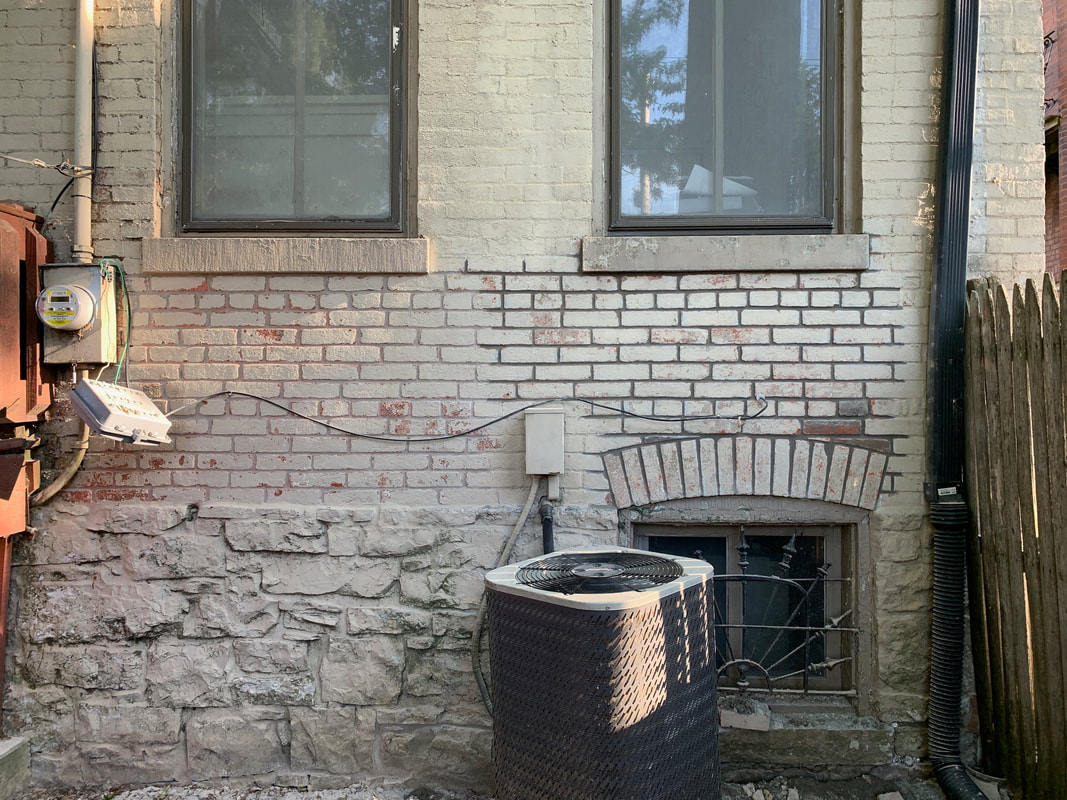 I got out the big ladder and removed the downspout, cut out the section of fence nearest the house, and pulled the fence post out of the ground. This allowed me to repoint the last little section of the lower rear wall of the house. At first, the repointing work went about as I expected. Some of the mortar was rotten, some of it wasn't, but the wall wasn't in horrible shape and mortar removal wasn't too difficult. Eventually I ran into some cracked bricks, and loose bricks, and crumbling bricks. 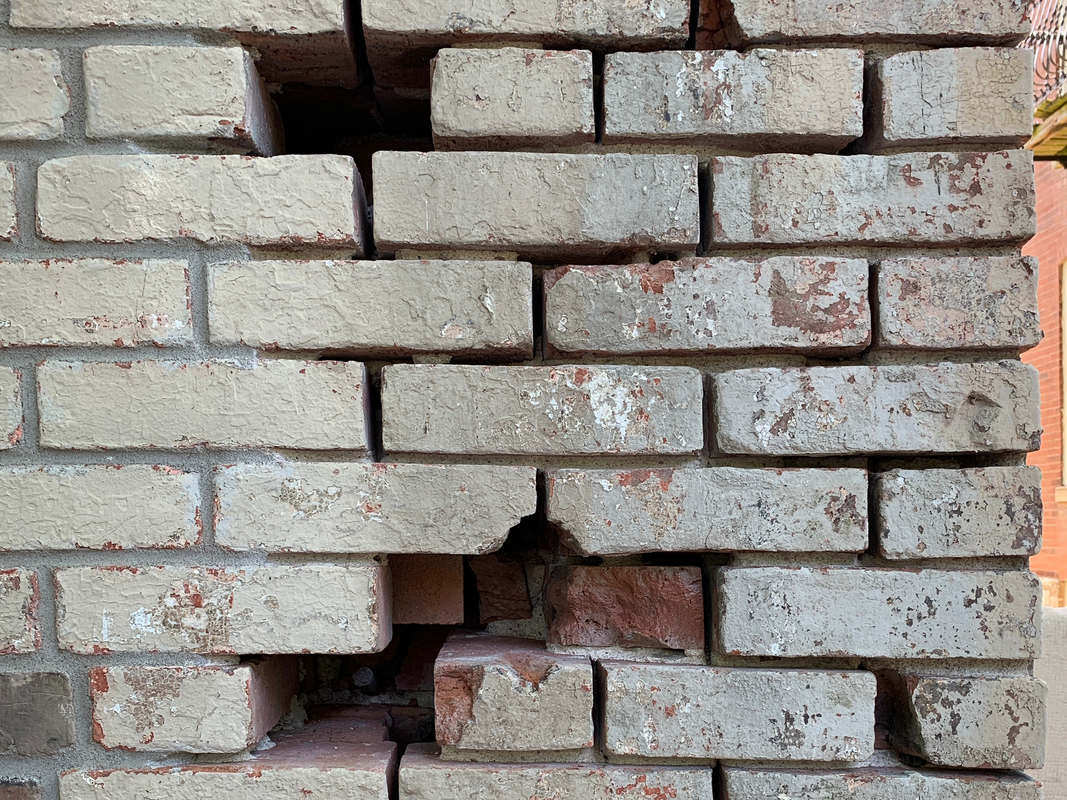 That's when things got interesting. I discovered a giant metal shaft of some sort in the wall, presumably driven from the interior side. That had caused one of the exterior bricks to crack into about a dozen different pieces, and I have no idea what purpose that steel rod served. 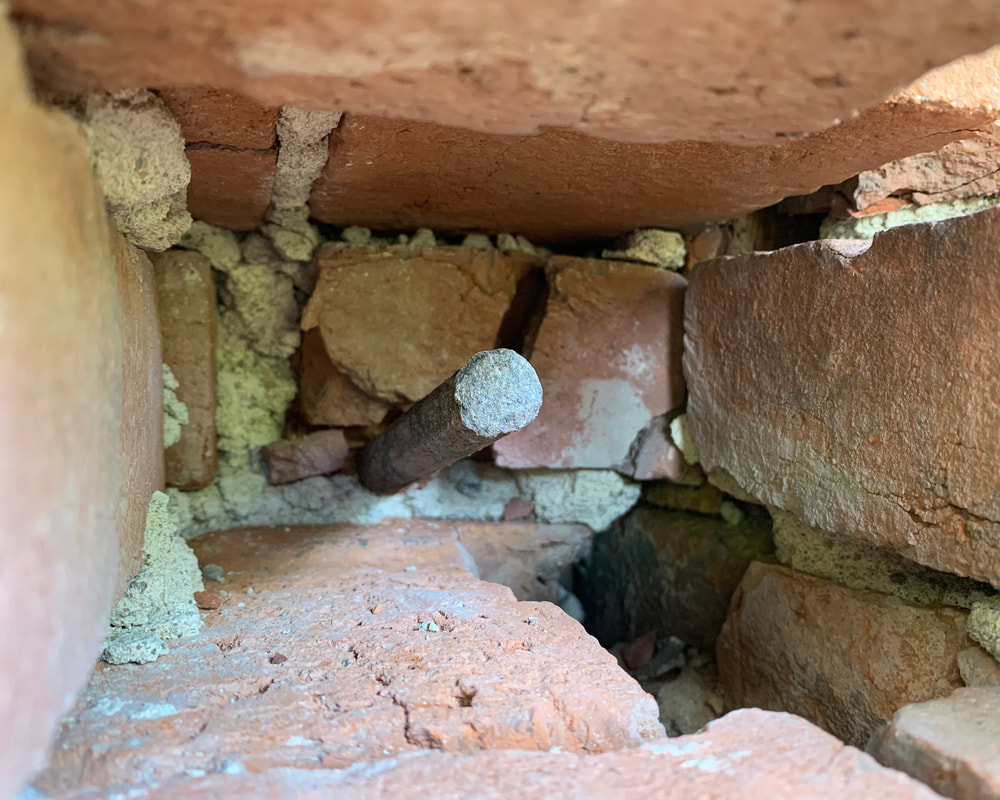 I also discovered - if hiding in plain sight counts as "discovered" - some big ol' nails that I assume held a downspout to the wall at one point. After looking, the nails continue off and on all the way up the wall where the current downspout is. 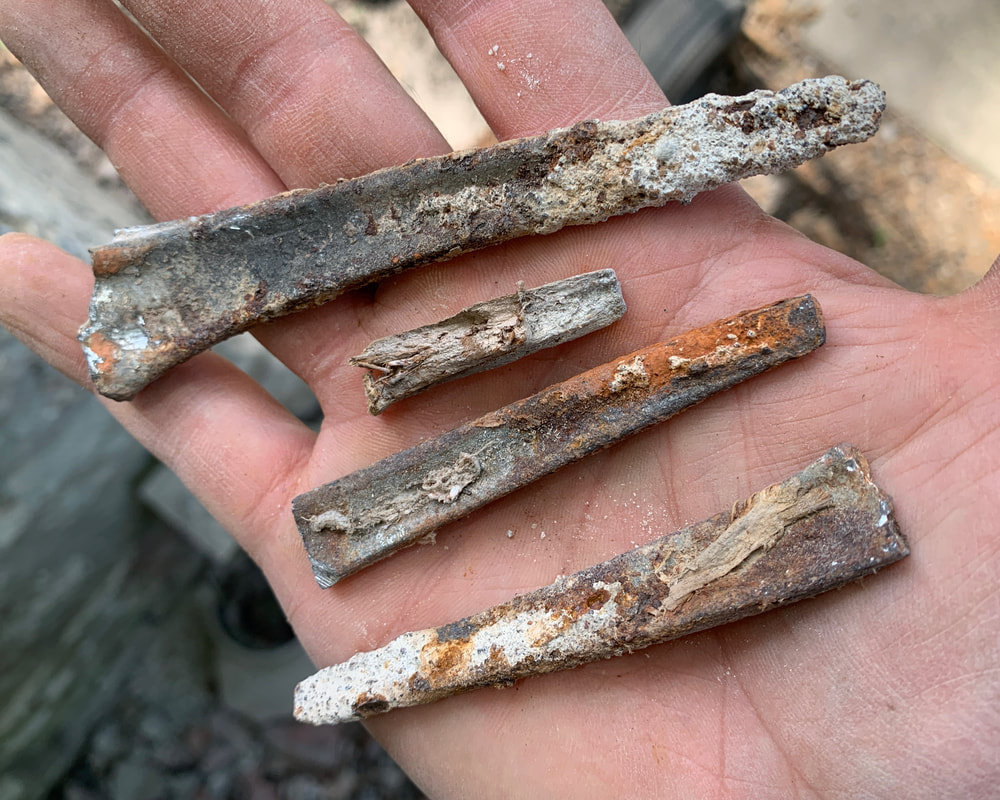 I went on about my business for a little while and then when I stood at just the right angle, I could see something else in the wall, in one of the removed brick cavities. I got on my tippy-toes and looked closer...it was a wad of newspaper. 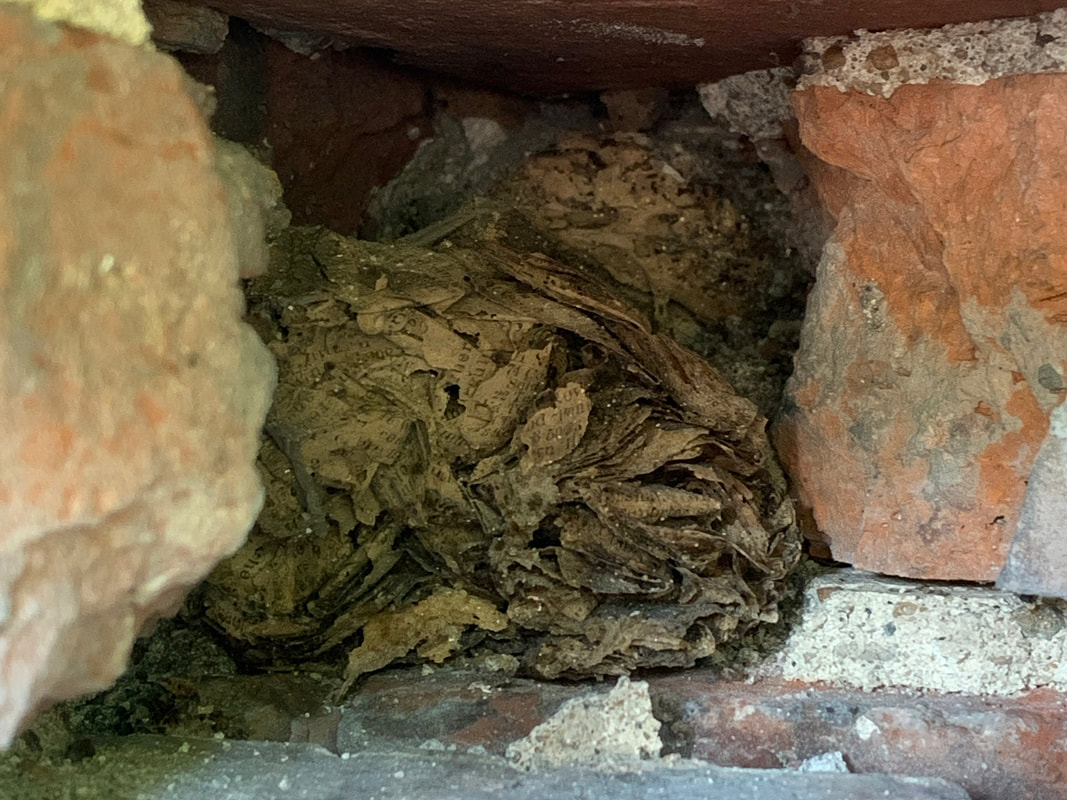 It looked to be pretty shredded and my first thought was...mouse nest. But then it occurred to me that the super tiny print meant the newspaper was really old and it had probably been used as backing for some interior plaster repair. I carefully removed the newspaper, which absolutely crumbles with just the lightest of touches, and put it in a bucket for further investigation. After work that evening I set out to see if I could determine what date the newspaper was from. Of the entire wad of newspaper, I was only able to successfully salvage maybe 10% and after a quick first glance, I didn't see any dates...but I did get a few clues that made figuring things out pretty easy.  I spotted a few mentions, fragments of mentions anyhow, of "St. Louis Globe-Democrat", which was one of the city's big papers for many, many years. 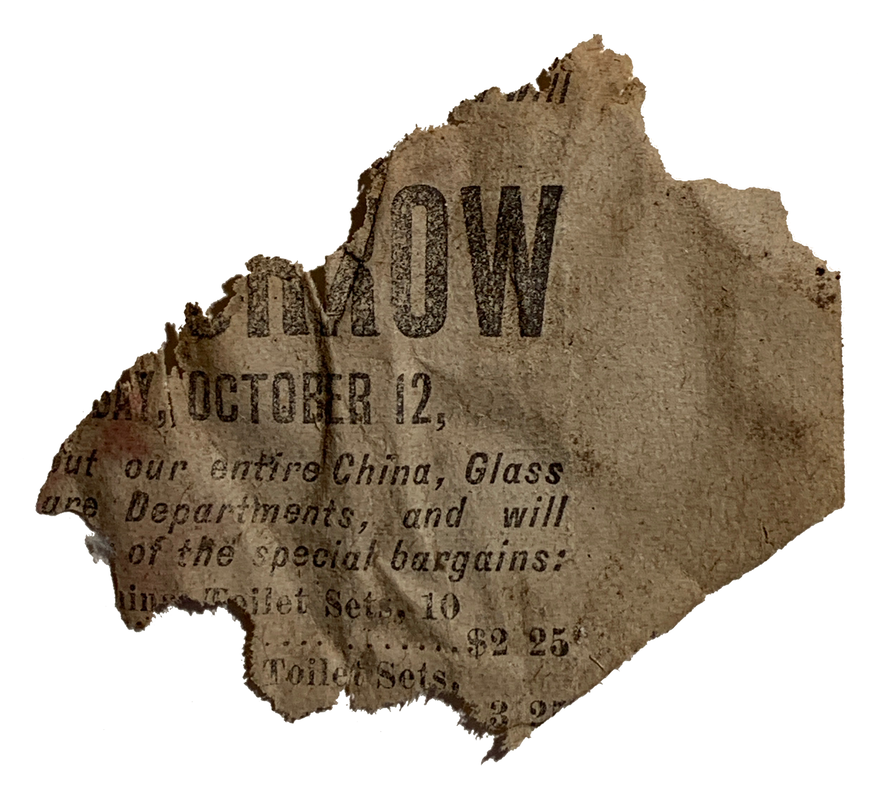 I also spotted a little clip that referenced October 12, with what I assumed was the word "tomorrow" above it, which meant I was probably looking at a newspaper from October 11...but what year? I grabbed a few more of the larger newspaper crumbs and looked for unique words or images that I could easily reference on newspapers.com. At first, I didn't have a lot of luck; I was getting thousands and thousands of search results, way too many to read through. But I kept trying, and eventually I came across this little fragment: 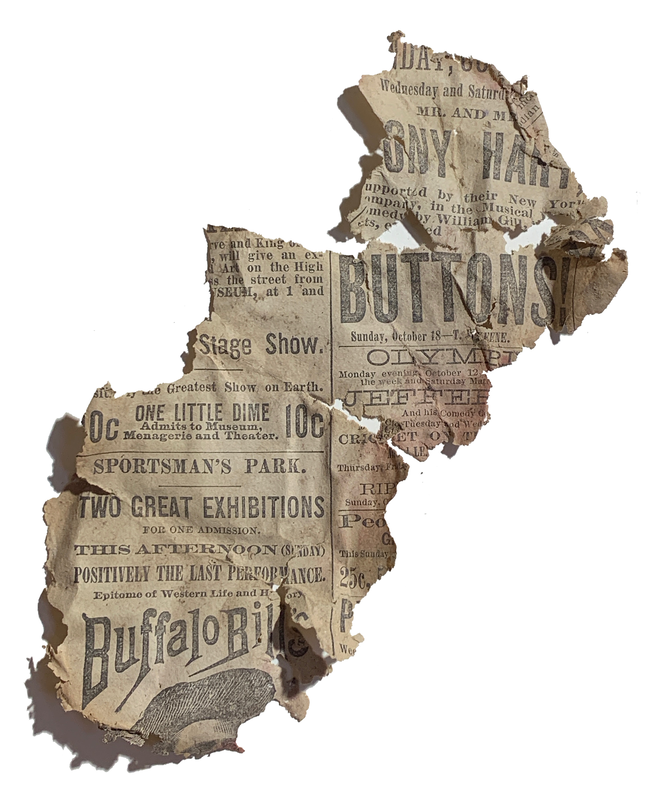 The word combination of "Sportsman's Park", which was home to a number of professional baseball teams going back as far as 1867, and "Buffalo Bill's" were unique enough when thrown into newspaper.com's search engine together that I only got a handful of results, all from 1885. 1885! I started looking through the search results while studying my little newspaper scraps to see if I could find something that matched. This was the scrap that solved the riddle:  See the little flag on top of the building? It says "Barr's". People local to St. Louis, and of a certain age, might recognize that as the Barr from Famous-Barr, except back in 1885 Barr's was known as the William Barr Dry Goods Co. and hadn't yet been merged with Famous Clothing Store (that happened in 1911). I'm getting off track. The point is, I had seen that same advertisement image in one of newspaper.com's search results. The date? Sunday, October 11, 1885. 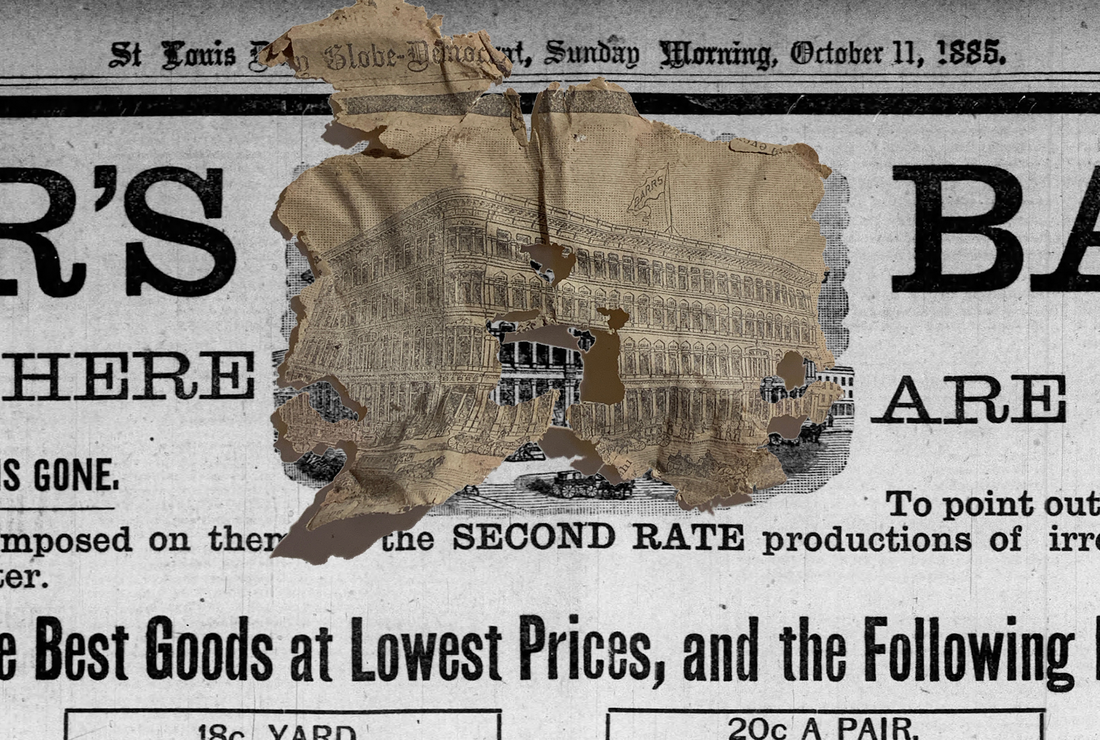 After a few more comparisons of my newspaper pieces and the October 11, 1885 edition of the St. Louis Globe-Democrat, it was confirmed...the newspaper stuffed into the wall of my house is from October 11, 1885, which is kind of mind boggling.  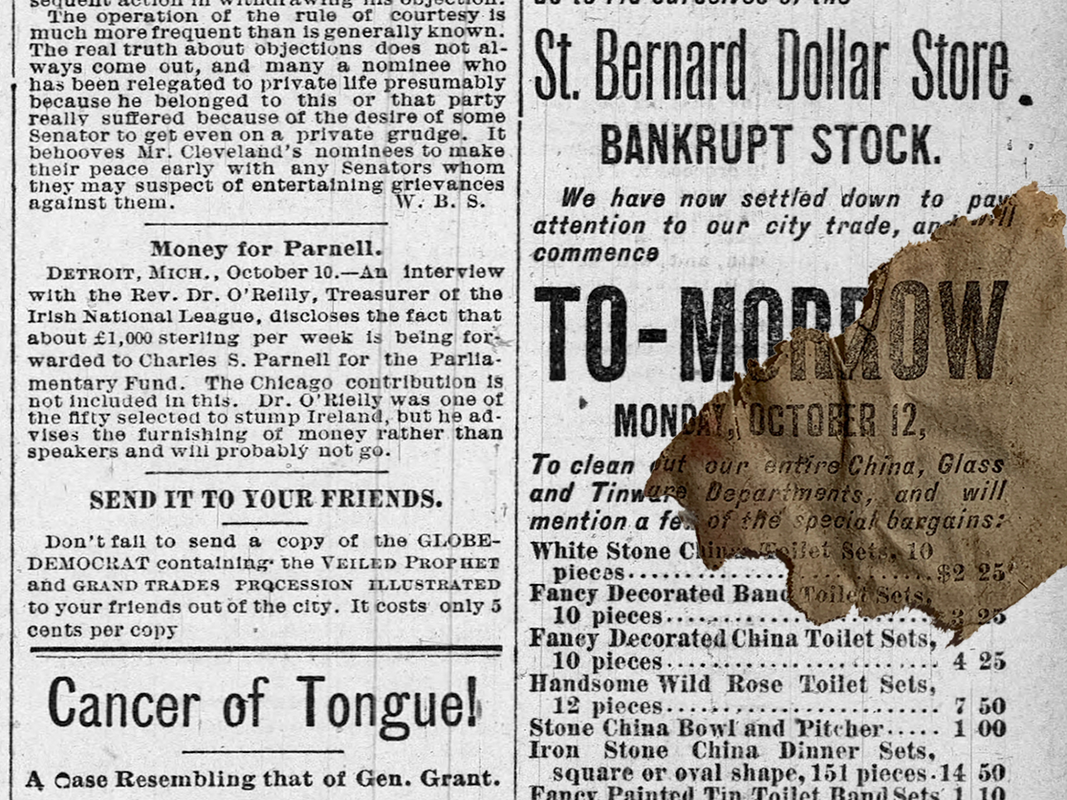 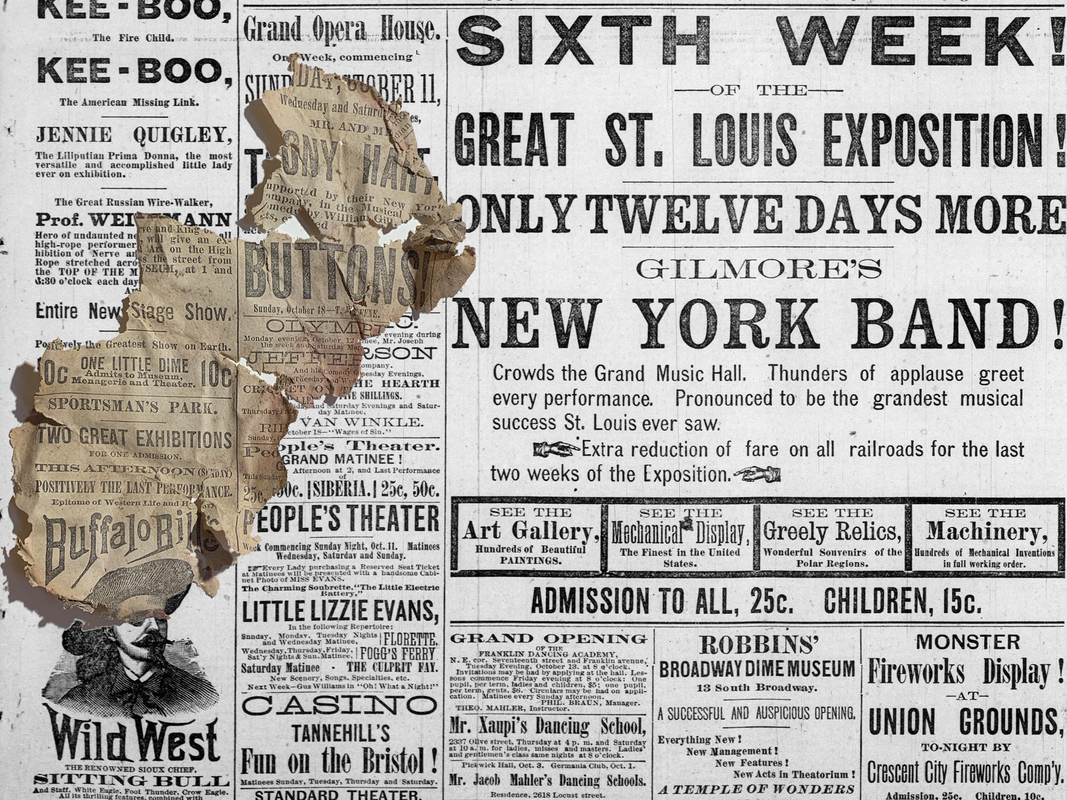 Here are the full newspaper pages the scraps were once a part of:
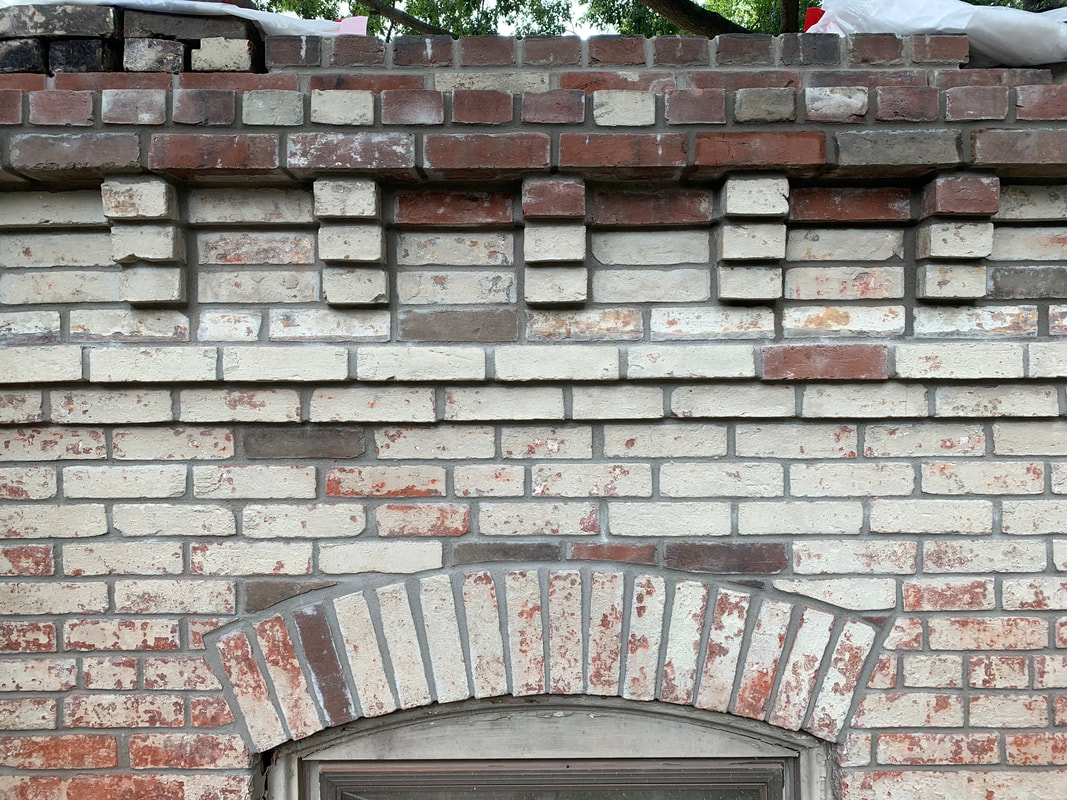
1885 was a looooong time ago, and even in the ridiculously fragile state the little newspaper crumbs are in, I really can't believe - given how much water had gotten into the wall and rotted out the mortar - some of the newspaper wad survived all these years. I was able to salvage a few more newspaper pieces than what I displayed here, but the Photoshop work involved in digitally laying my scraps over the full page takes forever so I stopped at four of 'em. I don't know what I'll do with the newspaper scraps or if it's possible to do anything to preserve them, but I'll definitely hang on the them. Now I'm kinda wondering if, when I get into some of the interior walls, I'll find any more... With the garden complete and everything growing, I turned my attention back towards the cistern area of the yard. Some brick repointing was part of the overall plan for that space and I figured I might as well knock that out - it's messy work - before I got the cistern fully demo'd and buttoned up. The brick that REALLY needed to be repointed was under the 2 bedroom windows, primarily due to water infiltration around the window sills and subsequent moisture in the wall. The area under the left window, which I redid a couple weeks ago, was mossy and the mortar was rotten, but the wall was otherwise still fairly solid. 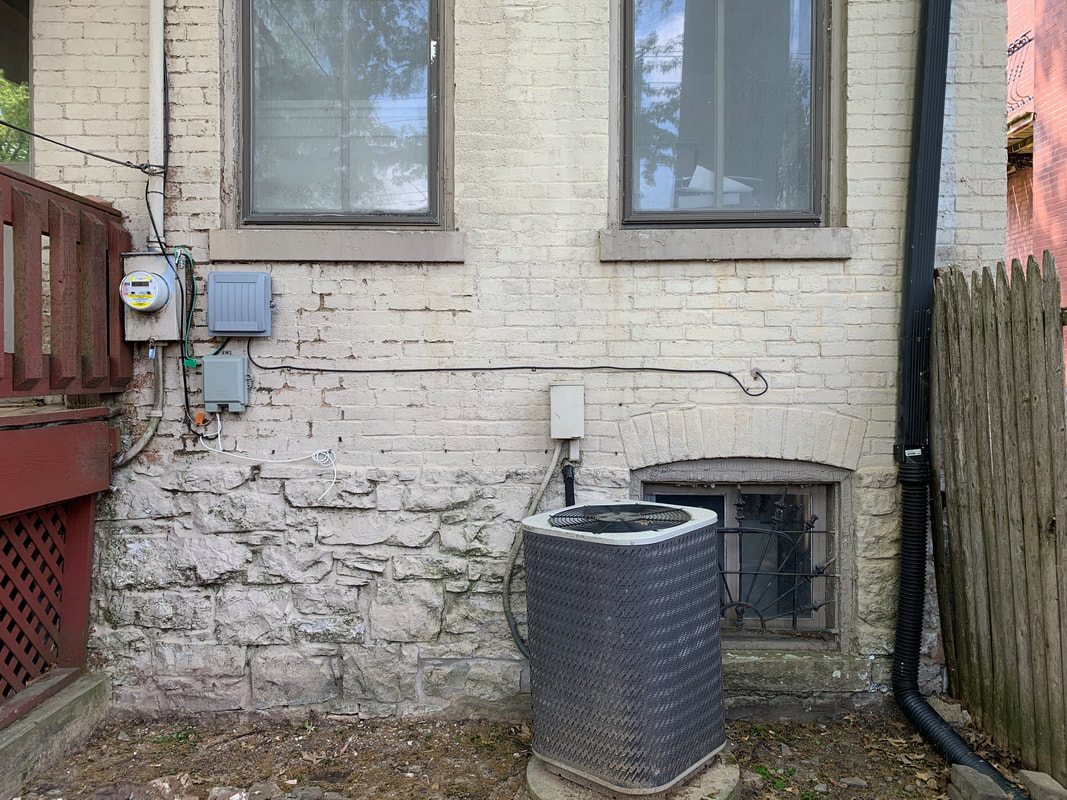 The area under the right window had a bunch of stair step cracks, it had definitely been (poorly) repointed in spots previously, and if I tapped the wall with my fist, I could feel it vibrate a bit -- aside from the cracks, the lower section had delaminated. 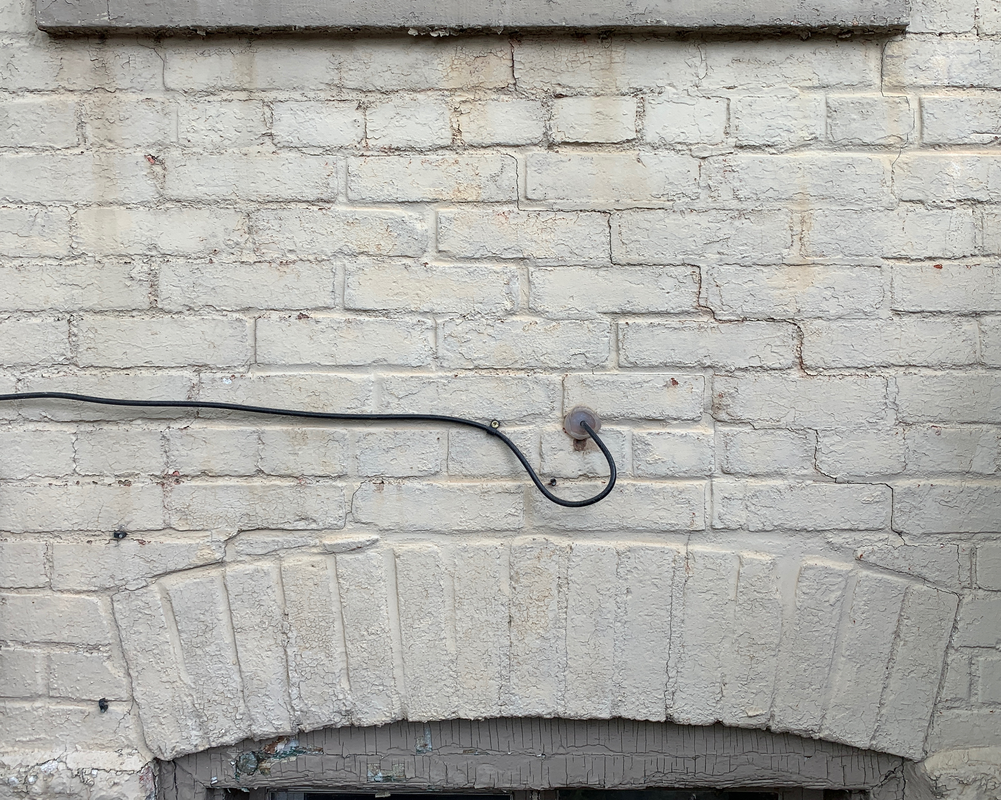 The arched section bowed out of the plane of the rest of the wall by about 1/2" and I knew that once I started raking out mortar, the bricks would be pretty easy to pull right out of the wall. 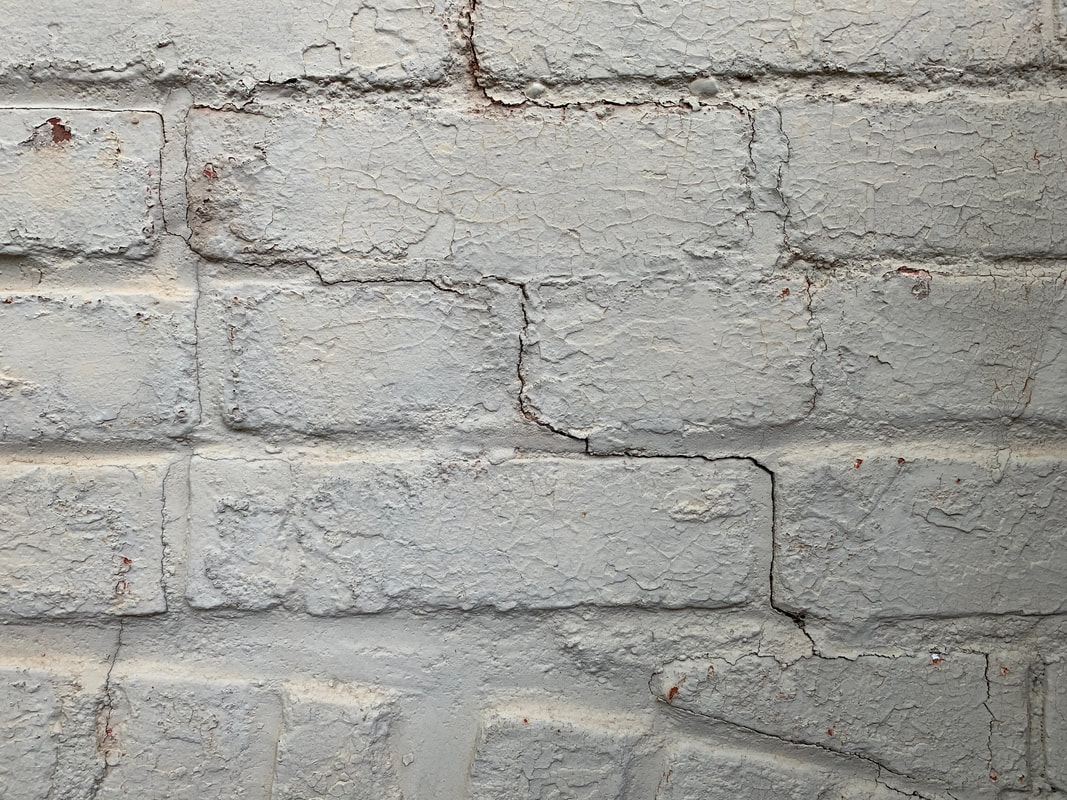 Those areas where the mortar looks a little smoother and flatter than the rest of the mortar, that's where somebody repointed previously. Given the shallow depth of the repointing and incorrect mortar (way too hard), it wasn't a real surprise that the wall cracked and delaminated regardless.  As I suspected would happen, it didn't take long to pull the arch apart.Those arches are super strong when fully assembled and working as a unit, but once a single brick gets loose, the whole thing becomes a house of cards. Also, as suspected, the inner wythe's mortar was garbage as well. 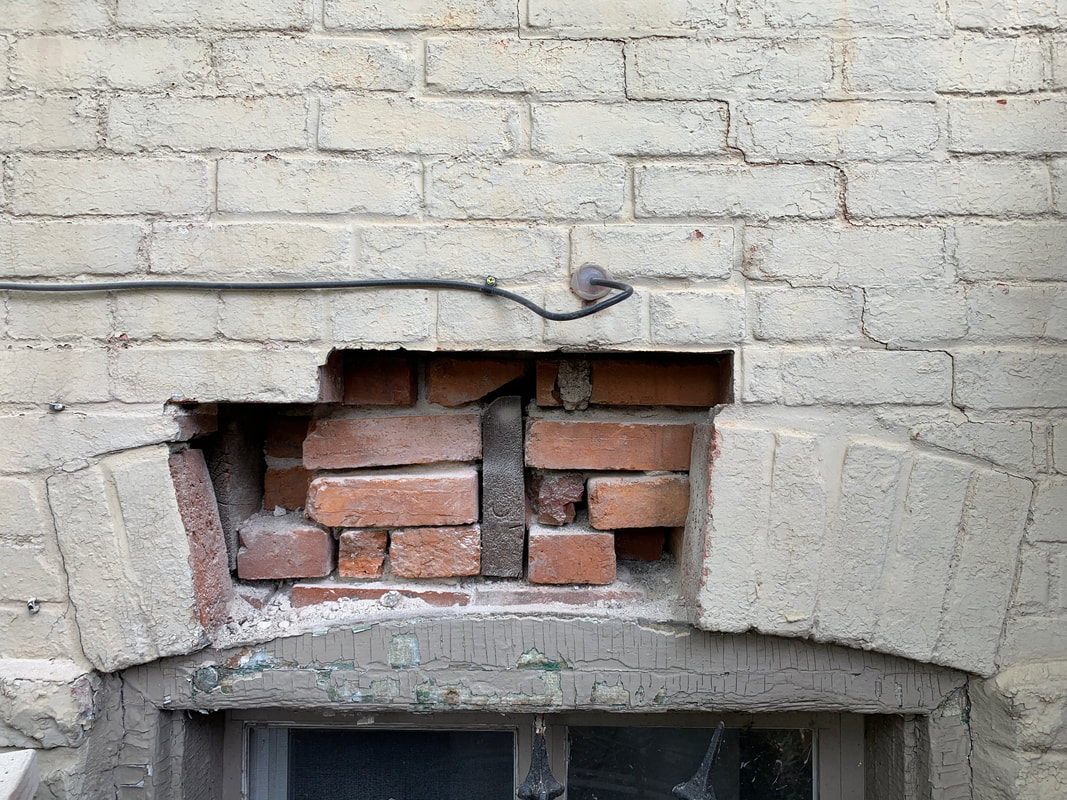 I was surprised to discover that the wall is 3 bricks (wythes) thick; every other wall I've gotten into so far is only 2 bricks thick. Once I got about as many bricks pulled out of the wall as I could before things got sketchy, I started repointing the exposed part of the interior wythe and then resetting the exterior bricks. 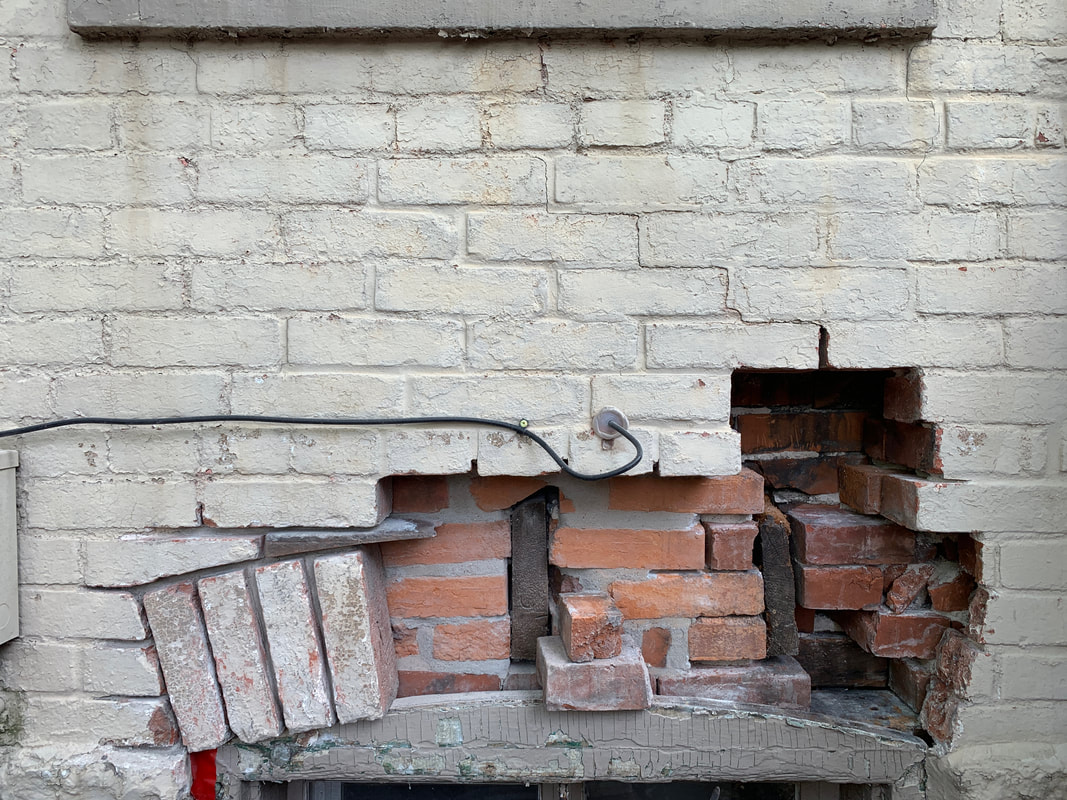 Before I started resetting the arch bricks, I ran a little self-adhesive flashing over the top of the basement window. The bricks sit on that, and I'll replace the whole window before too long so it was kinda moot, but you really don't want bricks and mortar sitting right on top of the wood; the masonry has a way of wicking moisture and if it's in contact with wood, the wood will rot eventually. The flashing provides an impervious separation between the wood and the masonry. 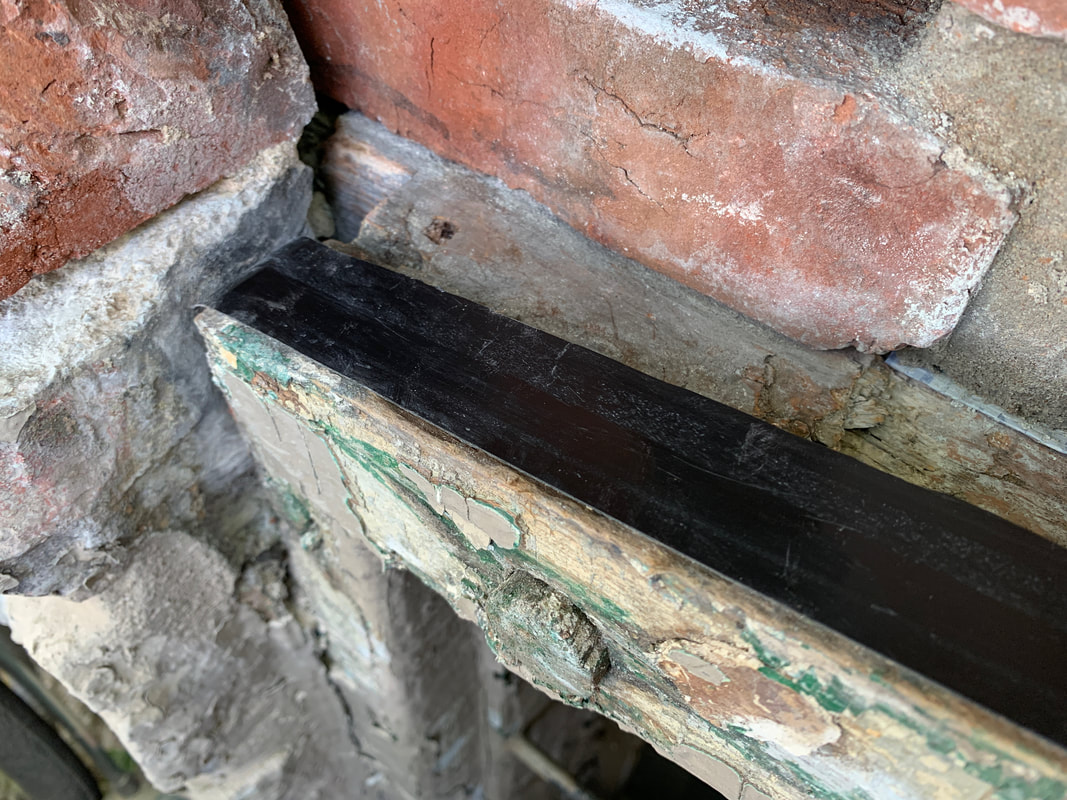 I also used a little house wrap to do the same thing where I didn't have enough space to finagle the sticky flashing. 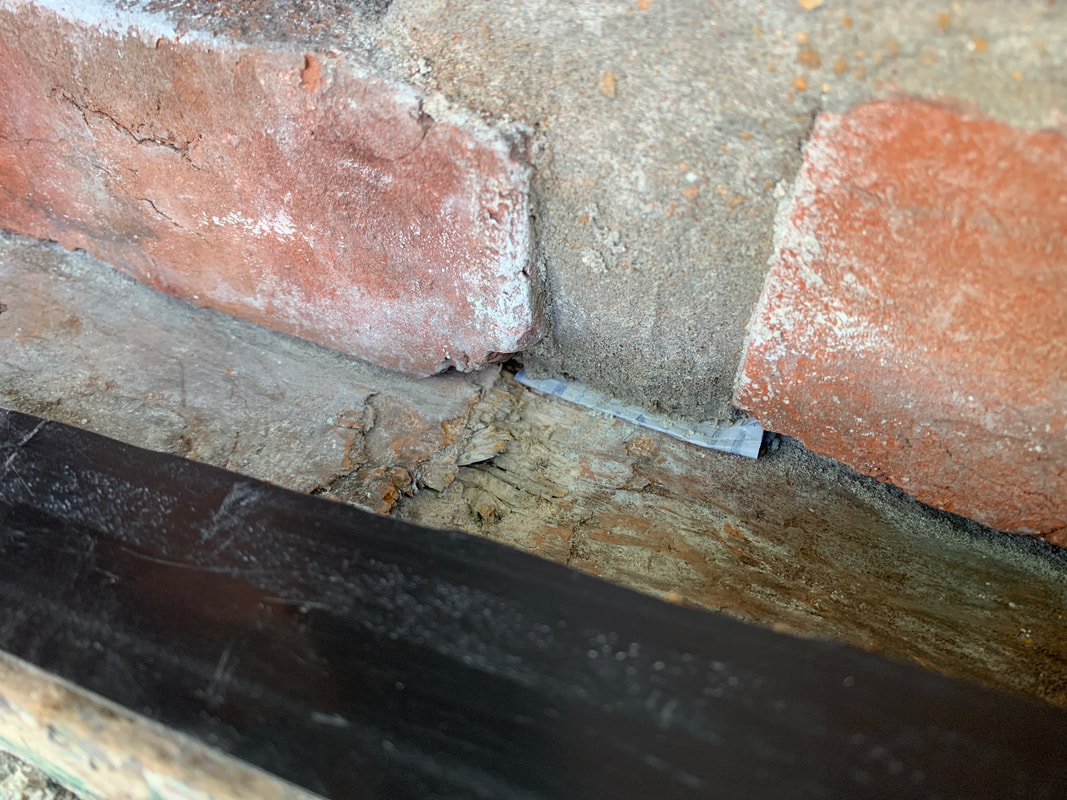 Once the arch was reset, the work went quick. Unfortunately, I kept finding bricks that came out of the wall way too easily and I wound up having to reset about a dozen bricks above the arch. 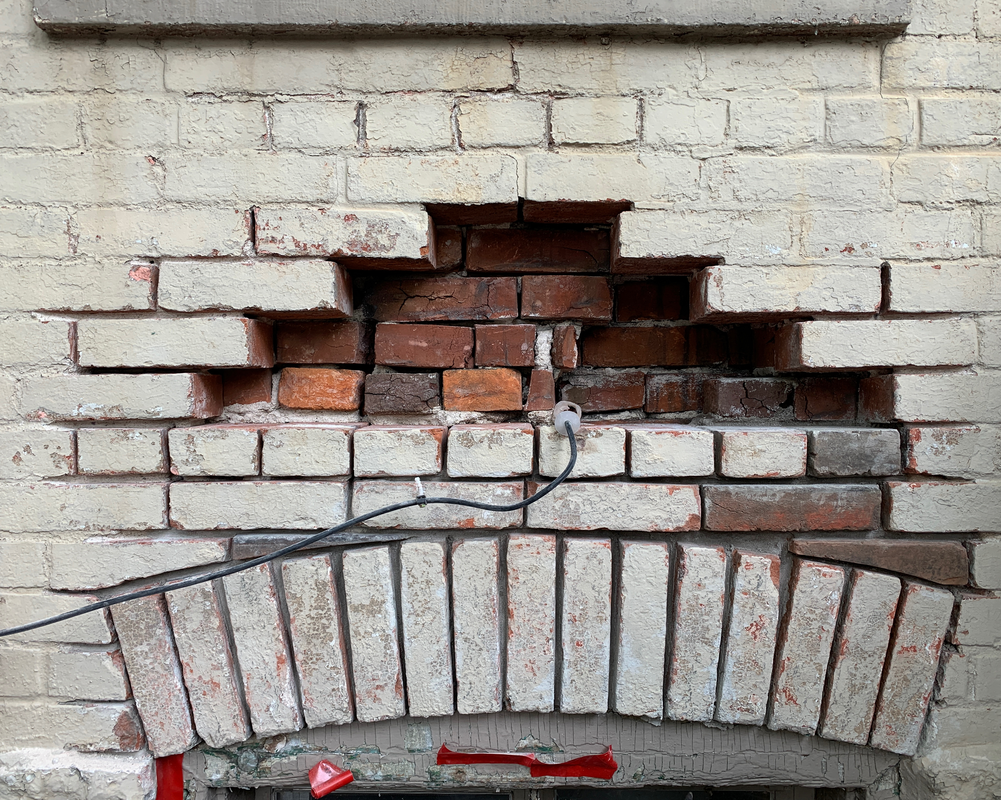 I eventually removed mortar from every joint in this little section of wall. Mortar removal is a lot like using a nail gun...fun to pull the trigger, but pretty easy to shoot 17 nails when only 3 or 4 are needed. Sometimes I get a little carried away with the mortar removal but...if I'm gonna do it, I'm gonna do it.  The repointing effort turned out pretty well. No more vibrating wall, no more cracked joints, no more delamination. I still need to reattach the coaxial internet cable, but that can wait for a minute. 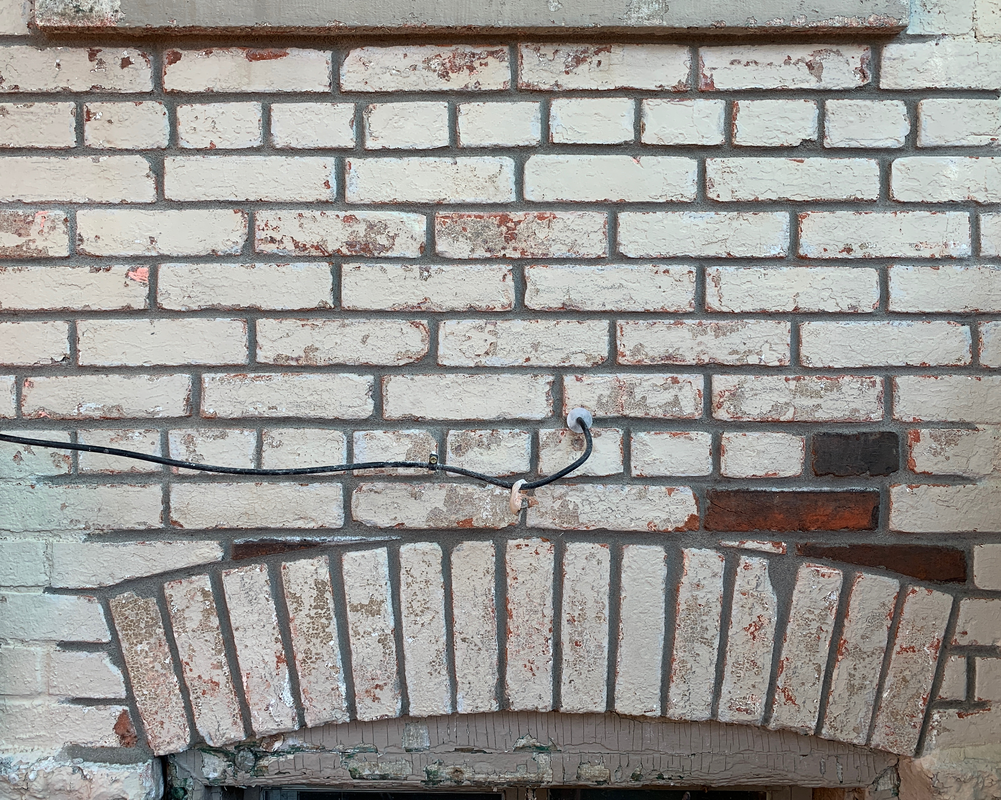 The mortar is different colors due to one side having been curing several weeks longer than the other, but it'll even out in a few days. And the best part? Aside from this section of wall being super solid, I'll NEVER have to repoint it ever ever ever again. 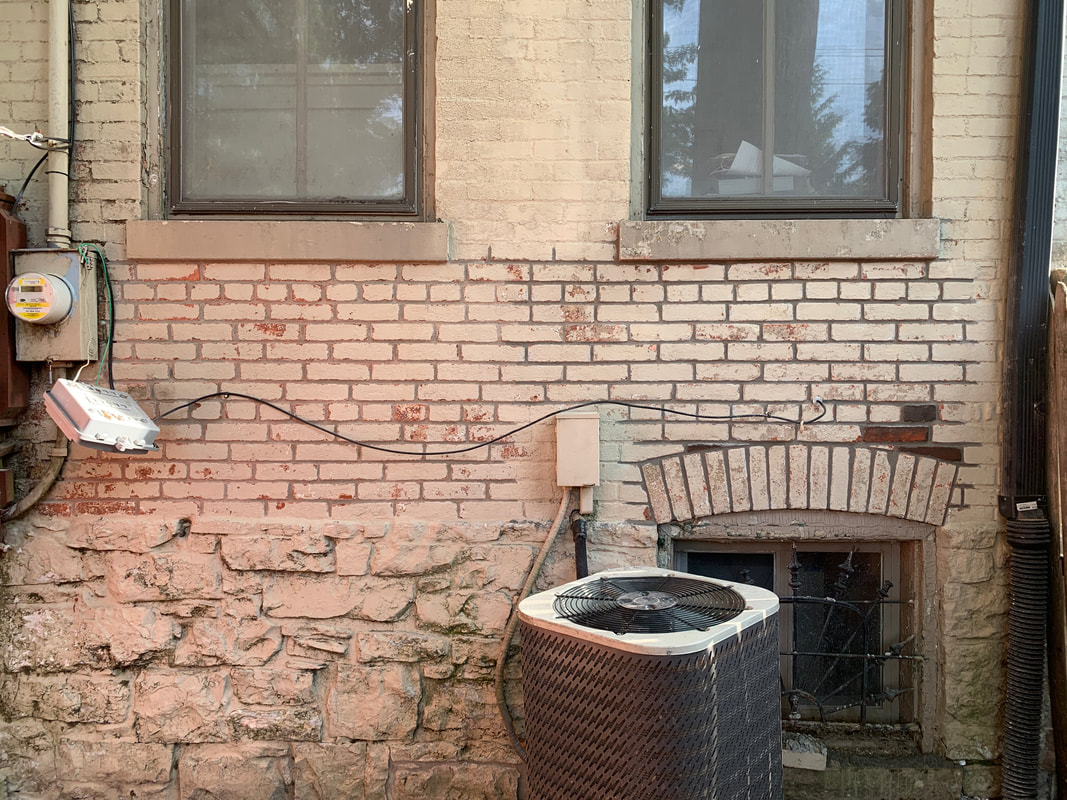 Now I can get back to the cistern, finish 'er up, and then replace a little section of fence... |