|
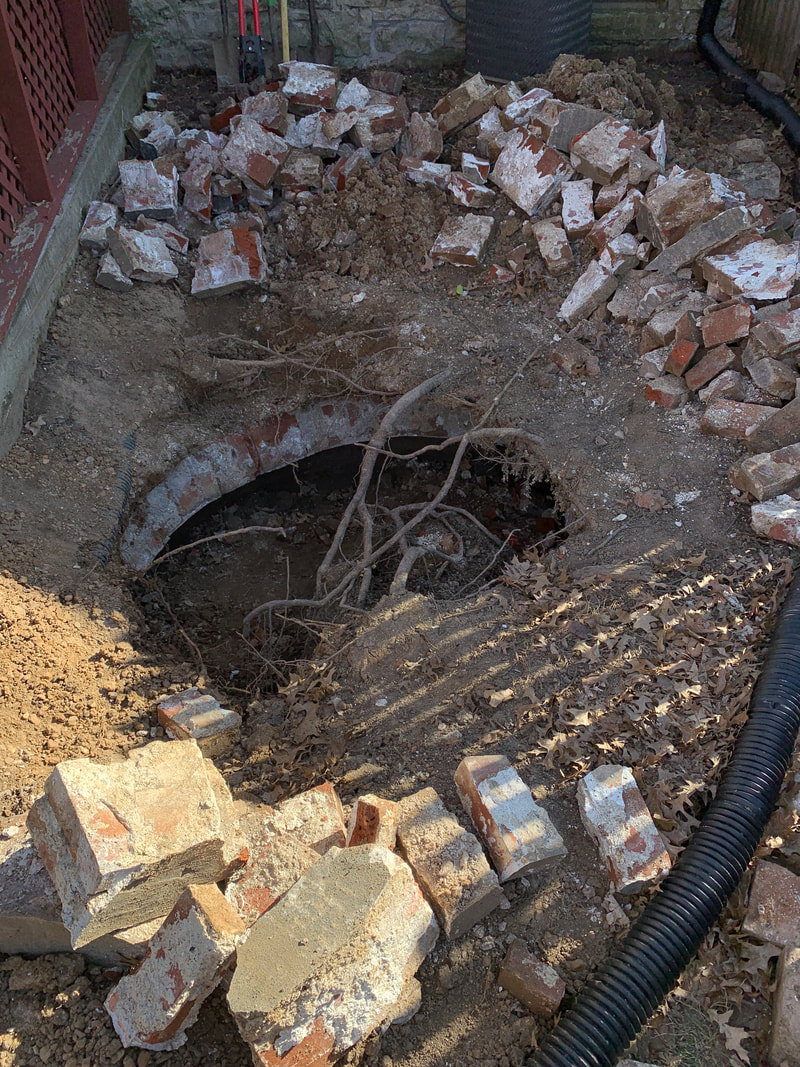
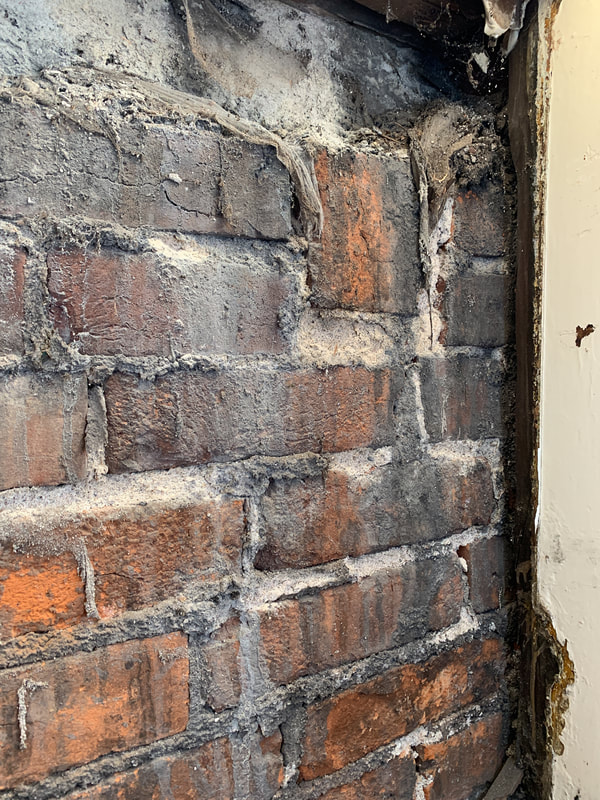
I was born with somewhere in the neighborhood of 18x more stubbornness than the average individual. This has been both a blessing and a curse. The cistern story, at least the part where I'm involved, starts a couple years ago. A funky little depression I'd noticed in the brick paving behind the house led me to pull up a couple bricks and stick a shovel in the ground. 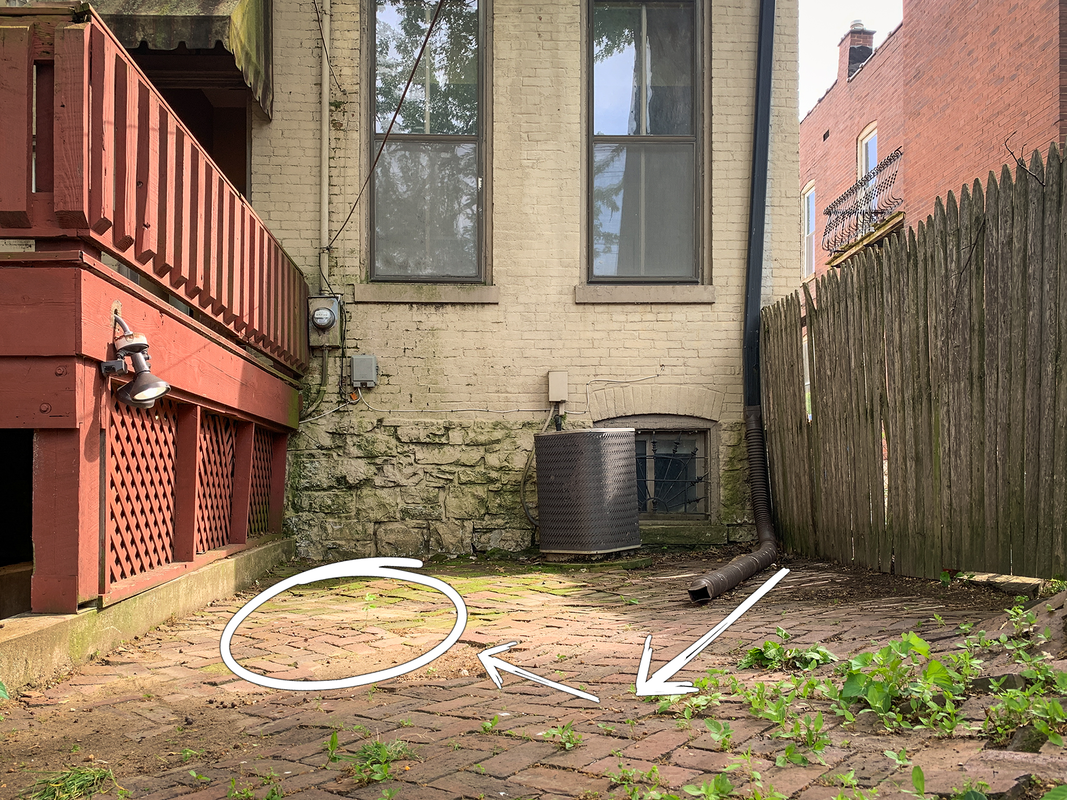 Long story short, the dirt under the removed bricks fell into some kind of void and, after additional digging and poking around, I realized that I'd discovered the house's cistern, still fully intact (but only partially filled in). 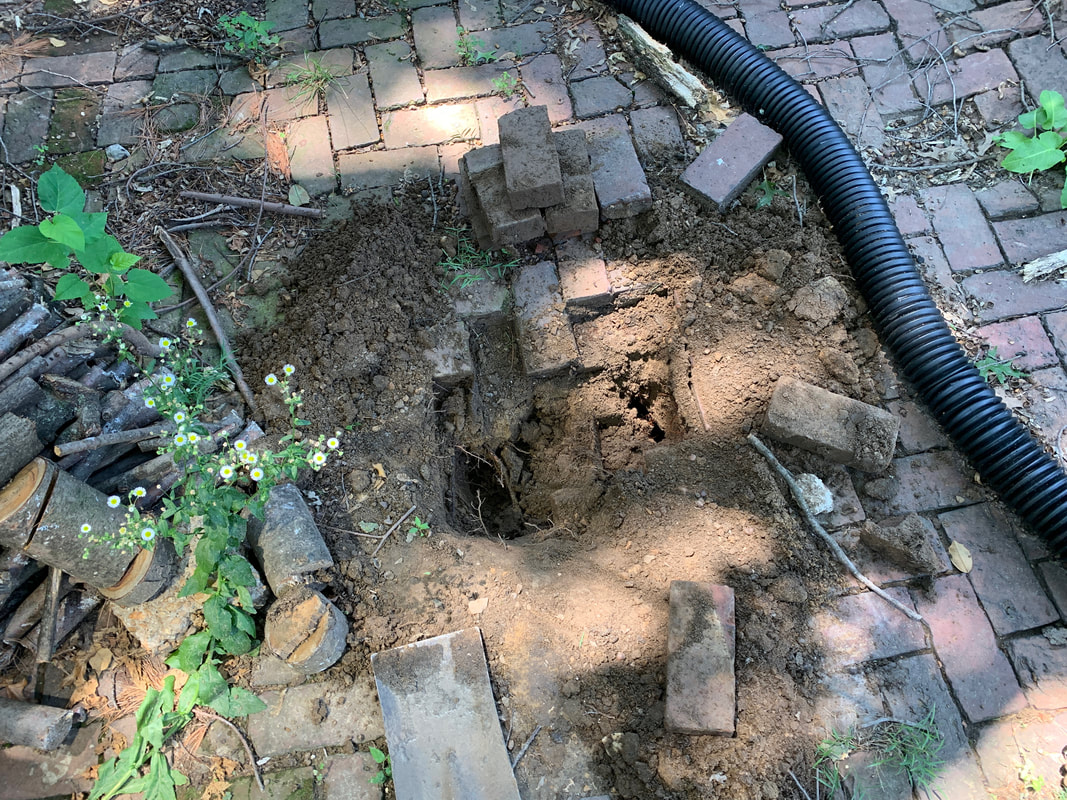 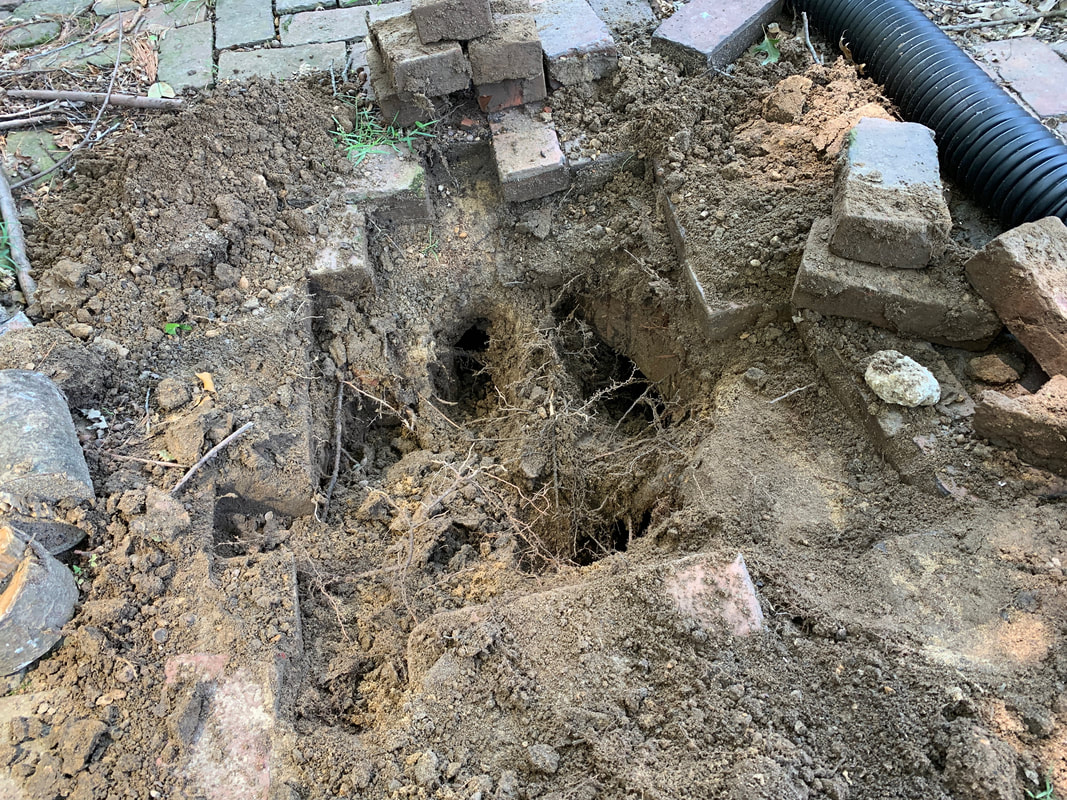 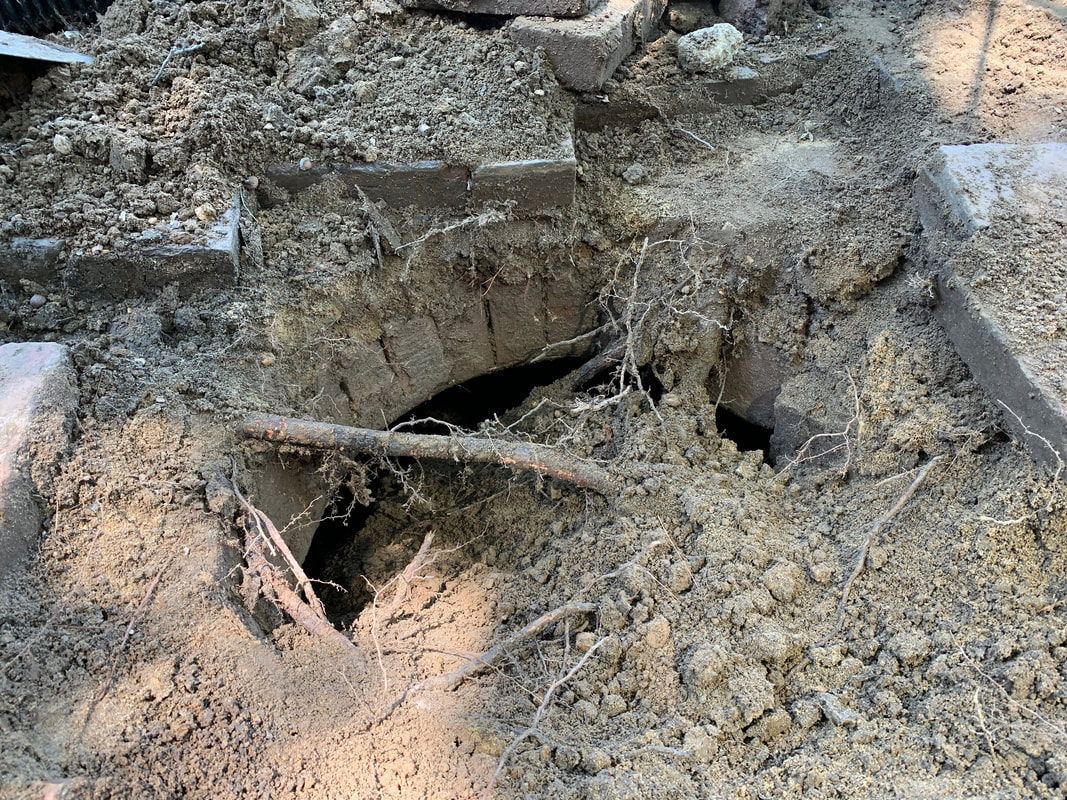 What's a cistern, you might be asking yourself? It's basically a big underground tank that holds water, and was entirely essential for sustaining life before the advent of indoor plumbing. How'd the water get there, you might be asking yourself? Rain would land on the roof, travel to the gutter, travel to the downspout, and the downspout would be piped underground into the cistern. It wasn't the cleanest of water, but it was water. A hand-operated pump above ground would bring the water up and out of the cistern. The cistern at my house is shaped about like this, although when I started digging I had no idea the thing was 6' deep (and 7' deep at its peak): 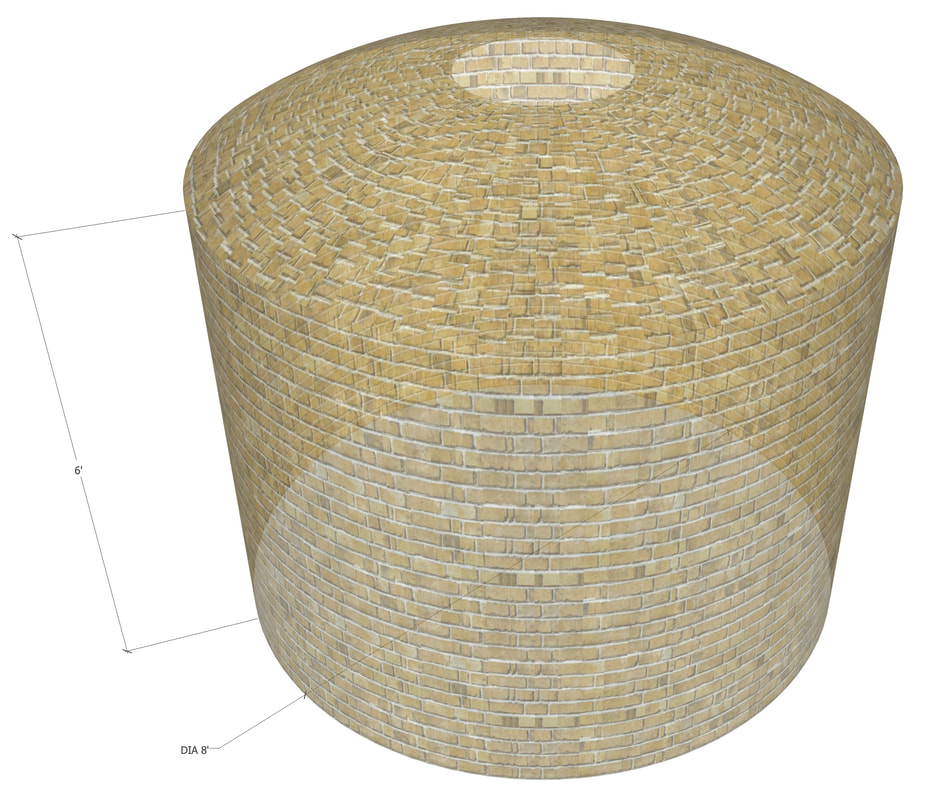 Anyhow, up until yesterday, that section of the yard - and cistern opening, a 24" diameter brick-lined hole - looked like this: 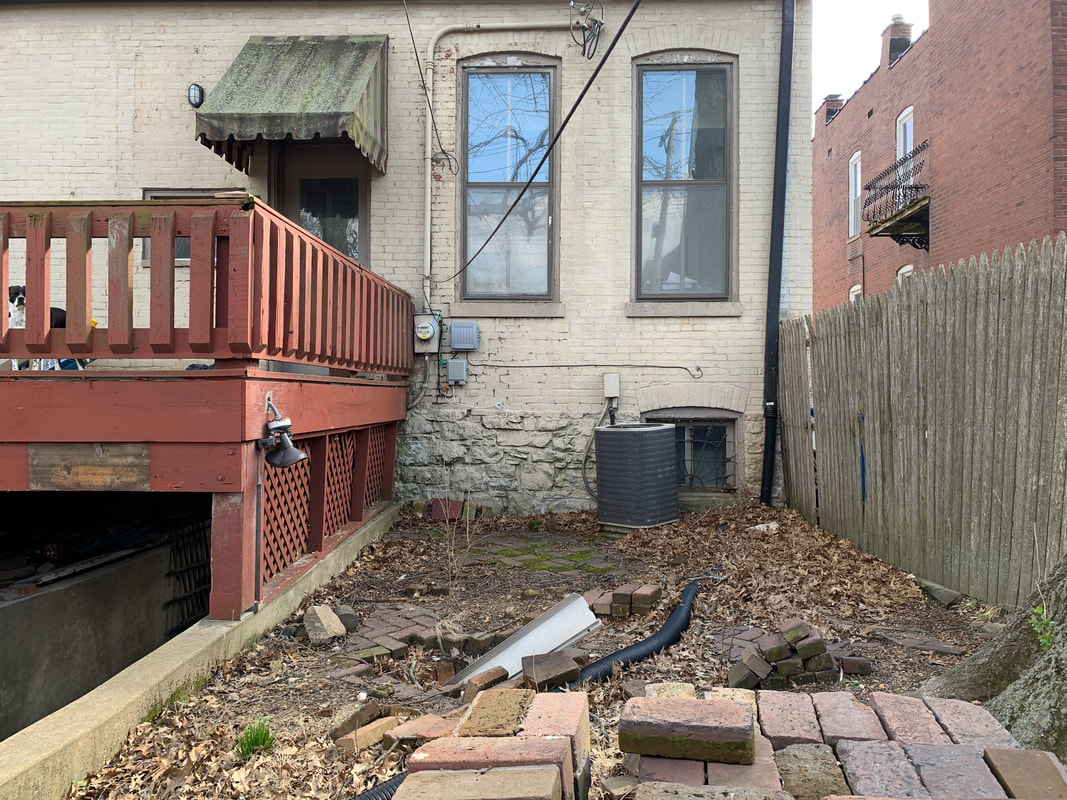 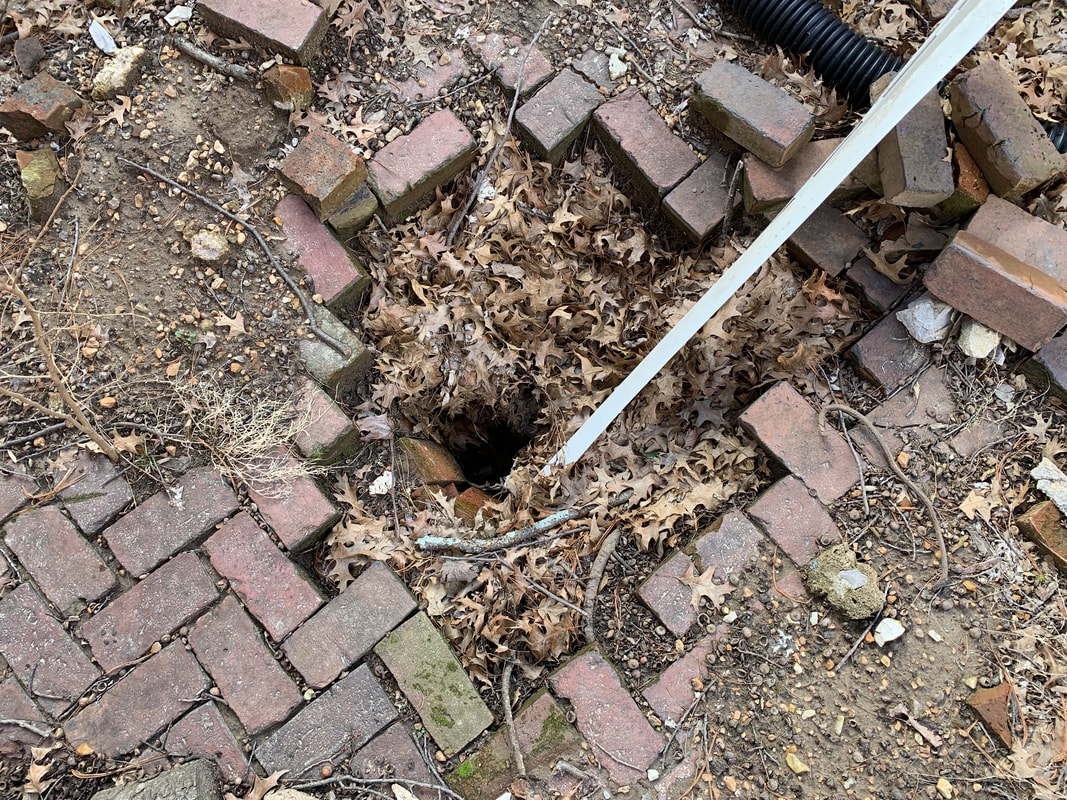 There's a litany of projects to be undertaken in this part of the yard and I didn't want to deal with the cistern until I was ready to tackle everything else, so I left it as-is. Until a couple days ago. On Saturday I pulled up all the bricks in that part of the yard, and foolishly had high hopes for fully excavating the cistern over the next couple weekends. See those bricks in the left center of the pic? That's the cistern opening. 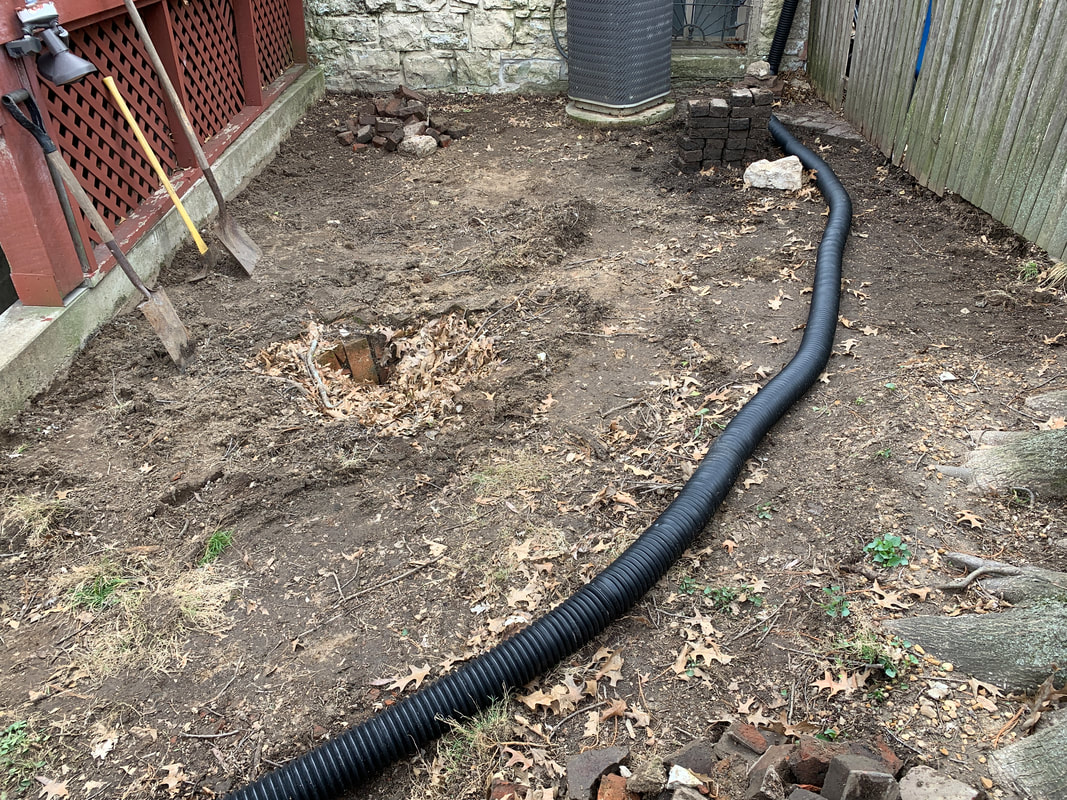 I knew there were tree roots growing across the top of the opening. They're the reason I didn't cover the opening or do anything to keep something from falling in; everybody that lives here is much too large to fall through that web of roots. My goal was to find a spot outside the cistern, dig down 3 or 4 feet, and get a good look at the structure from its exterior. I can't explain why, maybe it's my engineering background, maybe it's my infatuation with old school craftsmanship, but I wanted to see the thing before I demo'd it. I felt like the greatest chance of dodging oak tree roots while digging was to dig on the side of the cistern opposite the tree, so I cleaned up the cistern opening a bit and started digging in that direction. And of course, tree roots. Everywhere. 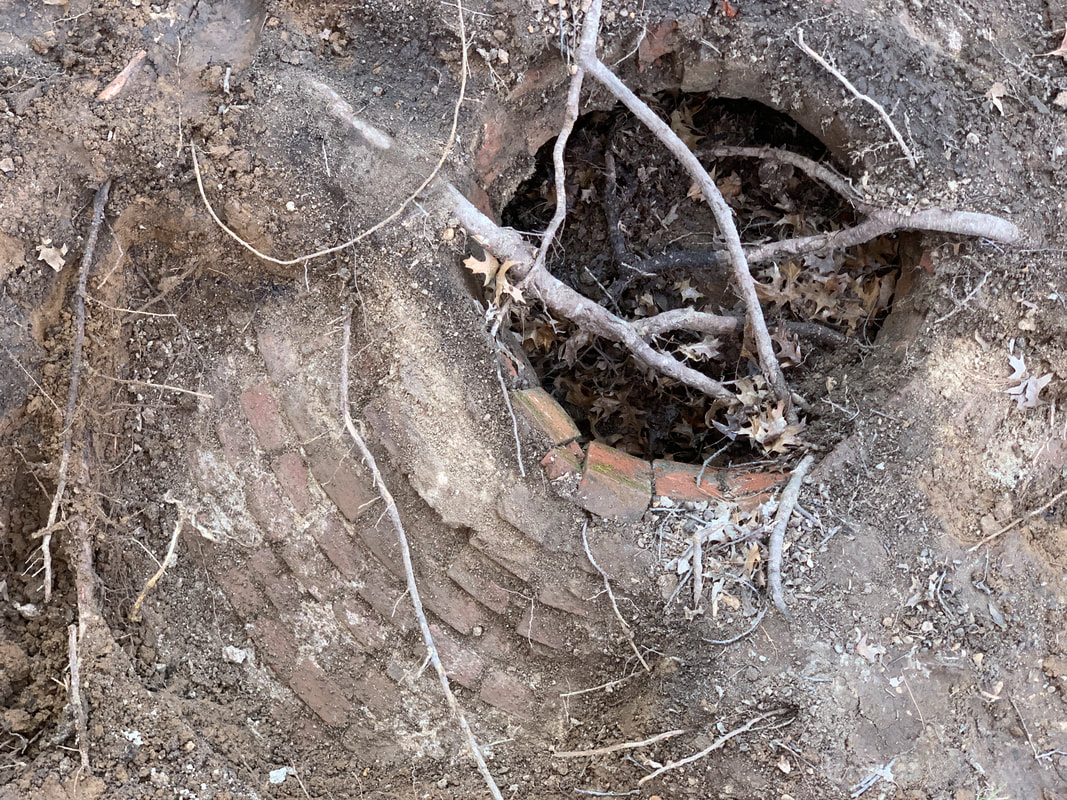 I dug about as far as I could and then tried a few other spots, trying to avoid tree roots. No luck. The oak tree roots crisscross and zigzag all over the place. I tried, and I tried, and I tried - remember that stubbornness comment I made to start things off? - but I just couldn't find a patch of dirt without tree roots. Also, due to recent rain, the ground was super saturated and digging up nothing but mud pretty much sucks. I started to question how much digging I really wanted to do, and how much room I realistically had to do so. It's pretty cramped over in that part of the yard and having the energy to dig up many cubic yards of dirt is one thing; having a place to dump it is another. After about an hour of walking laps around my little excavation while rationality and stubbornness - I did NOT want to give up on my original plan - waged war against each other in my head, I decided to resort to the backup plan. I decided to collapse the top of the cistern, fish out all the brick, and make the thing safe to work in. I told myself that, at the very least, if I wasn't gonna get to see the exterior face of the cistern wall, I was at least going to remove all the dirt from inside the cistern and see its bottom (and maybe some rad leftovers from the 19th century). I went inside, grabbed my big pry bar, and figured I'd have the cistern's lid popped apart in no time. In terms of this line of thinking, mistakes were made. Many, many mistakes. 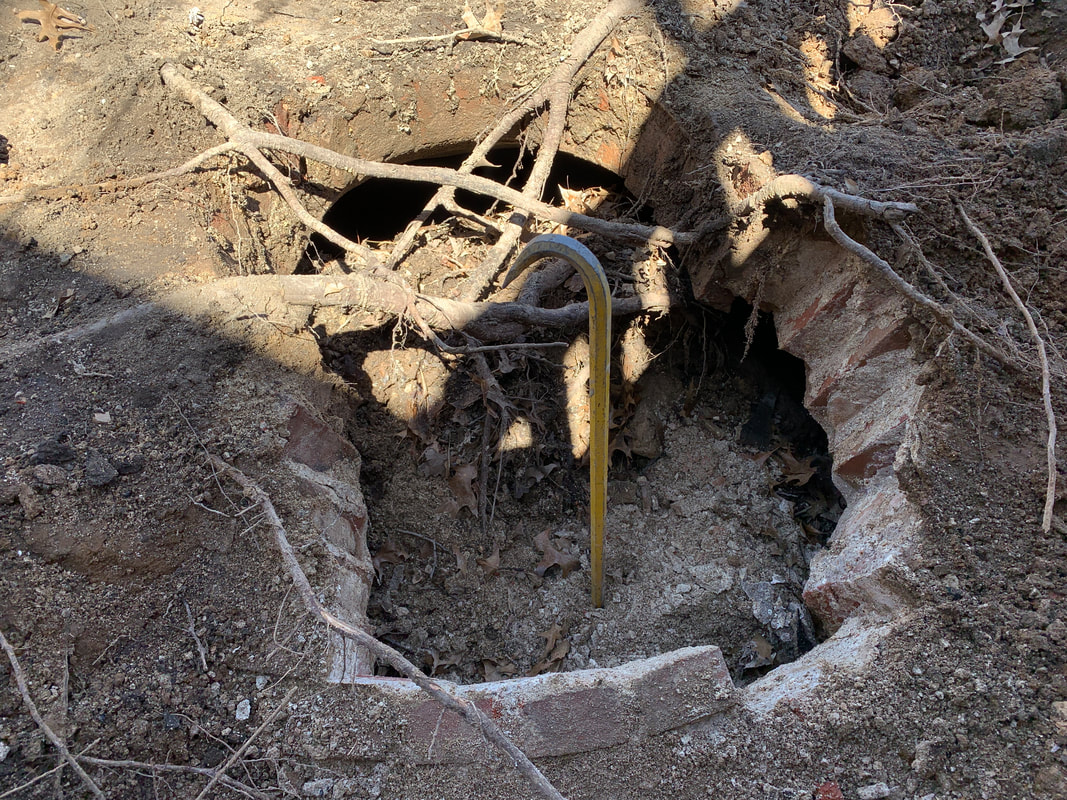 I underestimated the cistern's strength by comical proportions. Just getting a couple dozen bricks removed from the cap was WORK. I've repointed a lot of the brick and limestone throughout the house and about 50% of the time, the existing mortar is absolute trash. Somehow, the mortar used in this structure, below grade and subject to dirt and water every bit as much as, say, the side of the house, is stupid solid. After a couple hours I had at least widened the opening enough that I could safely stand inside the cistern and work from there, but the big pry bar wasn't cutting it. I went inside, grabbed a hammer and cold chisel, and figured - again, ridiculous amounts of incorrectly - I'd plow through the rest of the cap in no time. 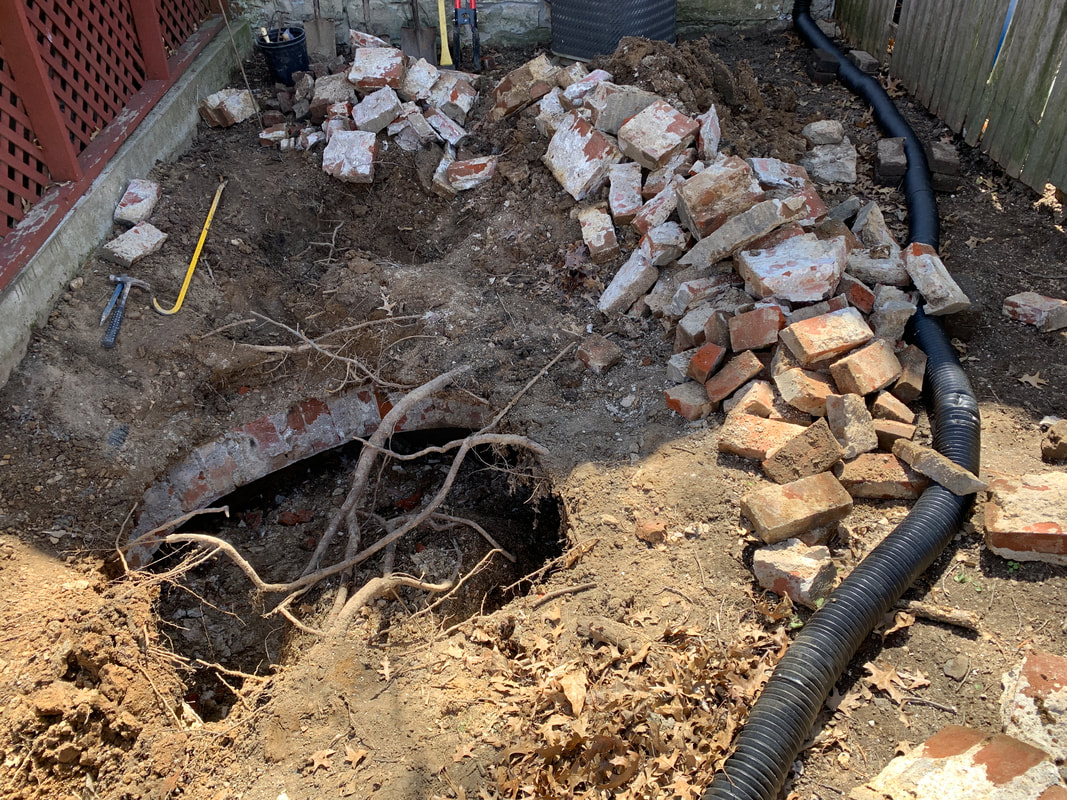 Truth is, a demo hammer would have been the perfect tool for the job but I don't own one, it was too late in the day to go rent one, and I didn't want to drop $800+ on a tool for a job this small. So I kept banging away with the hammer and chisel. 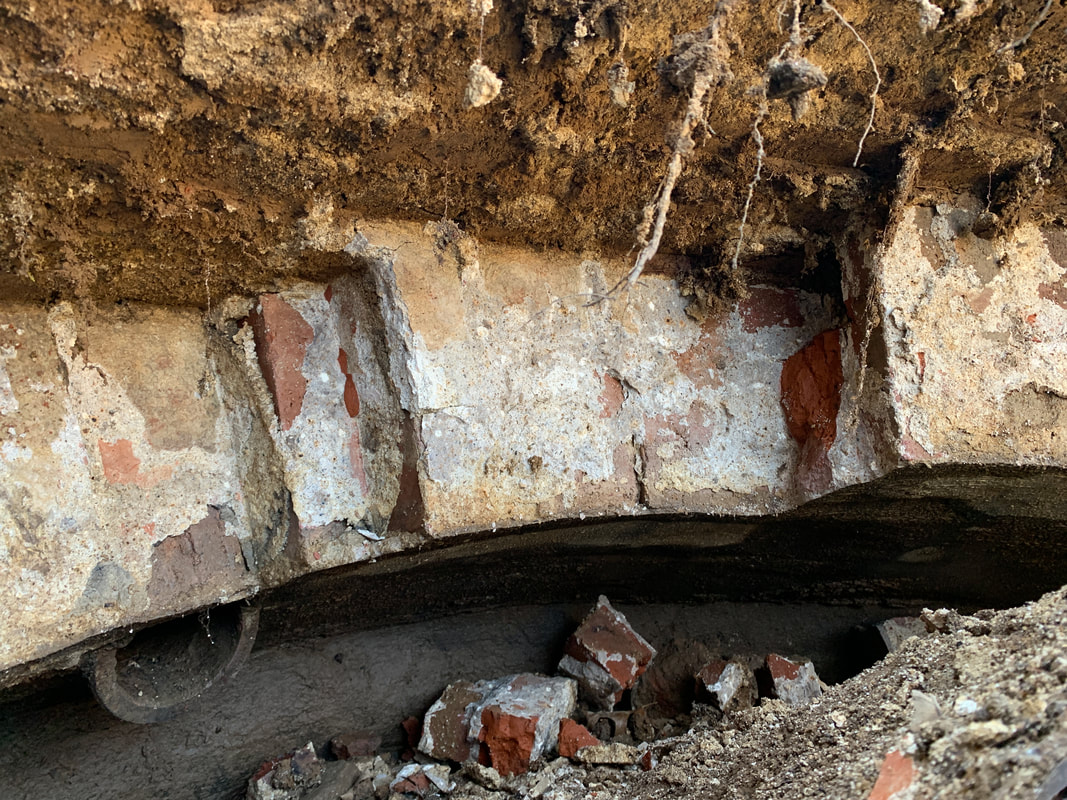 Once I got enough brick and dirt removed to where I could crouch down and halfway comfortably see the walls of the cistern, I noticed the inlet pipe. The other end of it is very much sticking up above ground at the corner of the house where the existing downspout drops from the gutter. I also noticed one of Freckles' footballs; she must have dropped it down there while chasing squirrels or, more likely, the resident neighborhood possum. 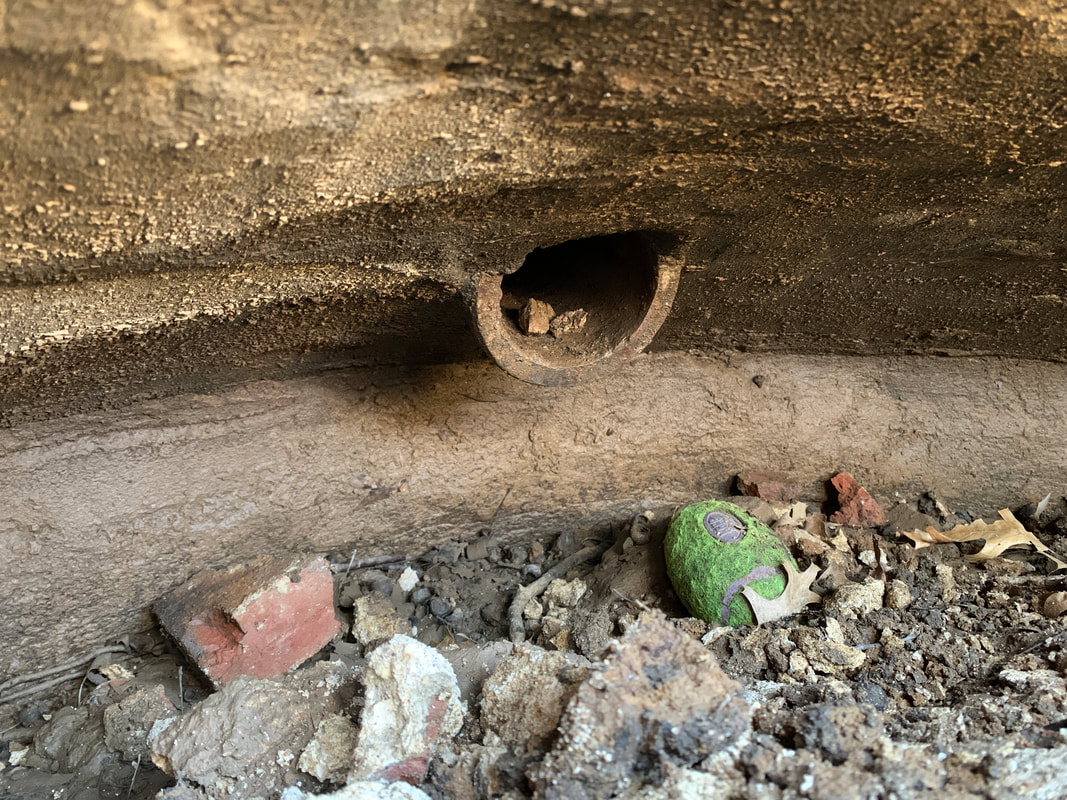 I swung that hammer until my arm started cramping up and my swing-and-miss rate got a little embarrassing. Once you start hitting your chisel-holdin'-hand more than the chisel, it's time to call 'er a day. I still have a couple courses of cistern cap brick to get rid of but I got a lot done this weekend. That said, I'm going back and forth on my plan to remove the dirt from inside the cistern.
I was expecting the cistern to be 3 ft., maybe 4 ft. deep, but it's not, it's every bit of 6 ft. deep. In its shallowest spot. By my math, that means there's about 10 cubic yards of dirt in the cistern. My stubbornness is making me want to give 'er a go and dig out the 10 yds. of dirt, although having a place to dump it is a whole other issue. By the end of each work day my ambition isn't so high and I feel like maybe whatever's at the bottom of the cistern - which may be nothing at all - should just stay there. Either way, I've still got some tough, tough labor ahead of me to just remove the cap brick, so I have some time to give it all a little more thought... I haven't done much rehab work lately. The weather has been cold and generally yucky, I've had to travel a bit for the new job, I've been sick a couple times - and I never get sick - and taking care of Roscoe as best I can is still a fairly time-consuming endeavor. And if I'm gonna mention Roscoe I gotta mention Freckles; she's become quite fond of Tower Grove Park (I think this will be "her" park, the same way Lafayette Park was always "Roscoe's"), and I spend quite a few hours taking her there every week, playing fetch when the crowds and park ranger aren't around, and doing my best to teach her to leave the squirrels alone, a battle I'm not sure I'll ever win. All that said, I've gotten a few things done lately and I'm gearin' up for a whole lot more. A couple weeks back I got some vegetable seeds started inside. I'm gonna take a crack at a small container garden this year, despite the yard and it's immense amount of full shade presenting some challenges. Also, I have no idea what I'm doing when it comes to this gardening nonsense. 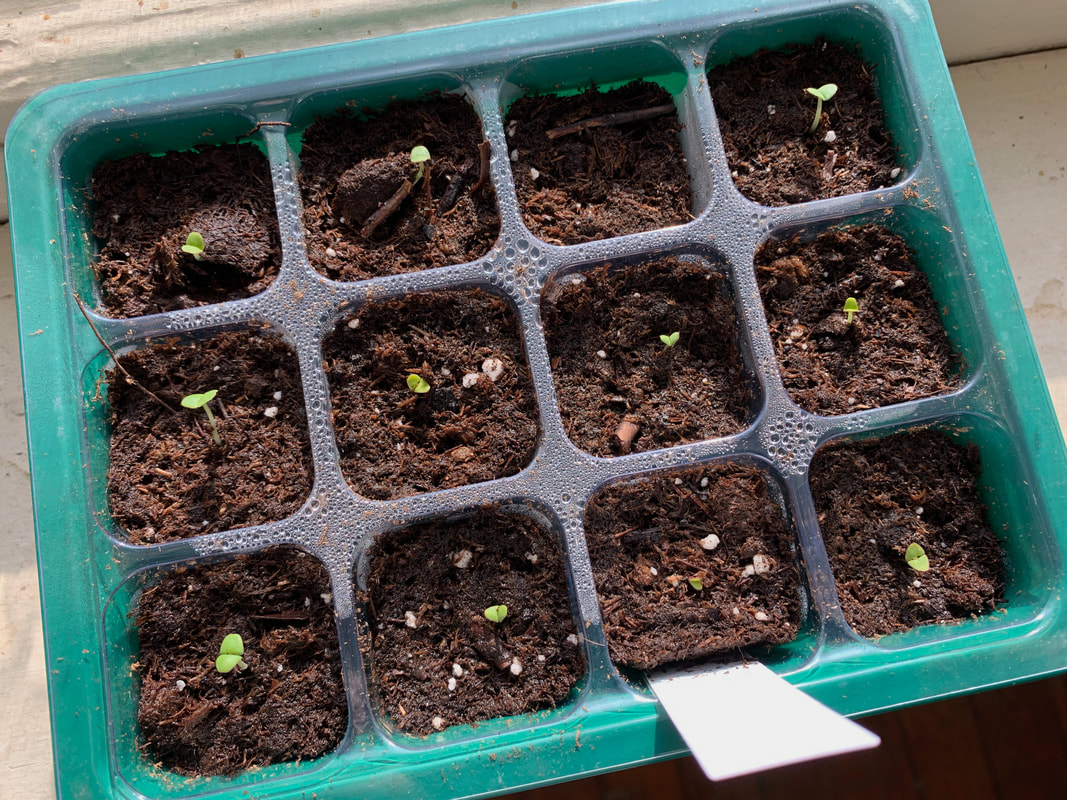 Basil Sprouts 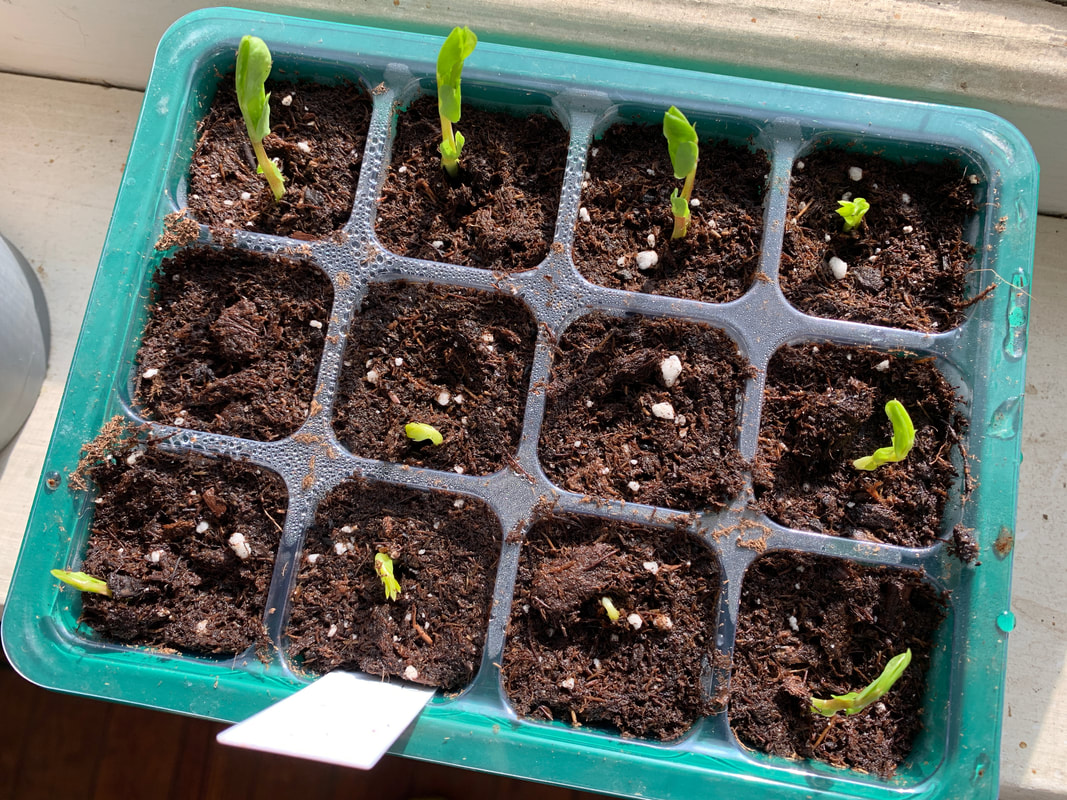 Pea Sprouts 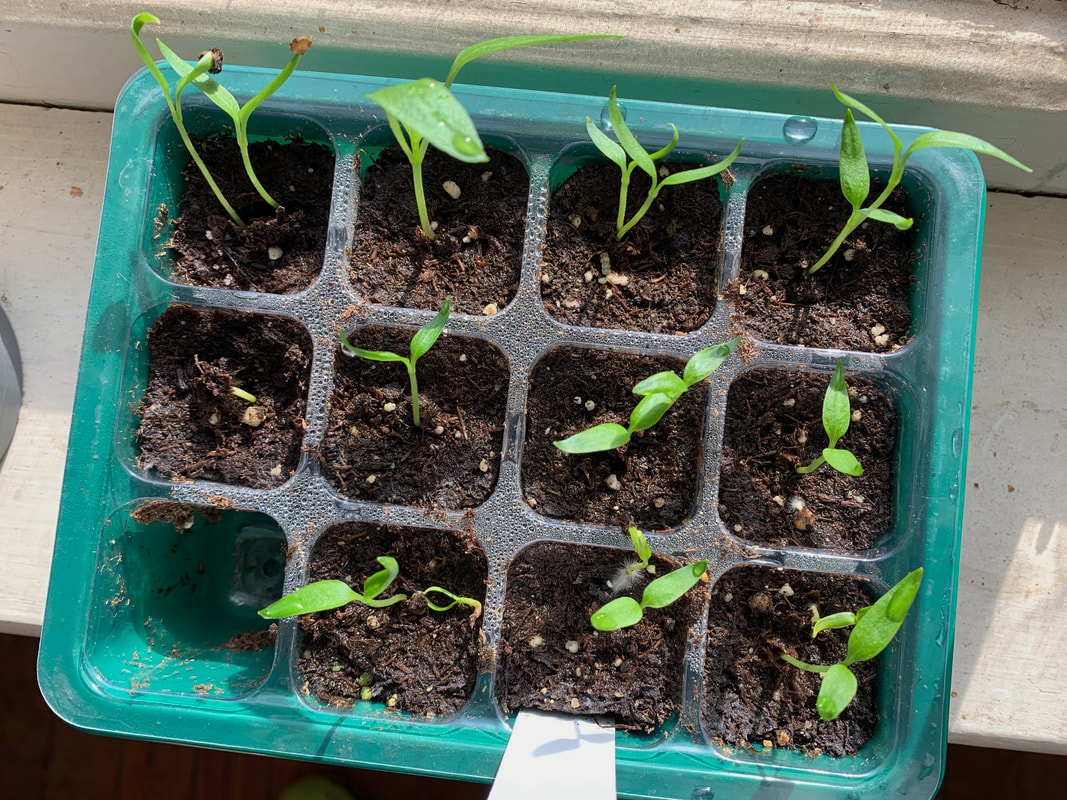 Bell Pepper Sprouts I still have a few more seeds to plant: broccoli, carrots, and cantaloupe. Before long, they'll all get moved outside, and I'll have to figure out how to keep the squirrels from devouring all of it. I got bored a couple weekends ago and decided to resume repointing basement limestone. When I first moved in I was pretty good about tackling it a little here, a little there, and then I moved on to other things and never came back to it. The mortar removal is zero fun, especially the spots where it's still fairly solid, but getting new mortar back in the wall is oddly satisfying. 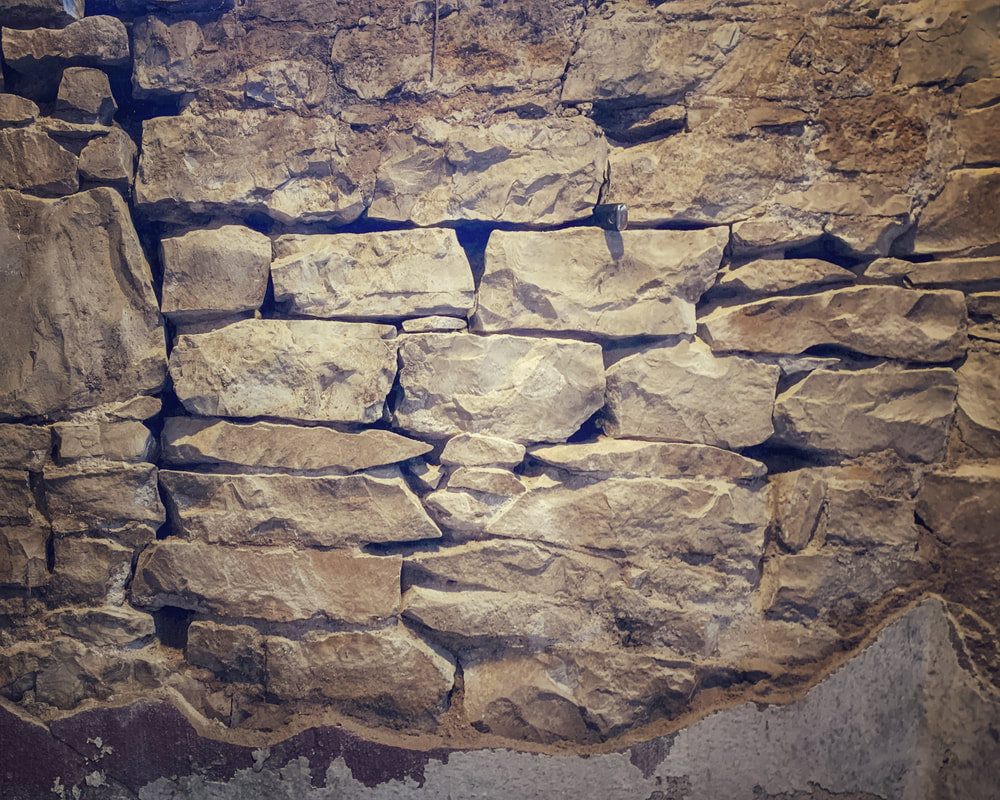 Limestone Mortar Removal 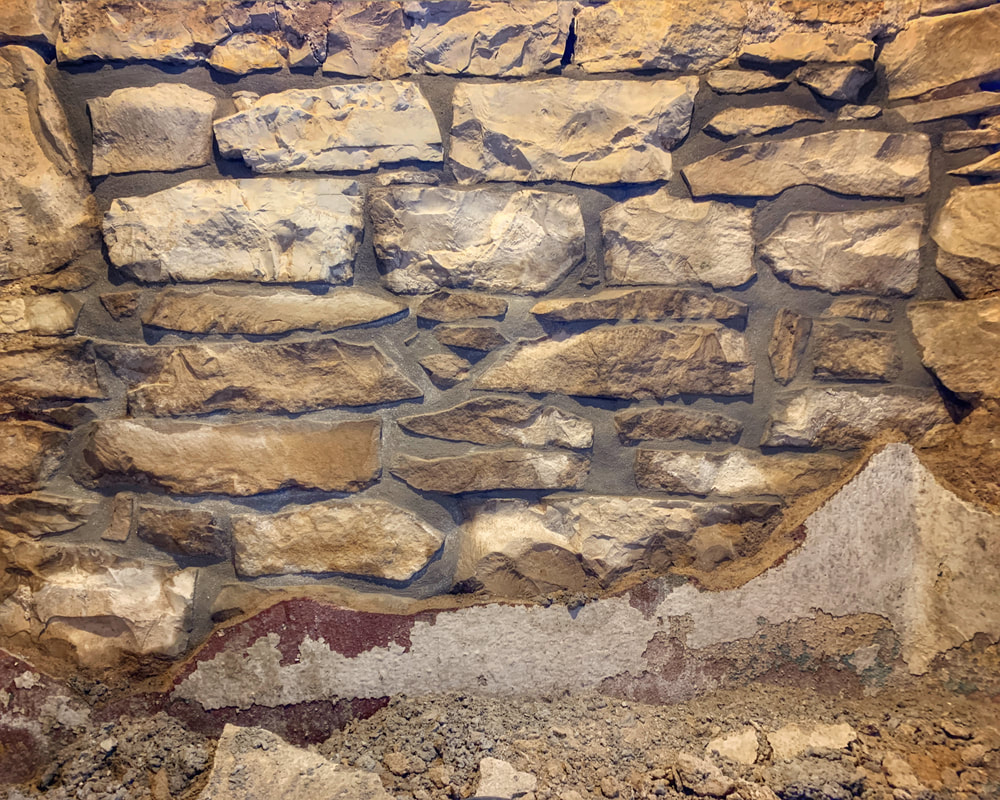 Repointed Limestone And a couple weekends before that, I got out the big ladder, climbed up the side of the house, and investigated what was hiding behind the sheet metal attic vents (not original). I had a suspicion that the original cast iron grilles were back there and sure enough, they are. They're not real practical in terms of allowing all manner of critters and rain into the house, but I'm thinking I can come up with a way to leave the cast iron grilles exposed AND prevent the infiltration of rodents and water...I just haven't come up with anything real great just yet.
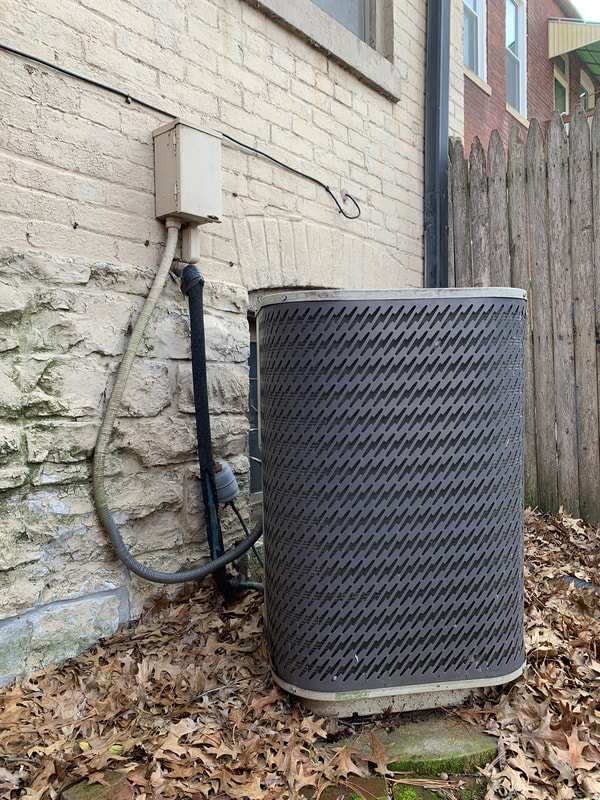
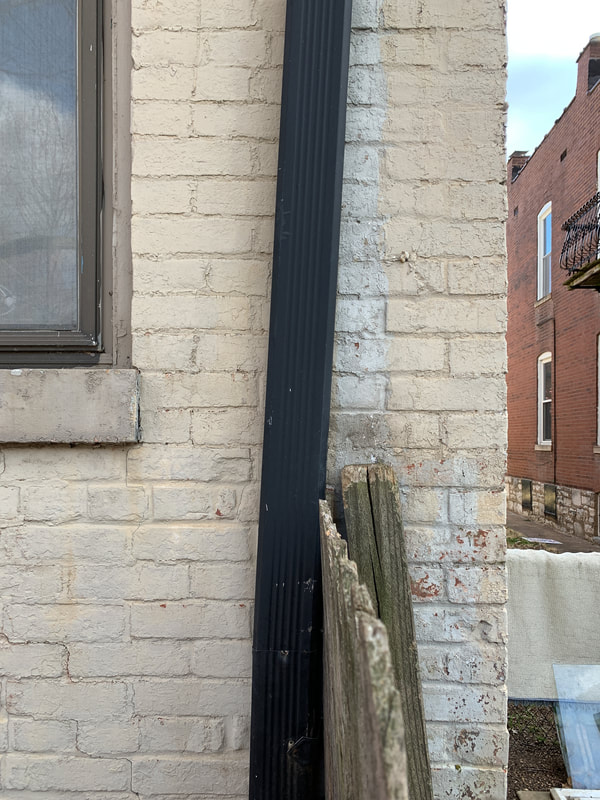
And then there's the big job, or massive collection of small jobs really, I'm hoping to start this weekend. Behind the house, between the house and the garage, is no-man's-land. It's been a dumping ground for stuff I don't have any other place for because it can't be seen by any of the neighbors and between the full shade and number of obstacles over there - downspout, a/c condenser, cistern, oak tree, etc. - it's not a real useful part of the yard. But it looks like hell and the wood fence is a stiff breeze away from falling into my neighbor's yard.  Over the next handful of weekends, I want to redo the whole space, starting with removing all the bricks that pave the entire area. 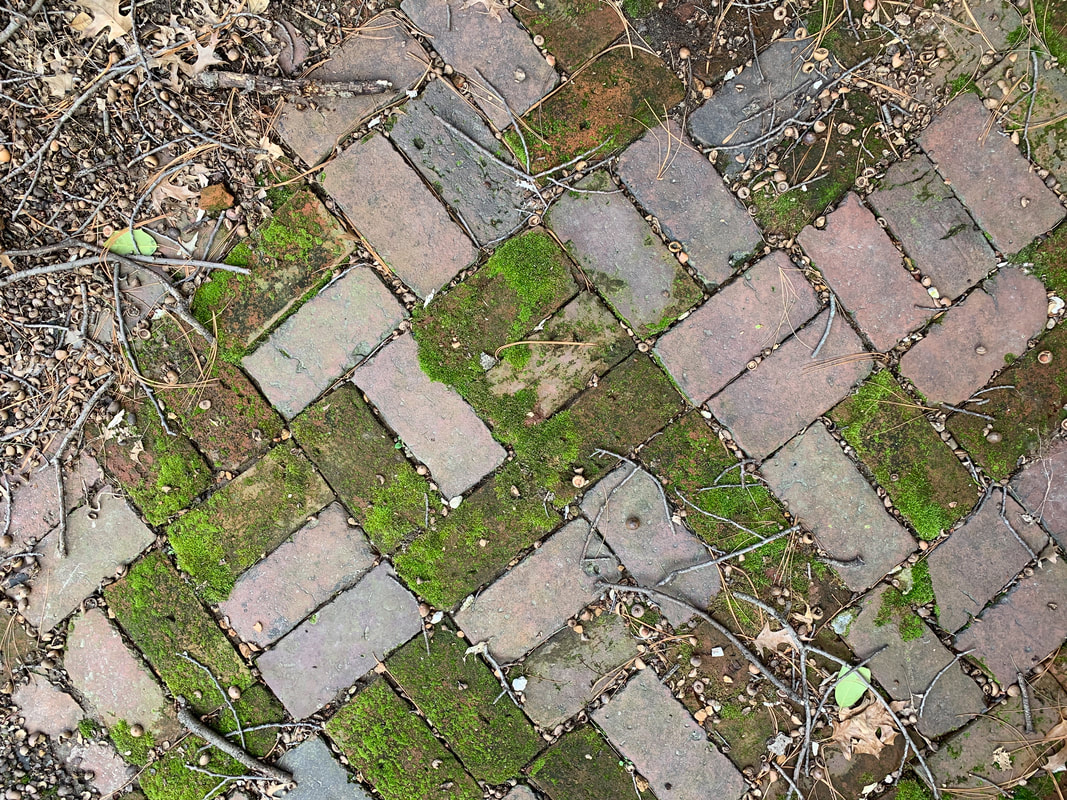 The challenge here is not having a good place to put all the bricks; I already have several large piles of brick and limestone chillin' in the yard. 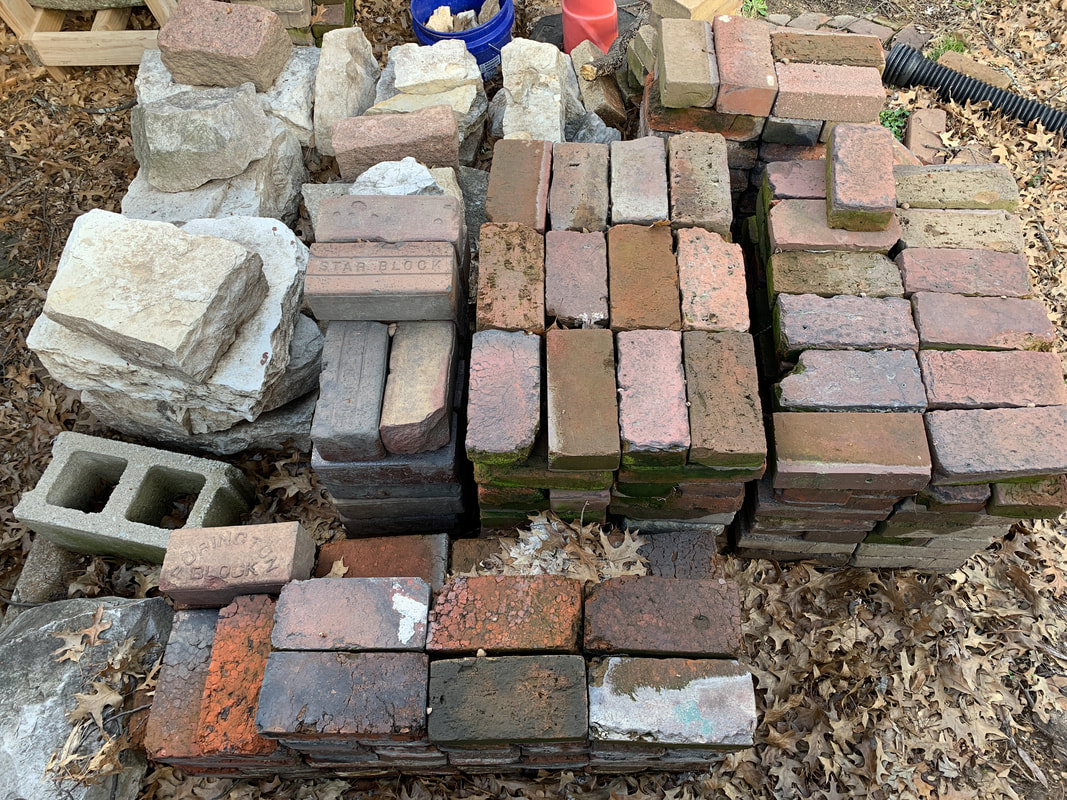 With the bricks gone, the next step is to excavate the cistern - which means more bricks - and ultimately filling in the hole where the cistern will get removed from. There is a 100% chance some of the oddball and broken bricks will get buried in the hole (the cistern is 8' in diameter and at least 2.5' deep -- it'll be a sizable hole).  Somewhere along the way I want to repoint the limestone foundation wall back there, but only the spots that need it...and there are plenty of 'em. I also want to rework the downspout a bit and get 'er snugged up to the house. It's the only downspout for the entire roof, so it carries a LOT of water at times and it's critical that it works the way it's supposed to.
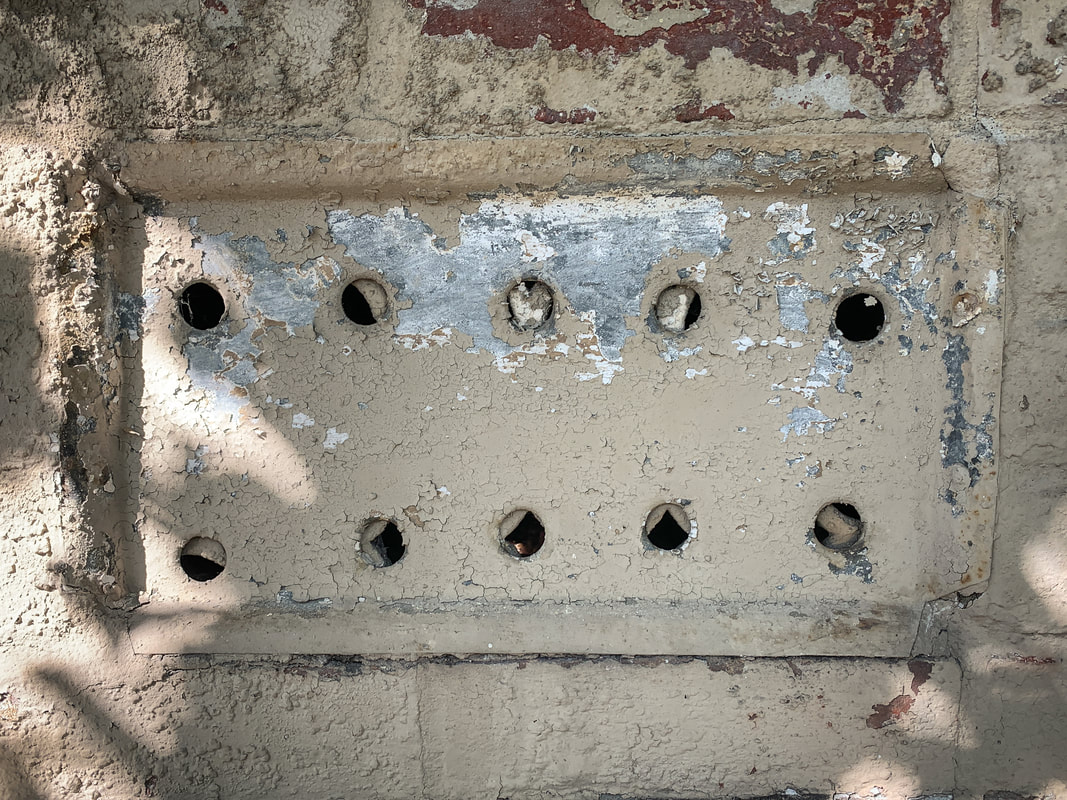
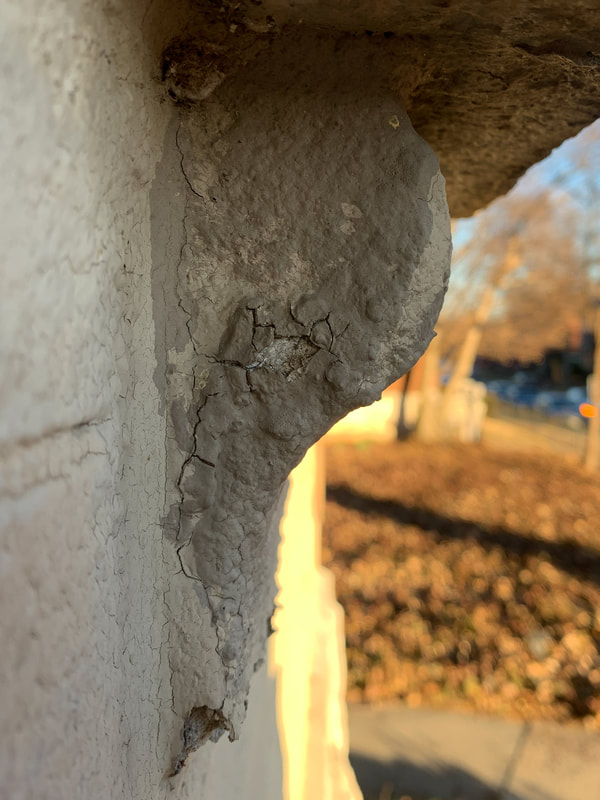
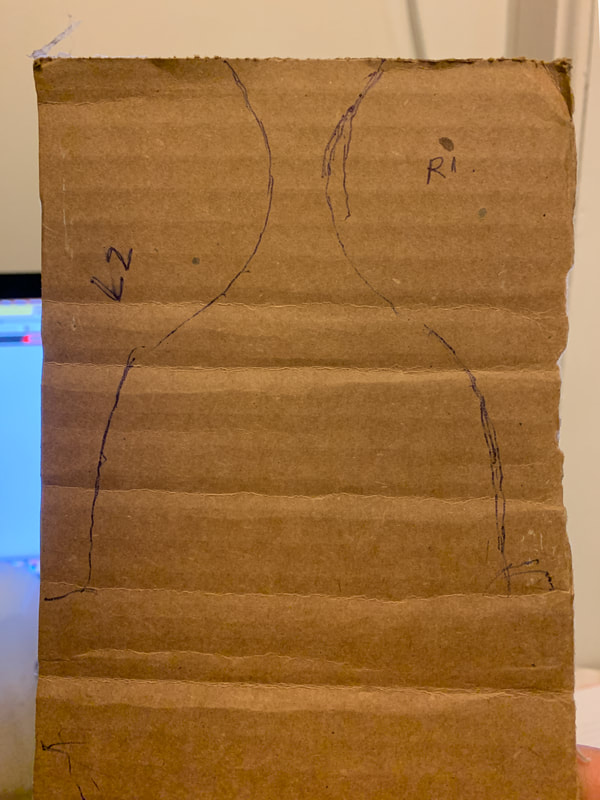
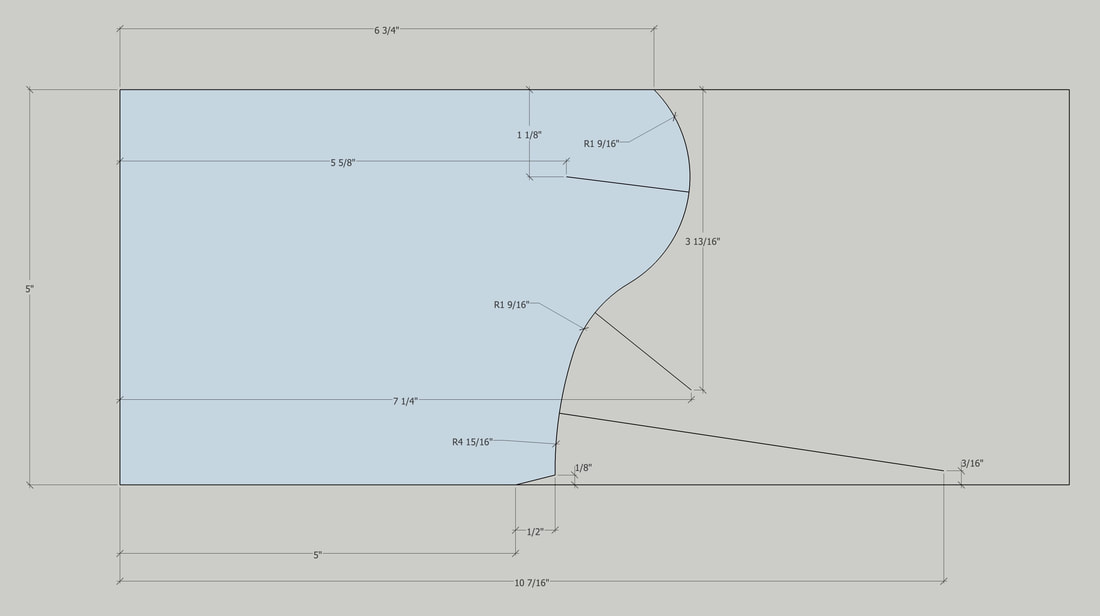
Once that's complete, I need to figure out a good way to get rainwater from the downspout over to the main part of the yard, which will be a giant challenge due to the silver maple that kinda blocks the path I'd like to take with some underground piping. Right now, the downspout more or less empties into a clean out for the sanitary sewer - a setup done by the previous owner - which you're not supposed to do. 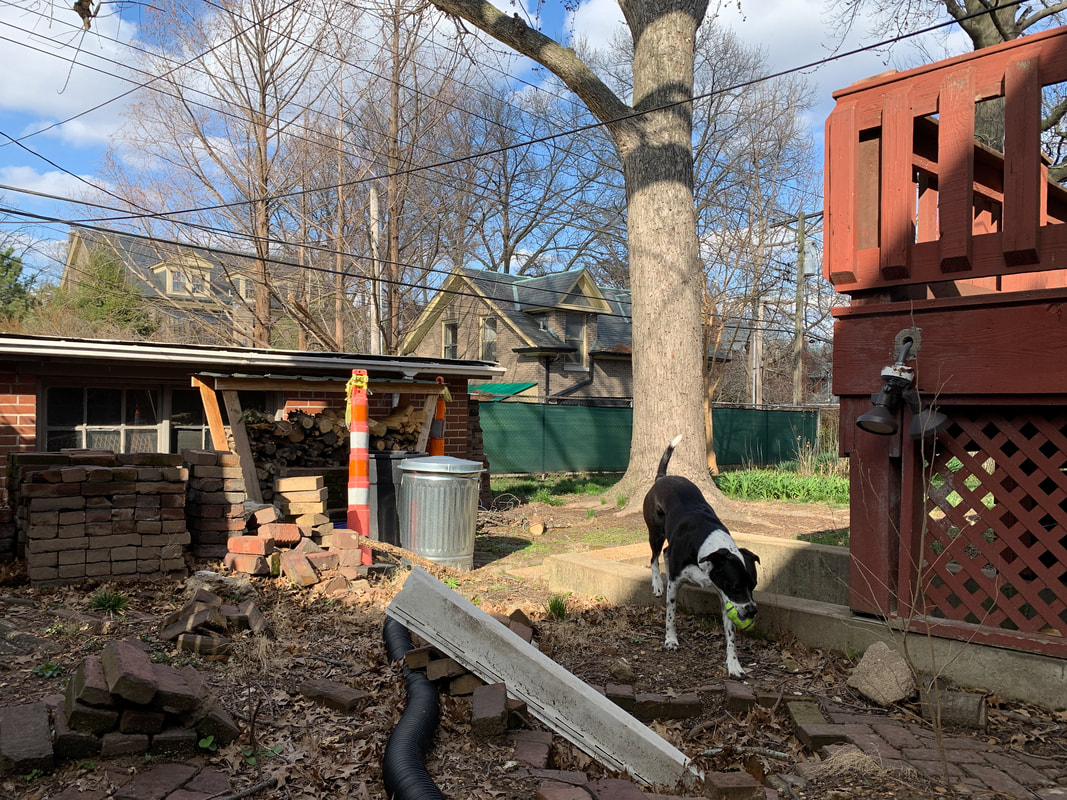  When I'm finally done making a mess back there, I'll put up a new fence, get the area graded the way it needs to be, and then figure out some sorta ground cover. I need that area to absorb some water so I don't want to paver the whole thing, but the shade back there means not much will ever grow real well so I can't plant much of anything either. And then there's the oak tree leaves and acorns to contend with; whatever I do to cover the ground, it's gonna be something that will allow for halfway easy cleanup. 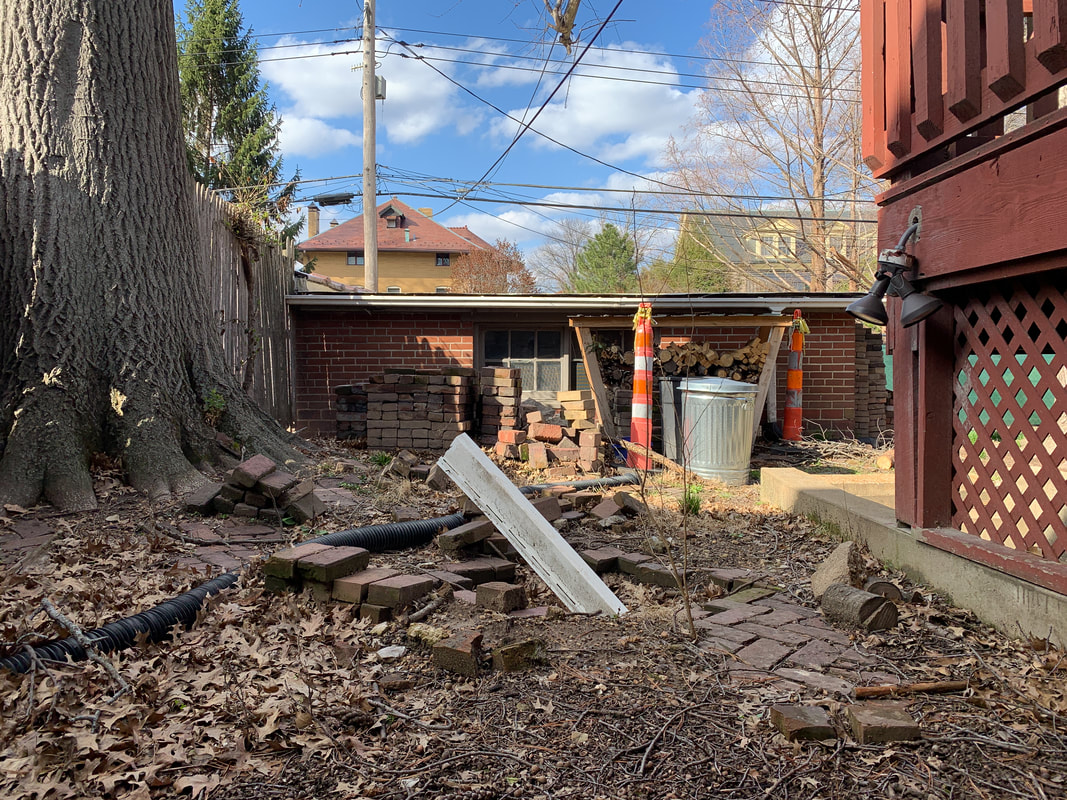 I've got 6 weekends set aside for all the work. I think I can pull it off, but between weather and dogs and work...ya never know. Well...there's some good, there's some bad, and there's some ugly, which is kinda what I expected. It looks like it'd be simple - just pour concrete in the form - but there are some very critical things that have to be just right for everything to work, and it's rare to be lucky enough to nail those things on a 1st try. 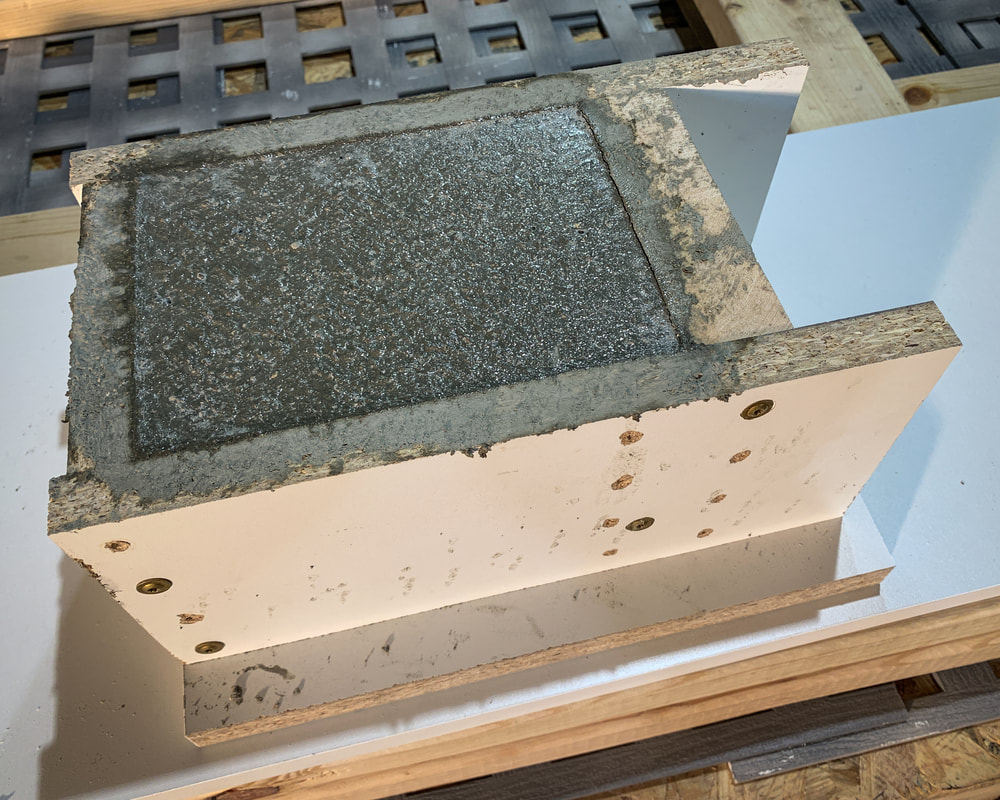 The good part was the form. It held up just fine and, with a few tweaks to how I go about actually constructing it, I can replicate that process whenever I cast the corbels for real. The bad part was not vibrating the concrete enough after it had been placed. See all those little holes? Those were air bubbles, which is what vibrating is supposed eliminate. Obviously, I didn't do a very good job - either in method or duration - vibrating the concrete. 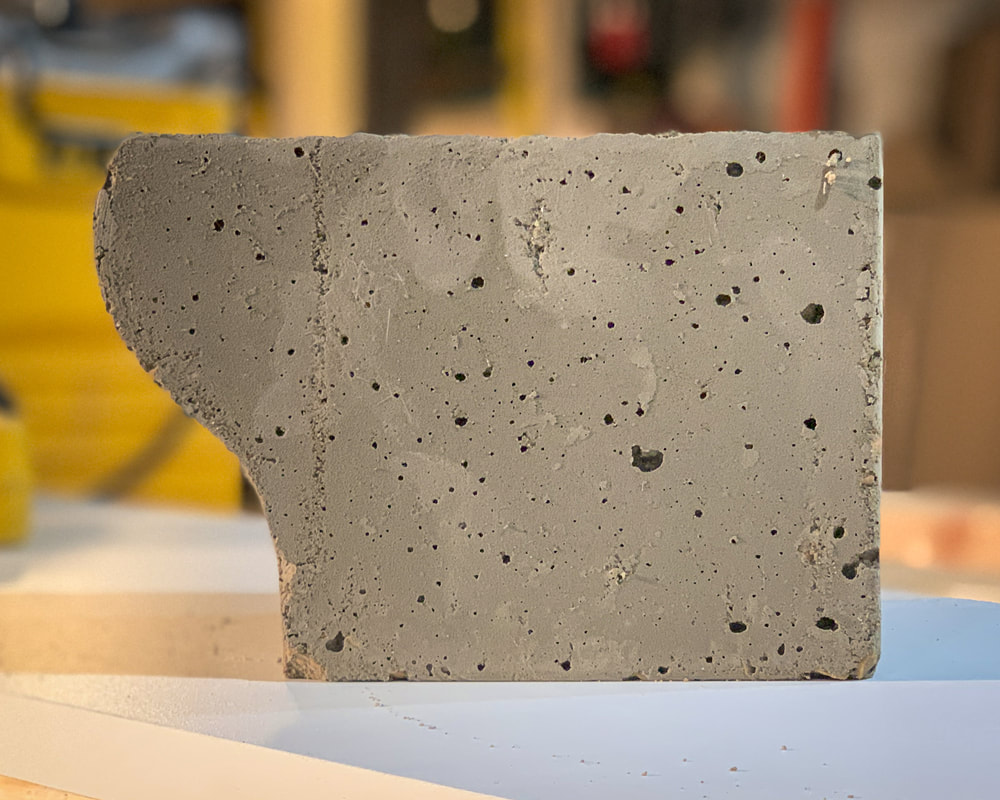 And then there's the ugly, which I sorta saw coming. The concrete mix I used was all wrong, too much relatively large aggregate and not enough fine aggregate. In other words, too much gravel, not enough sand. Next time around, I think I'll go with 2 parts sand, 1 part cement, a tiny amount of plasticizer, and then however much water I need to get a decent concrete flow. 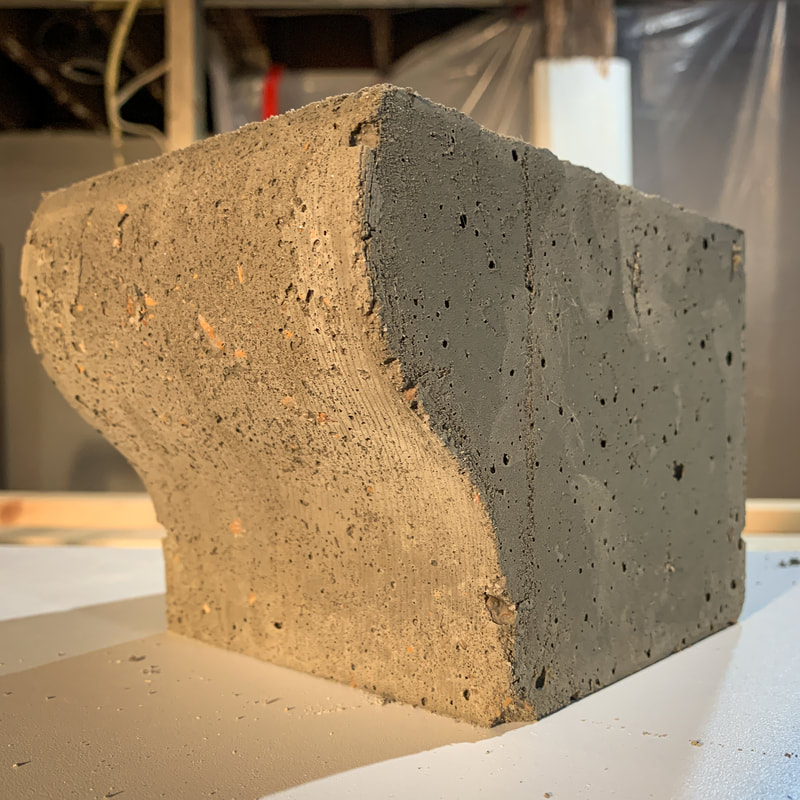 So...round 2 will be next weekend, hopefully with better results. Today I took a crack at casting a prototype window sill corbel. Why a prototype? Because I've never ever ever formed up a small mold and attempted to cast a small object, and I'm confident that it'll take me at least 3 attempts before I get a result I can live with. Backing up a hair, I'm going to address some of the more egregious issues on the house's front wall this year. The big ticket item will be the windows and while I'm confident in my ability to build the windows, replacing the precast sills and sill corbels will be a brand new experience. 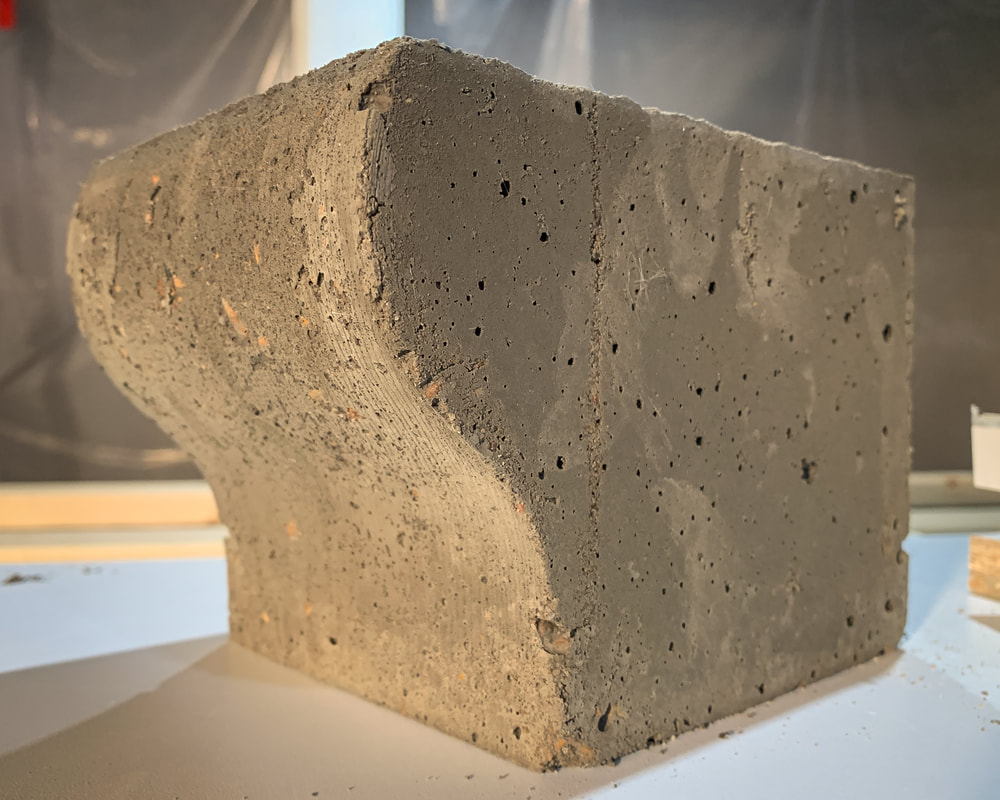 That said, I've poured concrete, I've formed concrete, I've built plenty of things, and in theory, I know how the concrete casting process is supposed to work. But knowing how to do it and having actually done it are two very different things. I started out by trying to figure out the dimensions of the curvy front of the existing corbels. They're so caked with paint and mortar that actually measuring anything was out of the question so I traced around all 4, took a pic of the tracing, dropped the photo into SketchUp, scaled it appropriately, drew the shape on top of the tracing, and reverse engineered the dimensions from that.
 Building the form, aside from the curved portion was pretty simple, but the curvy portion took some work. Making a long story short, I grabbed a scrap 2x4, cut it into 4 short, manageable pieces, jointed them, planed them, roughed out the curved shape on all 4 on the bandsaw, glued the 4 blocks togethers, let the glue dry, spindle sanded the 4-block assembly to its final shape, and then cut the assembly to the appropriate height. The rest of the form was just melamine-skinned particle board, quick and dirty. When the entire form was assembled, it looked like this: 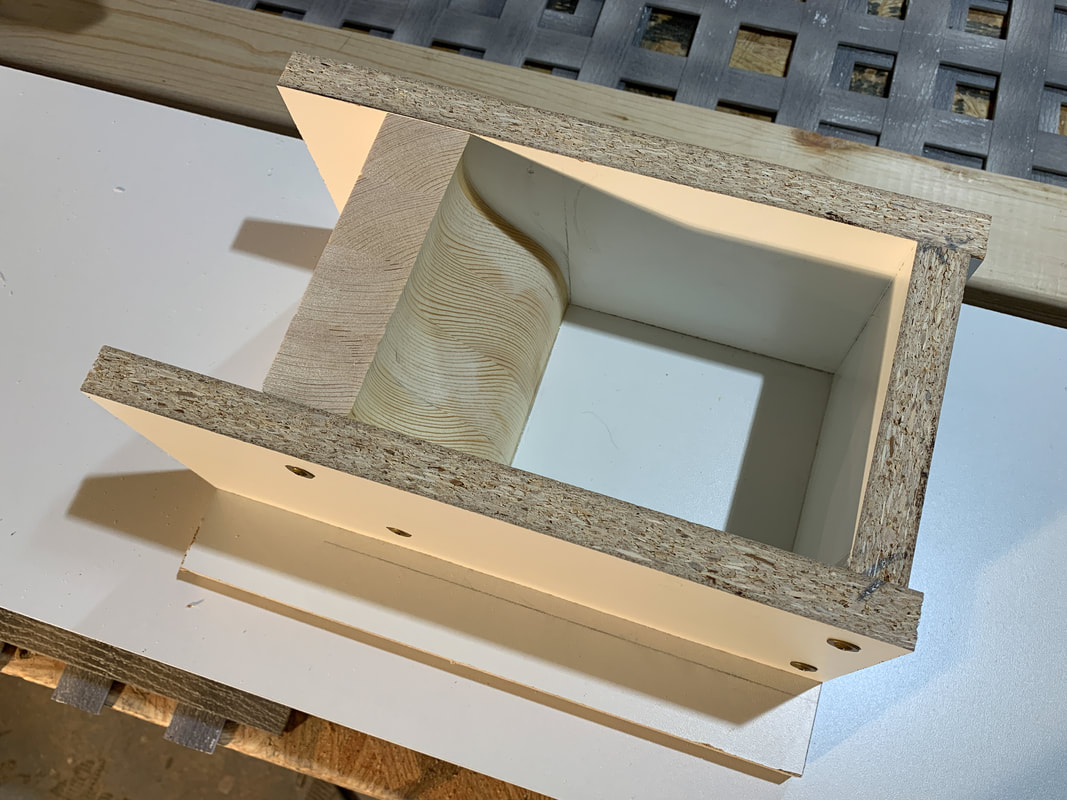 Then I mixed up some concrete, using whatever seemed like the most appropriate concrete variety available at the big box stores. Normally I'd go to the local concrete supply place a couple miles down the road and get something based on advice from people who know what's what, but they're only open M-F and I didn't get around to buying materials until today (Saturday), after what's becoming a weekly Saturday morning excursion, taking Freckles to Tower Grove Park.  Anyhow...I mixed up concrete. I don't think I picked a great product for this application, it seems like I need something with smaller aggregate to get a good finish. I'll find out tomorrow when I strip the forms. 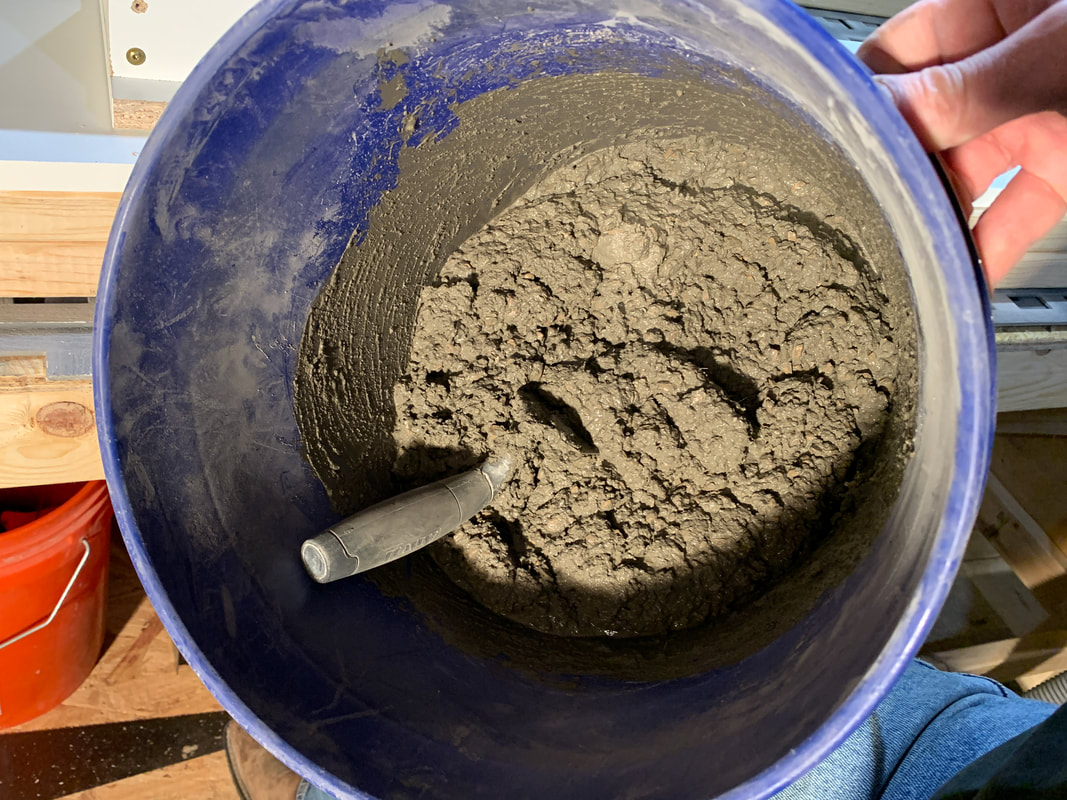 The rest of the job was straightforward: put concrete in the form, vibrate everything to remove voids and (hopefully) liquify the concrete a bit such that the sides will all be nice and smooth (vs. real aggregatey), screed it, then let it sit overnight. 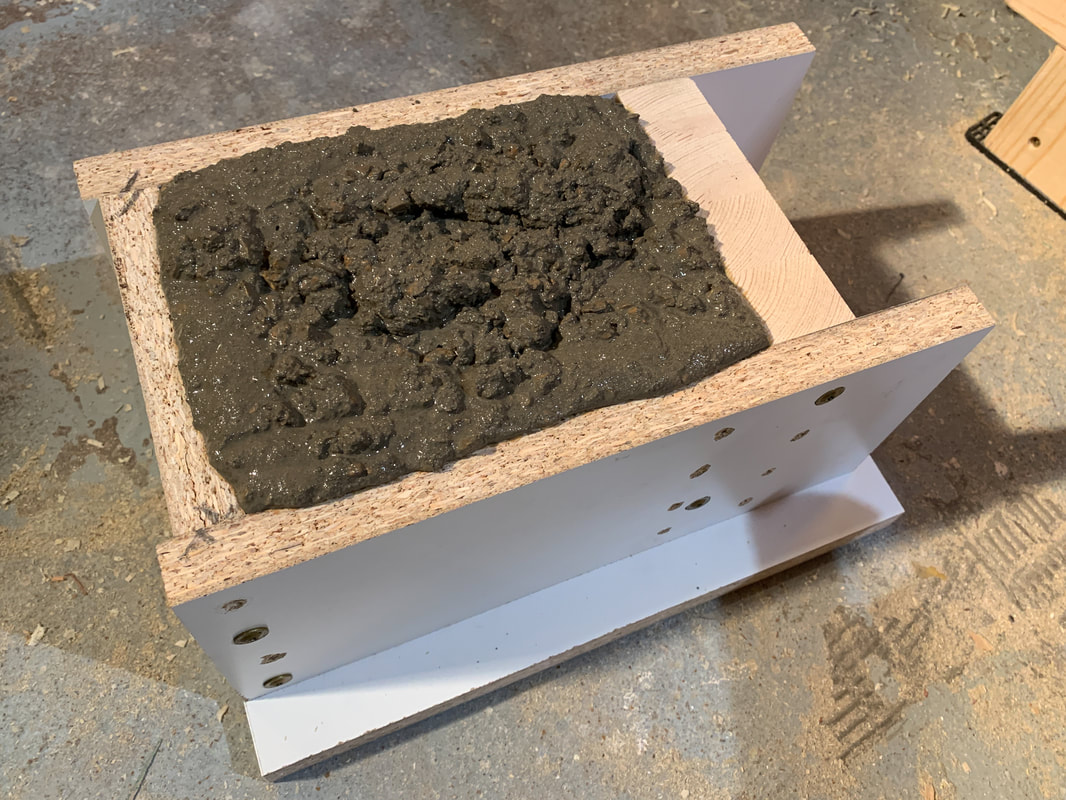 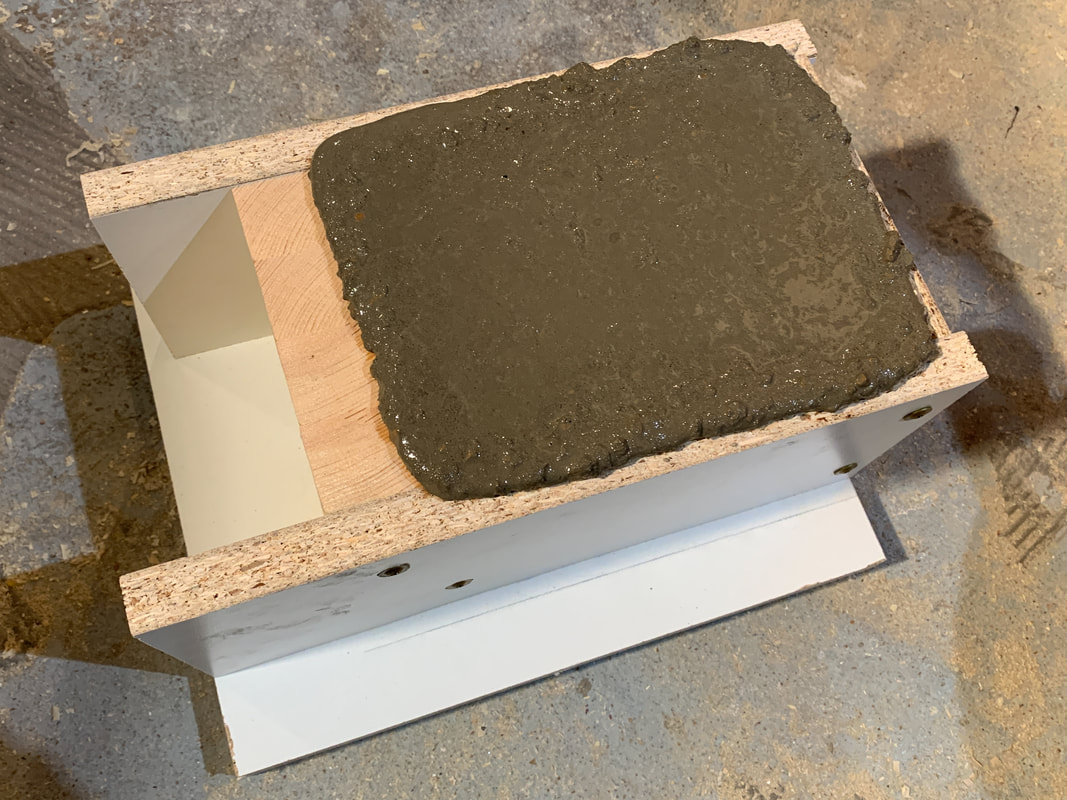 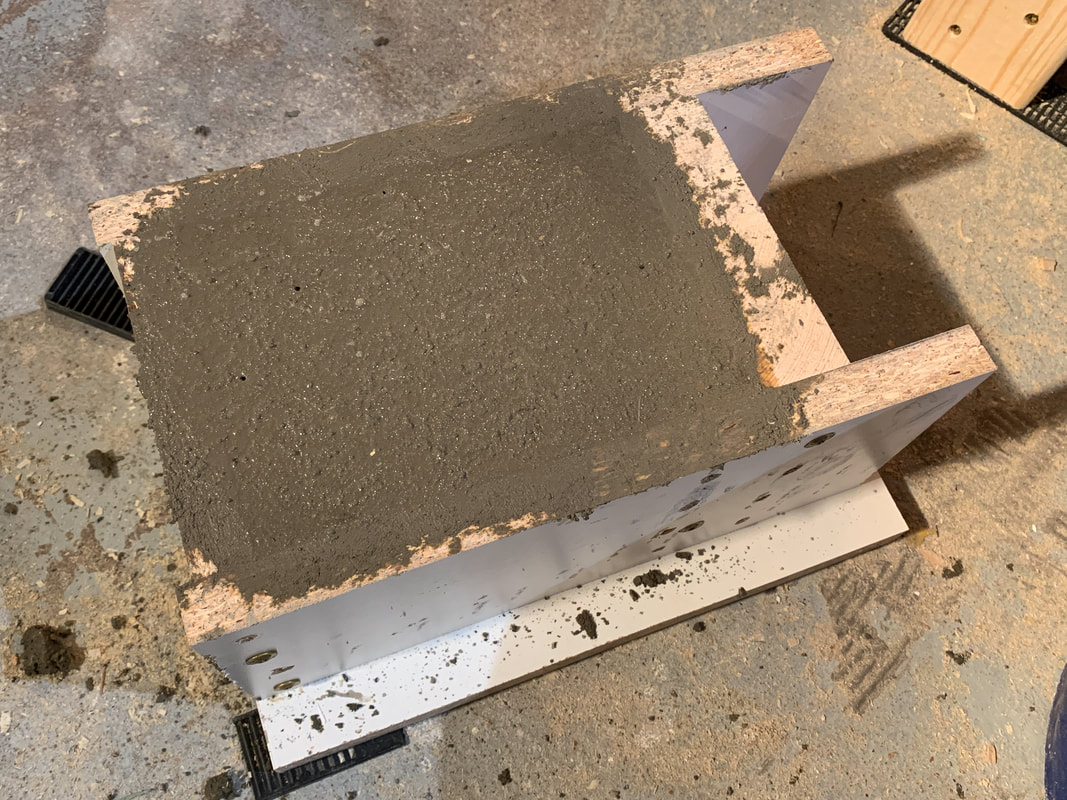 I wasn't real concerned with tooling the top; 1, this is just a prototype and 2, no part of the top will never be visible. Today's exercise was primarily to run through the process of building the form and figuring out if my concrete mix will work. I made a couple mistakes in the construction, and sorta painted myself into some corners when building the curved portion - very small pieces of wood take a lot of tools, like the table saw, planer, and jointer, out of the equation - but it was a good learning experience. 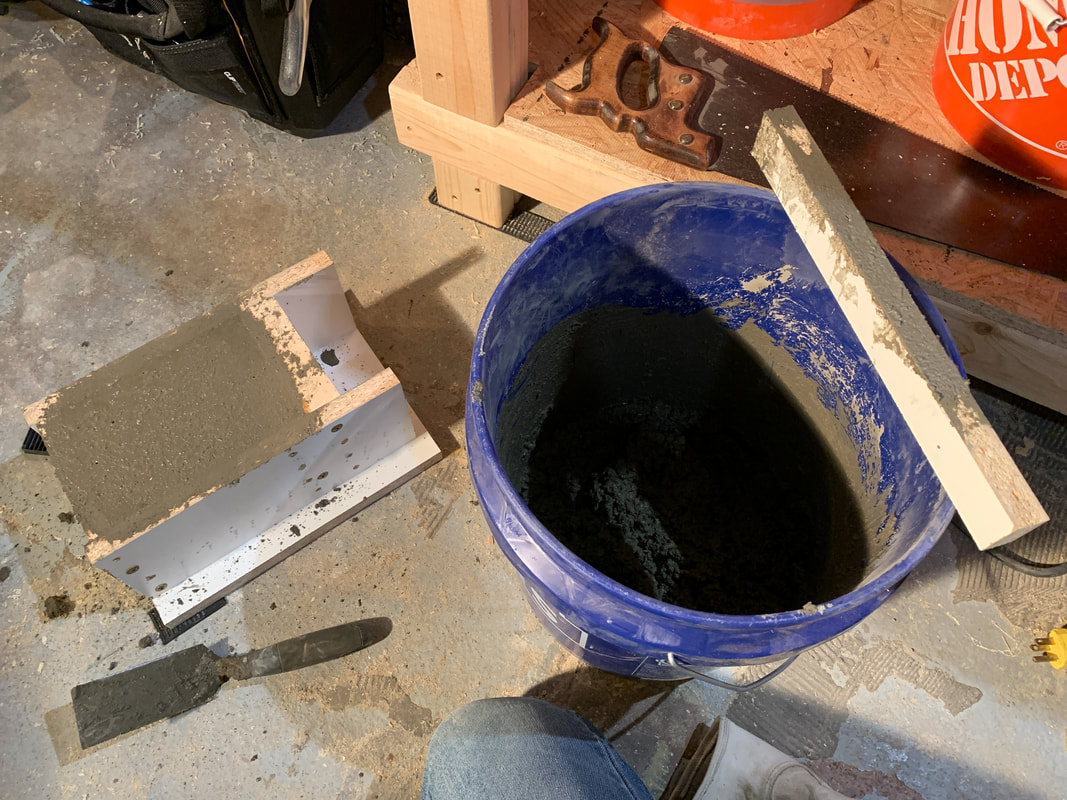 Tomorrow I'll strip the forms and see how she turned out. With any luck I'll only have a couple things to correct, but there's also a chance it'll turn out halfway decent. Either way, once I get the corbel casting figured out dealing with the sills ought to be pretty easy. Let's take a break from the neighborhood analysis for a minute to cover a quick - but fun - little project I tackled over the weekend. Technically, I didn't tackle the project I set out to tackle initially, but I still tackled a project and got some valuable info. 30,000 foot view, earlier this year I decided to make 2023 the year I (finally) address a good chunk of the front of the house. That means repointing all the limestone, repointing the brick where it's needed, and rebuilding the windows. And I mean REE-BILL-DING the windows:
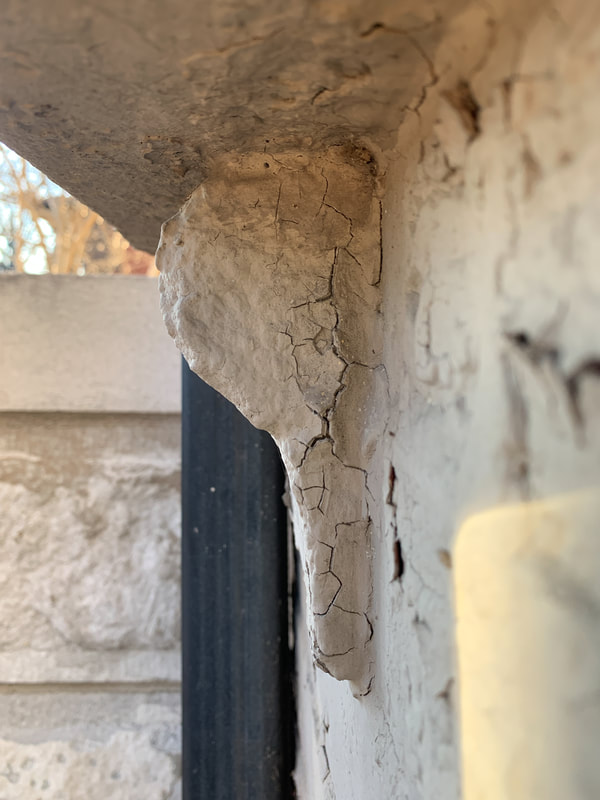
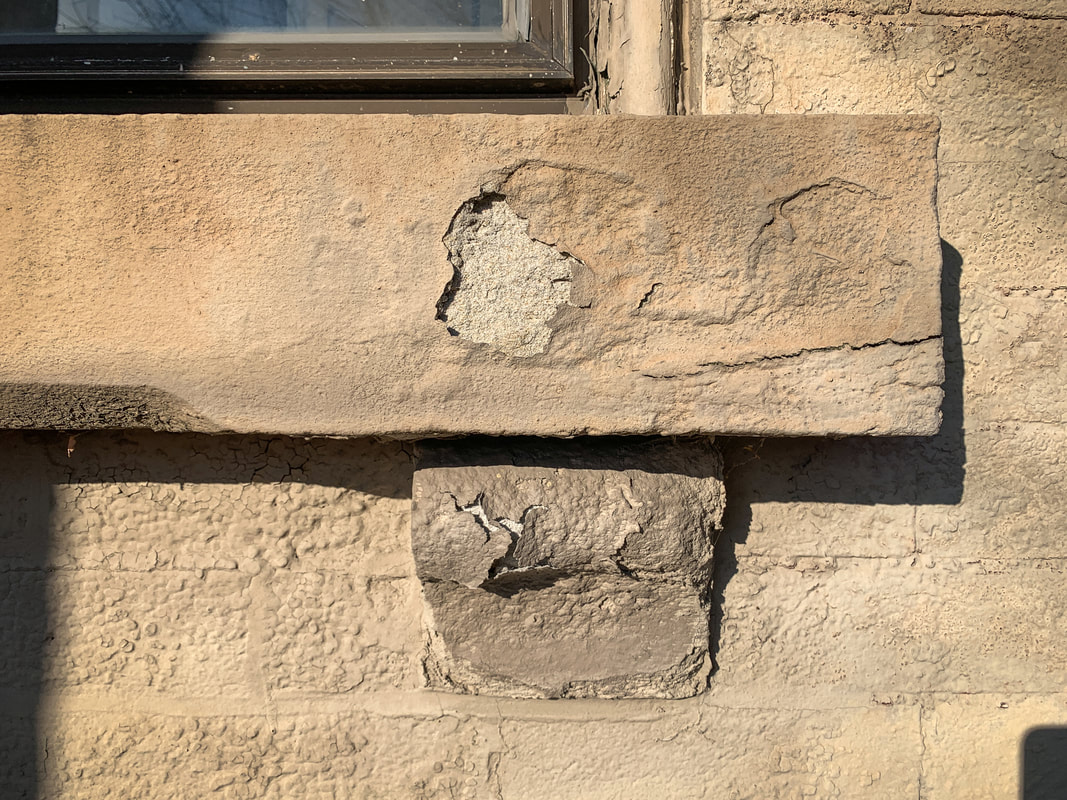 This pic obviously doesn't show EVERYTHING that's goin' on, but it's the gist of it. It's all bad. One of the first things I need to do is make the sills and sill corbels. Since I've never done anything like that before, I'm guessing it'll take a few tries to get it right. My game plan for last weekend was to try casting a sill corbel. Getting the exterior dimensions was easy enough but I needed to know how far into the wall those things went, and the only way to figure that out was to remove the original millwork under the window on the inside of the house. I was going to replace the millwork anyhow, given its condition. 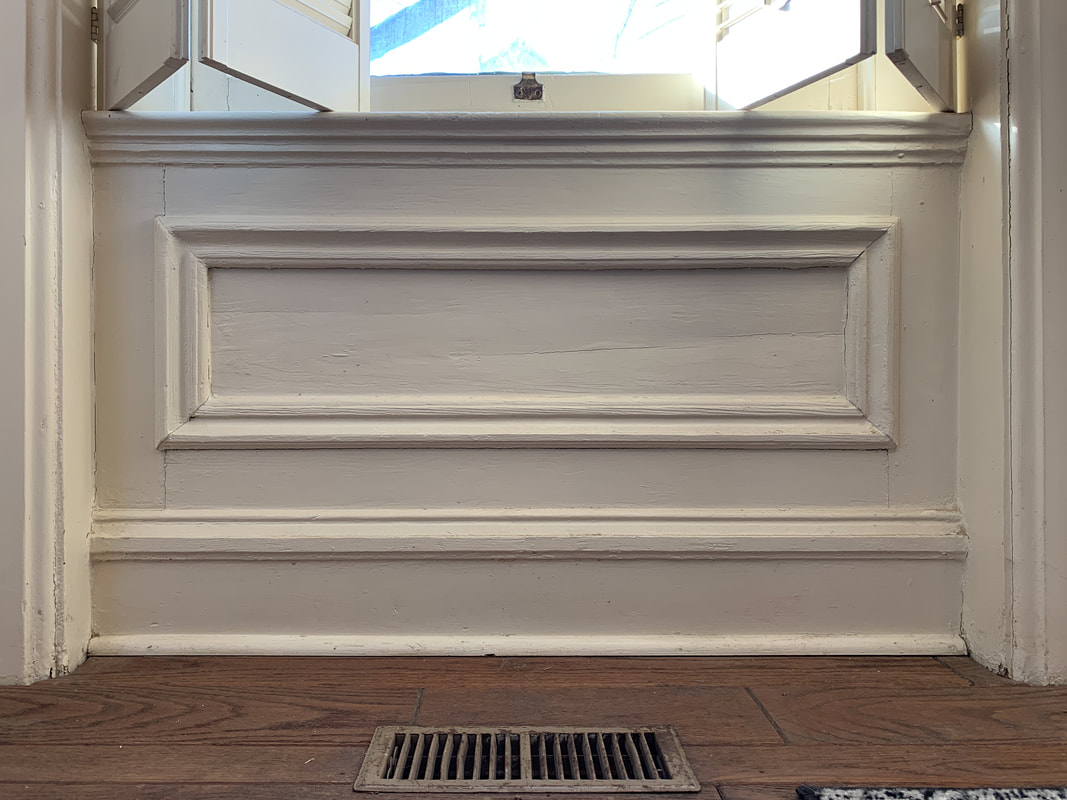 While the panel removal yielded the dimensional info I sought, it also revealed some brick in pretty rough shape. 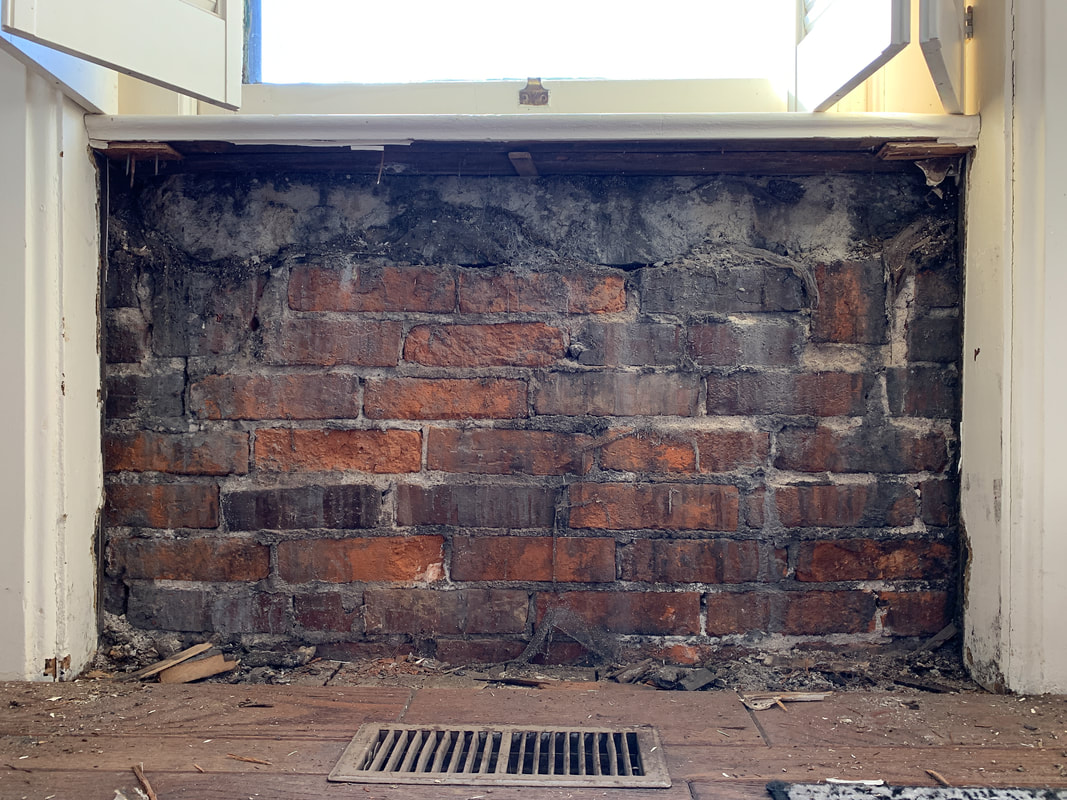
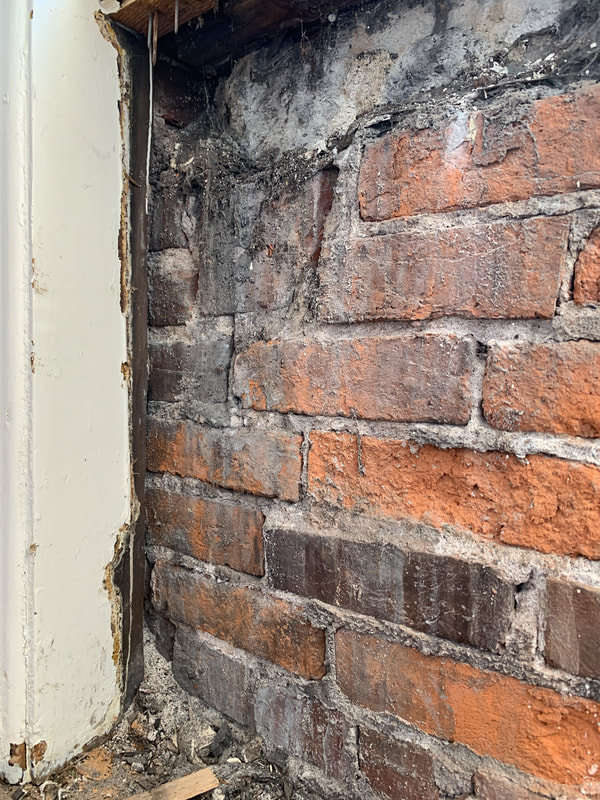
I figured I might as well repoint the brick while I was there, but about 2 seconds into removing mortar I realized I could pull the entire inner wythe apart with my hands. So I did. 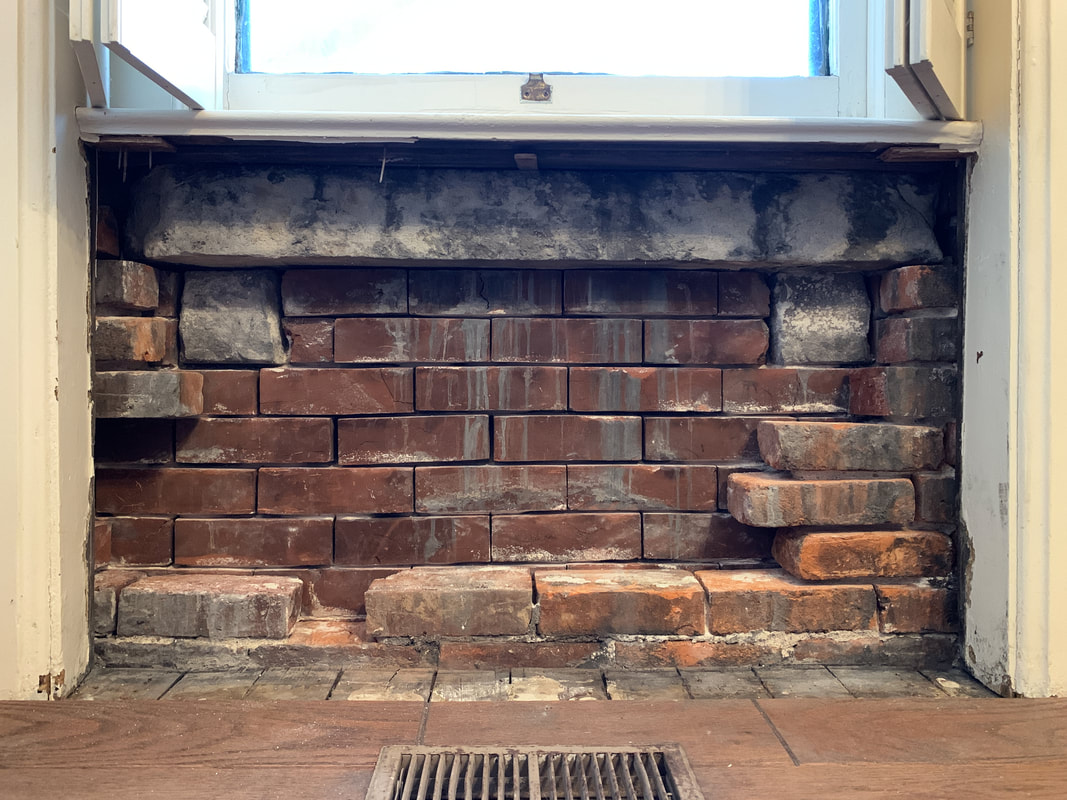 See those 2 square, gray-colored things? Those are the backs of the sill corbels. That's what I was hoping to find. The rotten mortar holding the wall together, not so much. With the inner wythe out of the way, I could see daylight through the wall in multiple spots. I haven't repointed any brick in about a year and a half so it took me a minute to get the feel for the tools, but before too long I was slingin' mortar and stackin' brick. 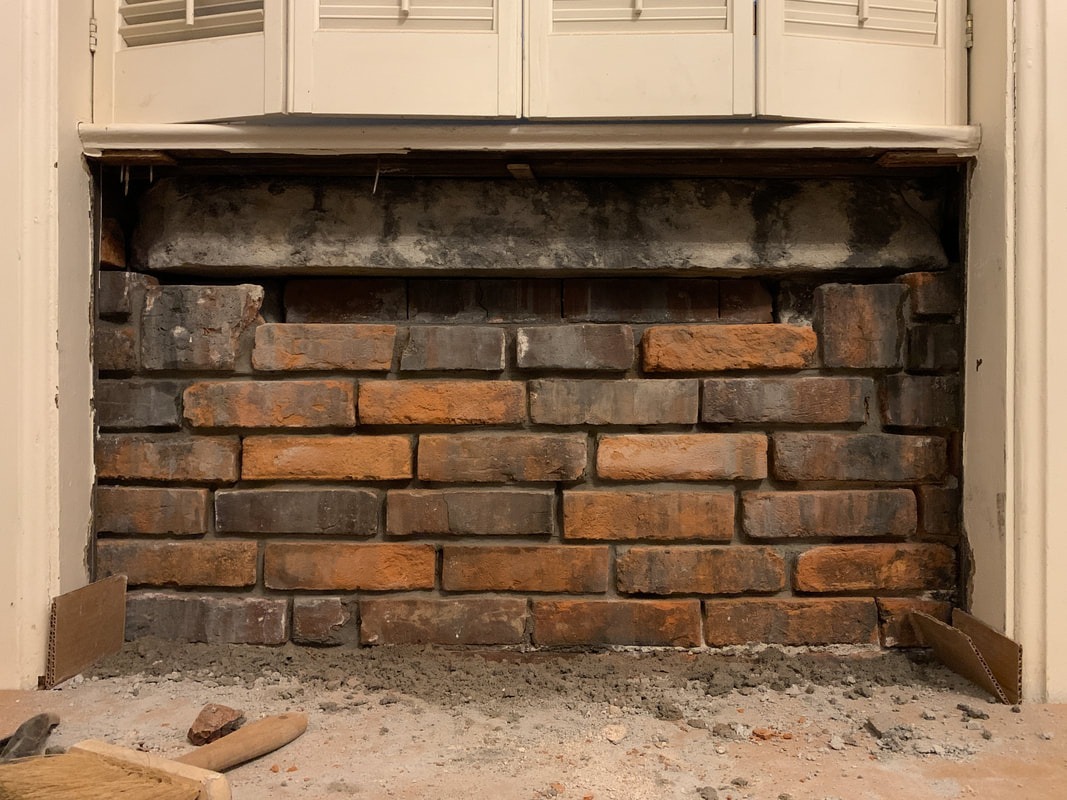 I dunno why, but it always makes me happy to go from holes in the wall to no holes in the wall.
The whole job took about 10 hours of work, start to finish. I didn't mortar up under the window sill because it's coming out later this year and there's no sense in making that job more difficult than it needs to be. 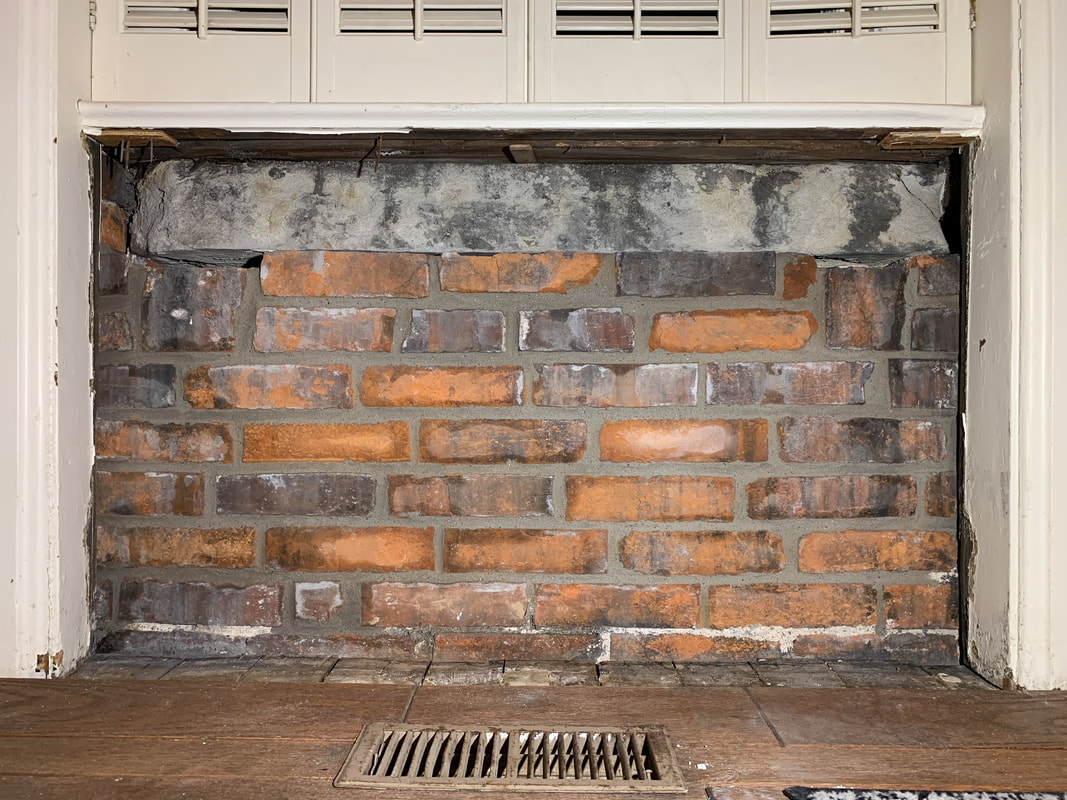 Maybe NEXT weekend I'll get around to casting those corbels... |